Patient Data Management 10-25
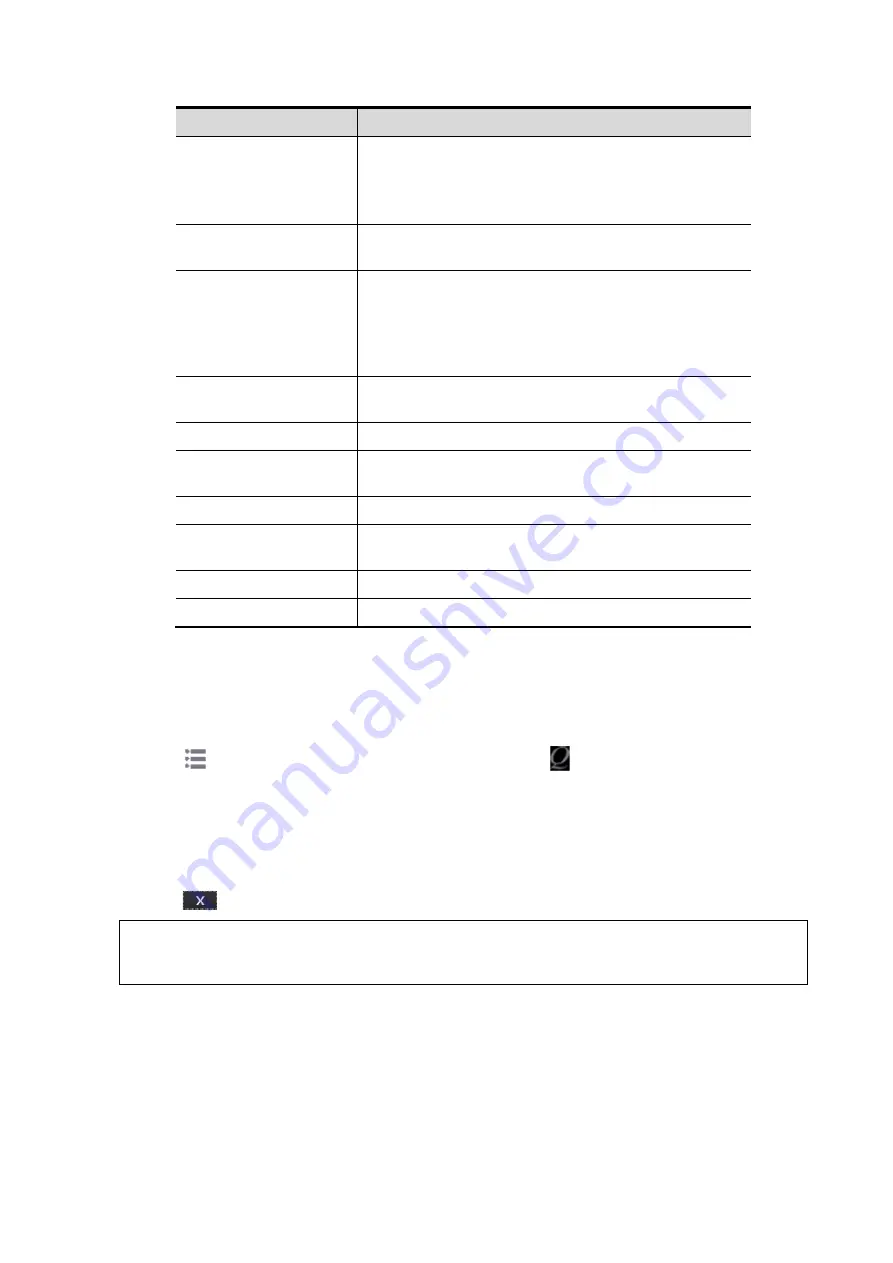
Parameter
description
Advanced
Sets the sub URLs of "QView full" and "QView lite".
The sub URL is set by default. Users can modify the
sub URL and tap [Apply] to exit the "QView sub URL
setting" window.
Worksheet Only
Sets whether to directly enter the Worksheet interface
after opening the Q-Path server.
Password On
Worksheet
Sets whether to display the Signature field box in a
worksheet.
Tap [Report] → [WorkSheet] or tap [Review] →
[Report] → [WorkSheet], enter the worksheet
password in the field box, and tap [OK].
Password On End
Exam
Sets whether to input the worksheet password after
ending an exam.
Password Visible
Sets whether the password is visible.
Import
Imports a user-defined worksheet template from the
USB storage (downloaded from the Q-Path server).
Backup
Backs up worksheets to the USB storage.
Restore
Restores the backup worksheet template from the
USB storage to the ultrasound system.
Delete
Deletes a worksheet template.
Restore Factory
Restores the worksheet template to the default state.
The operating procedures are as follows:
1. Set the DICOM storage server. For details, please refer to "11.1.3.1 Storage Service Preset ".
2. Send stored images or worksheet reports from iStation/Review/thumbnail area to the Q-Path
server. For details, please refer to the "11.3.1 DICOM Storage".
3. Tap
in the top-right corner of the screen and select
.
4. Log in to the Q-Path server through the Q-View browser to check the stored images and
worksheet reports.
Tips:
If network connection is not normal, the system will prompt “Loading Q-path application,
please wait....”.
5. Tap
to exit the function.
NOTE:
If you use Q-Path function to connect to websites other than Q-Path applications
(website setting is described above), the system will prompt the following information:
Only Q-Path application is allowed to be loaded!
Содержание TE5
Страница 1: ...TE7 TE5 Diagnostic Ultrasound System Operator s Manual Basic Volume ...
Страница 2: ......
Страница 6: ......
Страница 12: ......
Страница 24: ......
Страница 36: ......
Страница 54: ......
Страница 56: ...4 2 Exam Preparation 4 1 1 New Patient Information The Patient Info screen is shown as follows 2 1 3 ...
Страница 110: ......
Страница 115: ...Display Cine Review 6 5 6 Tap Return on the screen or tap Freeze to exit image compare ...
Страница 120: ......
Страница 124: ......
Страница 156: ......
Страница 174: ......
Страница 192: ...12 18 Setup Select Advanced and do as follows Select MAPS and do as follows ...
Страница 202: ...13 2 Probes and Biopsy C5 2s L12 4s L7 3s P4 2s L14 6s C11 3s L14 6Ns V11 3Ws P7 3Ts 7LT4s ...
Страница 203: ...Probes and Biopsy 13 3 7L4s P10 4s L20 5s P7 3s L14 5sp SC6 1s SP5 1s 6CV1s L9 3s C5 1s L11 3VNs C4 1s ...
Страница 222: ...13 22 Probes and Biopsy No Name Description 8 Grooves of the needle guided bracket Matched with the tabs of the probe ...
Страница 226: ...13 26 Probes and Biopsy NGB 034 NGB 035 ...
Страница 250: ......
Страница 272: ......
Страница 276: ...A 4 Wireless LAN Tap Add Manually create a network profile to set ...
Страница 282: ......
Страница 318: ......
Страница 322: ......
Страница 323: ...P N 046 006959 07 1 0 ...


