Image Optimization 5-45
Adjust VOI
VOI On
The VR image displays VOI information.
1. In image viewing status, select [VOI] to turn it to “On.”
2. Select the desired window by tapping [A], [B] or [C] or [VR].
3. Change the VOI position, size and curved VOI if necessary.
VOI Off
The VR image displays ROI information.
When [VOI] is set as “Off”, the ROI image is displayed on the screen. Swipe the image in different
directions to observe the MPR.
Accept VOI
1. This function is usually used for MPR observation and to determine the relative position of the
MPR to the VR.
2. Select [Accept VOI] to be [On].
3. Select the desired MPR by tapping [A], [B] or [C] or [VR].
4. Swipe on the current active MPR to view the image. The other two MPRs change
correspondingly.
Image Rendering Parameters
In image viewing status, render the image by adjusting the relevant parameters.
Render setting parameters description:
Tap
to select VR or MPR parameter adjustments.
When [VR] is highlighted, parameter adjustment is performed on the VR image.
When [MPR] is highlighted, parameter adjustment is performed on the MPR.
Adjustable parameters are as follows:
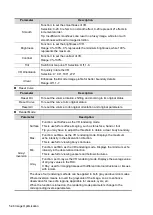
Parameter
Description
Threshold
Function: to set the threshold for VR rendering. The VR is rendered using
the signal between the high and low thresholds.
When signals are received, from small to large, they are divided into
different levels assigned within the range of 0-100%. The threshold is a
selected range where the system filters out signals below it and above it to
render the VR image.
The lower threshold can eliminate lower range noises and echo, which
contributes to a clearer and smoother image.
Range: 0%-100%.
Available in Surface render mode only.
Opacity
Function: to set the transparency value for VR rendering.
Range: 0%-100%.
The lower the number, the more transparent the grayscale information.
Available in Surface render mode only.
Содержание TE5
Страница 1: ...TE7 TE5 Diagnostic Ultrasound System Operator s Manual Basic Volume ...
Страница 2: ......
Страница 6: ......
Страница 12: ......
Страница 24: ......
Страница 36: ......
Страница 54: ......
Страница 56: ...4 2 Exam Preparation 4 1 1 New Patient Information The Patient Info screen is shown as follows 2 1 3 ...
Страница 110: ......
Страница 115: ...Display Cine Review 6 5 6 Tap Return on the screen or tap Freeze to exit image compare ...
Страница 120: ......
Страница 124: ......
Страница 156: ......
Страница 174: ......
Страница 192: ...12 18 Setup Select Advanced and do as follows Select MAPS and do as follows ...
Страница 202: ...13 2 Probes and Biopsy C5 2s L12 4s L7 3s P4 2s L14 6s C11 3s L14 6Ns V11 3Ws P7 3Ts 7LT4s ...
Страница 203: ...Probes and Biopsy 13 3 7L4s P10 4s L20 5s P7 3s L14 5sp SC6 1s SP5 1s 6CV1s L9 3s C5 1s L11 3VNs C4 1s ...
Страница 222: ...13 22 Probes and Biopsy No Name Description 8 Grooves of the needle guided bracket Matched with the tabs of the probe ...
Страница 226: ...13 26 Probes and Biopsy NGB 034 NGB 035 ...
Страница 250: ......
Страница 272: ......
Страница 276: ...A 4 Wireless LAN Tap Add Manually create a network profile to set ...
Страница 282: ......
Страница 318: ......
Страница 322: ......
Страница 323: ...P N 046 006959 07 1 0 ...

