


8-194
14
15
3
6
10
12
4
5
11
7
11
9
1
Secure with hand
Work bench
V block
Wooden block
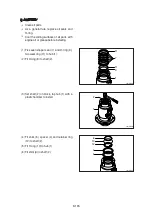
Remove six slipper seals (7) and O-ring
(9), two wear ring (11) from hub (1).
(5)
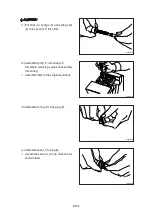
Place hub (1) on a V-block and by using a
wood buffer at the shaft end, hit out shaft
(2) to about 1/2 from the body with a
hammer.
Take care not to damage the shaft (2)
when remove hub (1) or rest it sideway.
Put a fitting mark on hub (1) and shaft (2).
(4)
ö
ö
Remove shim (6) and O-ring (10).
Remove retainer ring (12), spacer (4) and
shim (5).
(2)
(3)
DISASSEMBLY
Before the disassembly, clean the turning
joint.
Remove bolts (14), washer (15) and cover
(3).
2)
ö
(1)
21078DA10
21078DA11
8-14(3) (360-7)
21078DA12
Содержание HX145 LCR
Страница 11: ...SECTION 1 GENERAL SECTION 1 GENERAL Group 1 Safety Hints 1 1 Group 2 Specifications 1 10...
Страница 204: ...4 5 MEMORANDUM HYUNDAI HEAVY INDUSTRIES CO LTD CONSTRUCTION EQUIPMENT DIV...
Страница 553: ...8 82 Insert O rings to the relief valve 30 and reassemble them to rear cover 20 This completes assembly 17 32038SM42...
Страница 627: ...8 155 125LCR8TM30 Turn casing 1 upside down and remove oil seal 3 using jig 29...
Страница 636: ...8 164 125LCR8TM61 After assembling spring 44 in order clamp plug 41 Tightening torque 5 kgf m 36 lbf ft 31...
Страница 657: ...8 185 8 185 Remove lock nut 22 and then boot 23 14 36078RL14 2507ARL10...
Страница 668: ...8 196 14 15 3 Install cover 3 to body 1 and tighten bolts 14 Torque 10 12 5 kgf m 72 3 90 4 lbf ft 7 21078DA10...