


8-18
8-18
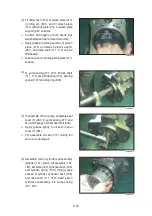
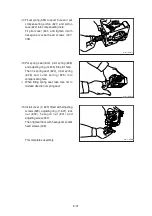
Fit tilting bush (214) of swash plate (212)
to tilting pin (531), and fit swash plate
(212) with shoe plate (211) to swash plate
support (251) correctly.
Confirm with fingers of both hands that
swash plate can be removed smoothly.
Apply grease to sliding sections of swash
plate (212) and swash plate support
(251), and drive shaft (111, 113) can be
fitted easily.
Take care not to damage shoe plate (211)
surface.
(3)
ö
ö
ö
140Z98MP24
To pump casing (271, 272), fit drive shaft
(111, 113) set with bearing (123), bearing
spacer (127) and stop ring (824).
(4)
140Z98MP25
In assemble of front pump, assemble seal
cover (F) (261) to pump casing (271) and
fix it with hexagon socket head bolt (406).
Apply grease lightly to oil seal in seal
cover (F) (261).
For assemble oil seal (774), taking full
care not to damage it.
(5)
ö
ö
140Z98MP26
Assemble piston cylinder subassembly
[cylinder (141), piston subassembly (151,
152), set plate (153), spherical bush (156)
and cylinder spring (157)]. Fitting spline
phases of cylinder, spherical bush (156)
and drive shaft (111, 113), insert piston
cylinder subassembly into pump casing
(271, 272).
(6)
140Z98MP27
Содержание HX145 LCR
Страница 11: ...SECTION 1 GENERAL SECTION 1 GENERAL Group 1 Safety Hints 1 1 Group 2 Specifications 1 10...
Страница 204: ...4 5 MEMORANDUM HYUNDAI HEAVY INDUSTRIES CO LTD CONSTRUCTION EQUIPMENT DIV...
Страница 553: ...8 82 Insert O rings to the relief valve 30 and reassemble them to rear cover 20 This completes assembly 17 32038SM42...
Страница 627: ...8 155 125LCR8TM30 Turn casing 1 upside down and remove oil seal 3 using jig 29...
Страница 636: ...8 164 125LCR8TM61 After assembling spring 44 in order clamp plug 41 Tightening torque 5 kgf m 36 lbf ft 31...
Страница 657: ...8 185 8 185 Remove lock nut 22 and then boot 23 14 36078RL14 2507ARL10...
Страница 668: ...8 196 14 15 3 Install cover 3 to body 1 and tighten bolts 14 Torque 10 12 5 kgf m 72 3 90 4 lbf ft 7 21078DA10...