


8-30
8-30
Lever (1) side
Lever (2) side
(fulcrum plug of
adjusting plug side)
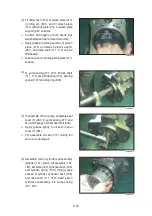
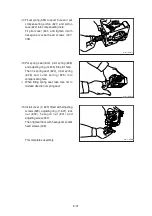
Fit return spring (654) and spring seat
(653) into spool hole and attach snap ring
(814).
(10)
Fit center plug (614) so that pin force-
fitted in center plug (614) can be put into
pin hole of lever (2).
Then install prevention plug (858).
Insert adjusting plug (615) and fit locking
ring.
Take care not to mistake inserting holes
for fulcrum plug and adjusting plug.
At this point in time move feedback lever
to confirm that it has no large play and is
free from binding.
(8)
(9)
ö
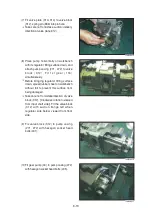
Put pilot piston (643) into pilot hole of
casing.
Confirm that pilot piston slides smoothly
without binding.
Put pin force-fitted in lever (2, 613) into
groove of pilot piston.
Then fix lever (2).
(6)
ö
(7)
Fit feedback lever (611), matching its pin
hole with pin hole in spool.
Then insert pin (874).
Insert pin in feedback lever a little to ease
operation.
Take care not to mistake direction of
feedback lever.
(5)
ö
ö
(210-7) 8-28
(210-7) REG11
(210-7) REG12
(210-7) REG13
Содержание HX145 LCR
Страница 11: ...SECTION 1 GENERAL SECTION 1 GENERAL Group 1 Safety Hints 1 1 Group 2 Specifications 1 10...
Страница 204: ...4 5 MEMORANDUM HYUNDAI HEAVY INDUSTRIES CO LTD CONSTRUCTION EQUIPMENT DIV...
Страница 553: ...8 82 Insert O rings to the relief valve 30 and reassemble them to rear cover 20 This completes assembly 17 32038SM42...
Страница 627: ...8 155 125LCR8TM30 Turn casing 1 upside down and remove oil seal 3 using jig 29...
Страница 636: ...8 164 125LCR8TM61 After assembling spring 44 in order clamp plug 41 Tightening torque 5 kgf m 36 lbf ft 31...
Страница 657: ...8 185 8 185 Remove lock nut 22 and then boot 23 14 36078RL14 2507ARL10...
Страница 668: ...8 196 14 15 3 Install cover 3 to body 1 and tighten bolts 14 Torque 10 12 5 kgf m 72 3 90 4 lbf ft 7 21078DA10...