6-43
TEST PROCEDURE
TEST PROCEDURE
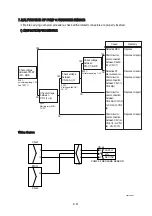
Test 4
Test 4 : Check electric current at EPPR
valve.
Disconnect connector CN-75 from EPPR
valve.
Insert the adapter to CN-75 and install
multimeter as figure.
Start engine.
Set S-mode and cancel auto decel
mode.
Position the multimodal dial at 10.
If r pm show approx 1750
±
50 r pm
disconnect one wire harness from EPPR
valve.
Check electric current at bucket circuit
relief position.
(1)
(1)
①
②
③
④
⑤
⑥
⑦
2)
2)
Main pump
Pressure adjusting
screw locknut
Valve casing
CN-75
EPPR valve
Pilot pressure
supply line
Test 5
Test 5 : Check pressure at EPPR valve.
Remove plug and connect pressure
gauge as figure.
·
Gauge capacity : 0 to 50 kgf/cm
2
(0 to 725 psi)
Start engine.
Set S-mode and cancel auto decel
mode.
Position the multimodal dial at 10.
If rpm show approx 1750
±
50 rpm check
pressure at relief position of bucket
circuit by operating bucket control lever.
If pressure is not correct, adjust it.
After adjust, test the machine.
(2)
(2)
①
②
③
④
⑤
⑥
⑦
SPEC : 2~25 kgf/cm
2
(30~350 psi)
14095MS22
Multimeter
CN-75
EPPR valve
Main pump
Adapter(P/no.:21Q6-50410)
Valve casing
Spec : 100~700 mA
14095MS21
Содержание HX145 LCR
Страница 11: ...SECTION 1 GENERAL SECTION 1 GENERAL Group 1 Safety Hints 1 1 Group 2 Specifications 1 10...
Страница 204: ...4 5 MEMORANDUM HYUNDAI HEAVY INDUSTRIES CO LTD CONSTRUCTION EQUIPMENT DIV...
Страница 553: ...8 82 Insert O rings to the relief valve 30 and reassemble them to rear cover 20 This completes assembly 17 32038SM42...
Страница 627: ...8 155 125LCR8TM30 Turn casing 1 upside down and remove oil seal 3 using jig 29...
Страница 636: ...8 164 125LCR8TM61 After assembling spring 44 in order clamp plug 41 Tightening torque 5 kgf m 36 lbf ft 31...
Страница 657: ...8 185 8 185 Remove lock nut 22 and then boot 23 14 36078RL14 2507ARL10...
Страница 668: ...8 196 14 15 3 Install cover 3 to body 1 and tighten bolts 14 Torque 10 12 5 kgf m 72 3 90 4 lbf ft 7 21078DA10...

