


5-92
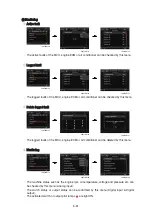
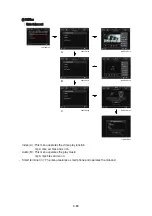
POWER OFF SWITCH
POWER OFF SWITCH
This switch makes the system and the LED OFF.
Just before the power OFF, set values are stored.
Default setting values
Default setting values
1)
1)
(1)
(2)
(2)
370073CD54
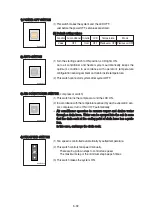
AUTO SWITCH
AUTO SWITCH
Turn the starting switch to ON position, LCD lights ON.
Auto air conditioner and heater system automatically keeps the
optimum condition in accordance with operator's temperature
configuration sensing ambient and cabin inside temperature.
This switch can restart system after system OFF.
2)
2)
(1)
(2)
This switch turns the compressor and the LCD ON.
In accordance with the temperature sensed by duct (evaporator) sen-
sor, compressor turns ON or OFF automatically.
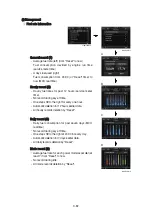
Air conditioner operates to remove vapor and drains water
Air conditioner operates to remove vapor and drains water
through a drain hose. Water can be sprayed into the cab in case
through a drain hose. Water can be sprayed into the cab in case
that the drain cock at the ending point of drain hose has a prob-
that the drain cock at the ending point of drain hose has a prob-
lem.
lem.
In this case, exchange the drain cock.
In this case, exchange the drain cock.
(1)
(2)
※
Fan speed is controlled automatically by setted temperature.
This switch controls fan speed manually.
There are 8 up/down steps to control fan speed.
The maximum step or the minimum step beeps 5 times.
This switch makes the system ON.
(1)
(2)
(3)
370073CD52
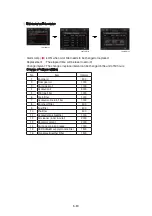
Function
Value
Air conditioner
OFF
In/outlet
Inlet
LCD
OFF
Temperature
Mode
Previous sw OFF
AIR CONDITIONER SWITCH
AIR CONDITIONER SWITCH (compressor switch)
3)
3)
370073CD53
FAN SPEED SWITCH
FAN SPEED SWITCH
4)
4)
370074CD56
·
·
Previous sw OFF
Содержание HX145 LCR
Страница 11: ...SECTION 1 GENERAL SECTION 1 GENERAL Group 1 Safety Hints 1 1 Group 2 Specifications 1 10...
Страница 204: ...4 5 MEMORANDUM HYUNDAI HEAVY INDUSTRIES CO LTD CONSTRUCTION EQUIPMENT DIV...
Страница 553: ...8 82 Insert O rings to the relief valve 30 and reassemble them to rear cover 20 This completes assembly 17 32038SM42...
Страница 627: ...8 155 125LCR8TM30 Turn casing 1 upside down and remove oil seal 3 using jig 29...
Страница 636: ...8 164 125LCR8TM61 After assembling spring 44 in order clamp plug 41 Tightening torque 5 kgf m 36 lbf ft 31...
Страница 657: ...8 185 8 185 Remove lock nut 22 and then boot 23 14 36078RL14 2507ARL10...
Страница 668: ...8 196 14 15 3 Install cover 3 to body 1 and tighten bolts 14 Torque 10 12 5 kgf m 72 3 90 4 lbf ft 7 21078DA10...