


8-17
8-17
ASSEMBLY
F o r r e a s s e m b l i n g r e v e r s e t h e
disassembling procedures, paying
attention to the following items.
Do not fail to repair the parts damaged
dur ing disassembling, and repair
replacement parts in advance.
Clean each part fully with cleaning oil
and dry it with compressed air.
Do not fail to apply clean working oil to
sliding sections, bearings, etc. before
assembling them.
In principle, replace seal parts, such as
O-rings, oil seals, etc.
For fitting bolts, plug, etc., prepare a
torque wrench or so on, and tighten them
with torques shown in page 8-11, 12.
For the double-pump, take care not to
mix up parts of the front pump with those
of the rear pump.
(1)
4)
Η
Θ
Ι
Κ
Λ
Μ
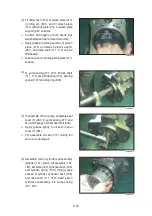
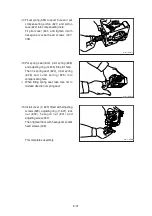
Insert the lock pin (255) after the swash
plate support (251) into the pump casing
(271, 272), and fit the lock pin (255) into
the hole of the swash plate support (251).
In case the servo piston, tilting pin,
stopper (L), stopper (S), and Qmin. plug
have been removed, attached then to the
pump casing in advance.
In the tightening work of the servo piston
and the tilting pin, use the tool not to
damaged the head of the tilting pin and
the feed back pin. Besides, apply loctite
(of medium strength) to the thread
portion.
(2)
ö
ö
140Z98MP23
Содержание HX145 LCR
Страница 11: ...SECTION 1 GENERAL SECTION 1 GENERAL Group 1 Safety Hints 1 1 Group 2 Specifications 1 10...
Страница 204: ...4 5 MEMORANDUM HYUNDAI HEAVY INDUSTRIES CO LTD CONSTRUCTION EQUIPMENT DIV...
Страница 553: ...8 82 Insert O rings to the relief valve 30 and reassemble them to rear cover 20 This completes assembly 17 32038SM42...
Страница 627: ...8 155 125LCR8TM30 Turn casing 1 upside down and remove oil seal 3 using jig 29...
Страница 636: ...8 164 125LCR8TM61 After assembling spring 44 in order clamp plug 41 Tightening torque 5 kgf m 36 lbf ft 31...
Страница 657: ...8 185 8 185 Remove lock nut 22 and then boot 23 14 36078RL14 2507ARL10...
Страница 668: ...8 196 14 15 3 Install cover 3 to body 1 and tighten bolts 14 Torque 10 12 5 kgf m 72 3 90 4 lbf ft 7 21078DA10...