


8-29
8-29
ASSEMBLY
For assembly, reverse disassembly
procedures, but pay attention to the
following items.
Always repair parts that were scored at
disassembly.
Get replacement parts ready beforehand.
Mixing of foreign matter will cause
malfunction.
Therefore, wash parts well with cleaning
oil, let them dry with jet air and handle
them in clean place.
Always tighten bolts, plugs, etc. to their
specified torques.
Do not fail to coat sliding surfaces with
clean hydraulic oil before assembly.
Replace seals such as O-ring with new
ones as a rule.
(1)
Η
Θ
Ι
Κ
Λ
4)
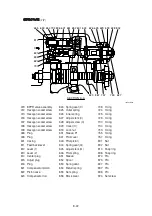
Spool
Feedback lever
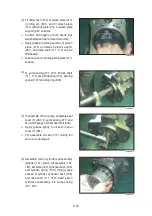
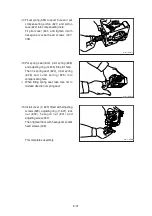
P u t c o m p e n s a t i n g r o d ( 6 2 3 ) i n t o
compensating hole of casing (601).
Put pin force-fitted in lever (1, 612) into
groove of compensating rod and fit lever
(1) to pin force-fitted in casing.
(2)
(3)
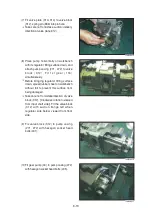
Fit spool (652) and sleeve (651) into hole
in spool of casing.
Confirm that spool and sleeve slide
smoothly in casing without binding.
Pay attention to orientation of spool.
(4)
ö
ö
(210-7) 8-27
Содержание HX145 LCR
Страница 11: ...SECTION 1 GENERAL SECTION 1 GENERAL Group 1 Safety Hints 1 1 Group 2 Specifications 1 10...
Страница 204: ...4 5 MEMORANDUM HYUNDAI HEAVY INDUSTRIES CO LTD CONSTRUCTION EQUIPMENT DIV...
Страница 553: ...8 82 Insert O rings to the relief valve 30 and reassemble them to rear cover 20 This completes assembly 17 32038SM42...
Страница 627: ...8 155 125LCR8TM30 Turn casing 1 upside down and remove oil seal 3 using jig 29...
Страница 636: ...8 164 125LCR8TM61 After assembling spring 44 in order clamp plug 41 Tightening torque 5 kgf m 36 lbf ft 31...
Страница 657: ...8 185 8 185 Remove lock nut 22 and then boot 23 14 36078RL14 2507ARL10...
Страница 668: ...8 196 14 15 3 Install cover 3 to body 1 and tighten bolts 14 Torque 10 12 5 kgf m 72 3 90 4 lbf ft 7 21078DA10...