6-49
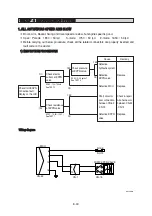
6. MALFUNCTION OF PUMP 2 PRESSURE SENSOR
6. MALFUNCTION OF PUMP 2 PRESSURE SENSOR
Fault code : HCESPN 121, FMI 0~4
Before carrying out below procedure, check all the related connectors are properly inserted.
INSPECTION PROCEDURE
INSPECTION PROCEDURE
※
1)
1)
Wiring diagram
Wiring diagram
CN-52
12
MCU
CN-51
3
13
CD-43
PUMP 2 PRESSURE SENSOR
SUPPLY
SIG
RETURN
A
B
C
CN-1
4
6
3
300L6MS07
·
Cause
Remedy
Defective MCU
Short circuit or
poor connection
between CN-52-
(12)-CN-1(3)
Detective P2
pressure sensor
Short circuit or
poor connection
between CN-1(3)-
CD-43(B)
Short circuit or
poor connection
between
CD-43(A)-CN-1(4)
or CD-43(C)-CN-1
(6)
Short circuit or
poor connection
between CN-1(4)-
CN-51(3) or CN-1
(6) - CN-51(13)
Replace
Replace or repair
Replace or repair
Replace or repair
Replace or repair
Replace or repair
Check voltage
between CN-52
(12) - GND
YES
YES
YES
NO
NO
NO
SPEC :
Starting switch ON :
24
±
2V
SPEC :
Starting switch ON :
24
±
2V
Check voltage
between
CN-1(4)-(6)
Check voltage
between
CN-1(3)-GND
Check voltage
between
CD-43(A)-(C)
YES
NO
SPEC :
Actuator operating: 1~5V
See TEST 10
SPEC :
Actuator operating: 1~5V
Содержание HX145 LCR
Страница 11: ...SECTION 1 GENERAL SECTION 1 GENERAL Group 1 Safety Hints 1 1 Group 2 Specifications 1 10...
Страница 204: ...4 5 MEMORANDUM HYUNDAI HEAVY INDUSTRIES CO LTD CONSTRUCTION EQUIPMENT DIV...
Страница 553: ...8 82 Insert O rings to the relief valve 30 and reassemble them to rear cover 20 This completes assembly 17 32038SM42...
Страница 627: ...8 155 125LCR8TM30 Turn casing 1 upside down and remove oil seal 3 using jig 29...
Страница 636: ...8 164 125LCR8TM61 After assembling spring 44 in order clamp plug 41 Tightening torque 5 kgf m 36 lbf ft 31...
Страница 657: ...8 185 8 185 Remove lock nut 22 and then boot 23 14 36078RL14 2507ARL10...
Страница 668: ...8 196 14 15 3 Install cover 3 to body 1 and tighten bolts 14 Torque 10 12 5 kgf m 72 3 90 4 lbf ft 7 21078DA10...


