


GE Analytical Instruments ©2010
72 of 226
DLM 74001-04 Rev. A
Chapter 4: Basic Analyzer Operation
1. Select the
Data
tab.
2. Press the
Setup History
button.
3. Set the
Archive Data
option to
On
or
Off
. When
Archive Data
is set to
On
, the Analyzer will not
overwrite the oldest data and prompts you to archive data to free up memory; when
Archive Data
is
set to
Off
, the Analyzer will make space for new data in memory by overwriting the oldest data.
4. If you wish to have data automatically downloaded to a USB flash memory drive, press the
Daily
Download
button and select
On
. Then, press the
Download Time
button and enter a time for the
download. When activated, every day at the specified time, the Analyzer will automatically download
the previous 24 hours of data to the flash memory drive, if it is connected to the Analyzer’s USB port.
Archiving Data History
When
Archive Data
is set to
On
, you will be prompted to archive your data when the data history is close to full.
If DataGuard is enabled, when the data history is completely full, an error message is issued and the Analyzer
stops taking TOC measurement until you archive the data.
To archive your data, follow these steps:
1. Select the
Data
tab.
• Press the
Print Archive
button if you wish to print the data history archive.
• Press the
Export Archive
button to export the data history archive to a file. You will be prompted to
verify that the export device is ready to capture the data. The archive can be exported to either a
USB device or the serial port.
2. After printing or exporting the archive, the data history will be overwritten with new measurements as
additional data are collected.
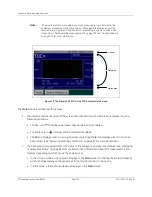
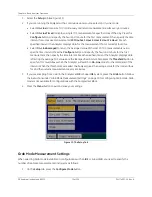
Viewing Data History
You can view the data history stored in the Analyzer whether or not analysis is in progress. To display the
Data
History
screen, follow these steps. On configurations without conductivity measurement, some options are not
available.
1. Select the
Data
tab.
2. Press the
View
button to display the data history.
3. Press the
Setup
button to change the type of data displayed in the data history list.
Note:
If the DataGuard option has been purchased and enabled, Archive Data is set to
On
.
When the data history is filled, analysis is stopped until the data history is printed or
exported. See “Using DataGuard” on page 105 for more information.
Содержание Sievers 500 RL
Страница 8: ...GE Analytical Instruments 2010 8 of 226 DLM 74001 04 Rev A ...
Страница 10: ...GE Analytical Instruments 2010 10 of 226 DLM 74001 04 Rev A ...
Страница 36: ...GE Analytical Instruments 2010 36 of 220 DLM 74001 04 Rev A ...
Страница 66: ...GE Analytical Instruments 2010 66 of 226 DLM 74001 04 Rev A Chapter 3 Installation ...
Страница 152: ...GE Analytical Instruments 2010 152 of 226 DLM 74001 04 Rev A Chapter 7 Maintenance ...
Страница 170: ...GE Analytical Instruments 2010 170 of 226 DLM 74001 04 Rev A Chapter 8 Troubleshooting ...
Страница 177: ...Appendix A GE Analytical Instruments 2010 177 of 186 DLM 74001 04 Rev A Figure 51 Left Side Analyzer Dimensions ...
Страница 178: ...Appendix A GE Analytical Instruments 2010 178 of 186 DLM 74001 04 Rev A ...
Страница 185: ...Notes GE Analytical Instruments 2010 185 of 186 DLM 74001 04 Rev A 186 ...
Страница 186: ...Notes GE Analytical Instruments 2010 186 of 186 DLM 74001 04 Rev A 186 ...