


Appendix B
GE Analytical Instruments ©2010
179 of 186
DLM 74001-04 Rev. A
Appendix B: Connecting to a PC
Using HyperTerminal
HyperTerminal is a Microsoft communications program that can be used to communicate with
serial devices, such as the Analyzer. To use HyperTerminal, you must first connect your Analyzer to
the computer with a serial (RS-232) cable.
To use HyperTerminal with the Analyzer:
1. Make sure the serial cable is connected to the Analyzer and the computer, and make sure
the Analyzer is powered on.
2. Launch HyperTerminal using one of these methods:
• The location of HyperTerminal varies from computer to computer. Often it can be
launched by exploring the Start menu path as follows:
Start ¶ Programs ¶ Accessories ¶ Communications ¶ HyperTerminal.
• Select
Start
Run, type
Hypertrm
in the
Open
field, and click
OK
.
3. When HyperTerminal launches, the
Connection Description
window displays. Enter a
name in the Name field, such as
Sievers 500 TOC Analyzer
, and click
OK
.
4. If you are using an Ethernet connection, when the
Connect To
window displays, select
TCP/IP
from the
Connect Using
drop-down menu. Click
OK
.
• For the
Host
address, enter the Analyzer’s IP address (see the System Info screen on the
Analyzer).
• Ensure the port number is set to
23
.
• Click
OK
.
• Proceed to Step 6.
5. If you are using an RS-232 connection, when the
Connect To
window displays, select
Communications Port
from the
Connect Using
drop-down menu. Click
OK
. If more than
one communications port is in the list and you’re not sure which one to select, see
“Determining Your Communications Port Number” on page 180.
6. In the
Com Settings
window, specify the following settings:
Bits Per Second:9600 (or rate that matches Analyzer setting)
Содержание Sievers 500 RL
Страница 8: ...GE Analytical Instruments 2010 8 of 226 DLM 74001 04 Rev A ...
Страница 10: ...GE Analytical Instruments 2010 10 of 226 DLM 74001 04 Rev A ...
Страница 36: ...GE Analytical Instruments 2010 36 of 220 DLM 74001 04 Rev A ...
Страница 66: ...GE Analytical Instruments 2010 66 of 226 DLM 74001 04 Rev A Chapter 3 Installation ...
Страница 152: ...GE Analytical Instruments 2010 152 of 226 DLM 74001 04 Rev A Chapter 7 Maintenance ...
Страница 170: ...GE Analytical Instruments 2010 170 of 226 DLM 74001 04 Rev A Chapter 8 Troubleshooting ...
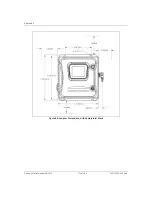
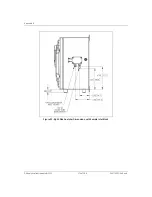
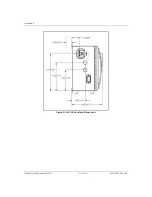
Страница 177: ...Appendix A GE Analytical Instruments 2010 177 of 186 DLM 74001 04 Rev A Figure 51 Left Side Analyzer Dimensions ...
Страница 178: ...Appendix A GE Analytical Instruments 2010 178 of 186 DLM 74001 04 Rev A ...
Страница 185: ...Notes GE Analytical Instruments 2010 185 of 186 DLM 74001 04 Rev A 186 ...
Страница 186: ...Notes GE Analytical Instruments 2010 186 of 186 DLM 74001 04 Rev A 186 ...