


GE Analytical Instruments ©2010
160 of 226
DLM 74001-04 Rev. A
Chapter 8: Troubleshooting
The Analyzer Will Not Power On
The Analyzer does not contain a user-replaceable fuse. If the Analyzer will not power on, confirm that the
external circuit breaker has not been switched off. Also confirm that the electrical power lines that lead in to the
Analyzer are attached securely to the terminal block, and that the grounding wire is connected.
No Flow Through the Analyzer
To troubleshoot a lack of flow through the Analyzer, follow the steps in the following two sections: “Checking the
Sample Pump” and “Backflushing the Analyzer.” Note that sample will not flow through the Analyzer if the
sample pump is not operating or if the 60-µm stainless steel in-line filter is clogged.
Checking the Sample Pump
While the Analyzer is operating, open the Analyzer front panel and make sure the sample pump is turning. If the
pump is not turning and the Analyzer is operating (the display screen indicates that analysis is taking place),
contact GE Analytical Instruments Technical Support for instructions.
Confirm Flow of Water to the Analyzer
Make sure the flow of sample water to the Analyzer is enabled from your water system.
Also, confirm that the
iOS
System or Super
iOS
System inlet valve is open. Inlet to the
iOS
System is controlled by
a needle valve, which is adjusted by the screw on the
iOS
. Turn the screw clockwise to decrease flow, and turn
the screw counter-clockwise to increase flow. The flow rate should be adjusted so that flow out of the waste line
is between 30-300 mL/min.
Make sure the Analyzer is powered on at all times, except when maintenance is being performed, to ensure that
water flows through the Analyzer’s fluidics module.
Backflushing the Analyzer
When there is a lack of flow through the Analyzer, a flush of the DI and sample fluidics may clear clogs in the
tubing. Follow these steps to confirm that a backflush is needed and to perform the backflush:
1. Open the Analyzer door.
Warning
To avoid potentially dangerous shock, do not touch anything inside
the Analyzer while observing the sample pump.
Содержание Sievers 500 RL
Страница 8: ...GE Analytical Instruments 2010 8 of 226 DLM 74001 04 Rev A ...
Страница 10: ...GE Analytical Instruments 2010 10 of 226 DLM 74001 04 Rev A ...
Страница 36: ...GE Analytical Instruments 2010 36 of 220 DLM 74001 04 Rev A ...
Страница 66: ...GE Analytical Instruments 2010 66 of 226 DLM 74001 04 Rev A Chapter 3 Installation ...
Страница 152: ...GE Analytical Instruments 2010 152 of 226 DLM 74001 04 Rev A Chapter 7 Maintenance ...
Страница 170: ...GE Analytical Instruments 2010 170 of 226 DLM 74001 04 Rev A Chapter 8 Troubleshooting ...
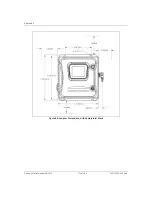
Страница 177: ...Appendix A GE Analytical Instruments 2010 177 of 186 DLM 74001 04 Rev A Figure 51 Left Side Analyzer Dimensions ...
Страница 178: ...Appendix A GE Analytical Instruments 2010 178 of 186 DLM 74001 04 Rev A ...
Страница 185: ...Notes GE Analytical Instruments 2010 185 of 186 DLM 74001 04 Rev A 186 ...
Страница 186: ...Notes GE Analytical Instruments 2010 186 of 186 DLM 74001 04 Rev A 186 ...