


GE Analytical Instruments ©2010
146 of 226
DLM 74001-04 Rev. A
Chapter 7: Maintenance
3. Stop the flow of sample water to the Analyzer.
4. Open the Analyzer front panel.
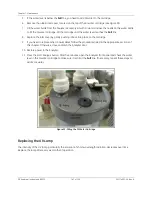
5. Locate the DI water cartridge (see Figure 32 on page 140).
6. Slide the tray under the DI water cartridge.
7. Lift the spring clip at the top of the DI water cartridge, and rotate the cartridge to the right so it slides
out of the retaining hook.
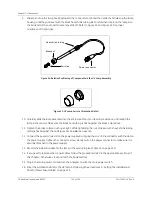
8. Remove the John Guest fitting labeled “B” from the barb on the top of the DI water cartridge. To loosen
the fitting, use the John Guest fitting removal tool from the accessories kit to push in on the bottom ring
on the fitting, so that the ring moves toward the fitting Place the fitting into the tray to collect water (see
Figure 37).
9. Remove the rubber inlet cover from the top of the cartridge.
10. Loosen the fitting labeled D from the barb on the top of the DI water cartridge, and place it in the tray to
collect water. When water is no longer dripping from either of the connectors, carefully remove the tray
from the Analyzer, empty the water, and return the tray to the Analyzer.
11. Remove the two John Guest fittings from the barbs on the bottom of the DI water cartridge, labeled “A”
and “C.” Drain the water from the tubing into the tray.
12. Dispose of the old DI water cartridge in compliance with local, state, and federal regulations.
13. Carefully remove the tray and discard the collected water.
14. Remove the new DI water cartridge from the packaging, and remove the caps from each of the barbs.
15. Remove the rubber inlet cover from the new cartridge and set it aside.
16. Attach the John Guest fittings to the barbs on the bottom of the new DI water cartridge, labeled “A” and
“C.”
17. Slide the water bottle nozzle into the inlet hole. Make sure the tubing that connects to Port “B” is
positioned higher than the DI water cartridge, and then gently squeeze the water bottle. Be sure to fill
the reservoir until the water reaches the
Full
line.
18. Connect the fitting labeled “B” to the barb labeled “D” on top of the DI water cartridge.
19. Slide the DI water cartridge into the bracket and rotate it into the retaining clip until it snaps into place.
The cartridge must be level as you rotate it inward, and the bottom of the cartridge must be
perpendicular to the bracket.
20. Visually check for leaks from the reservoir after the DI water cartridge has been filled.
21. Turn on the Analyzer using the main power switch. This will start the DI pump. Check for large air
bubbles in all the tubing that connects to the DI water cartridge. If large air bubbles are present, tap or
manipulate the tubing to work the air bubbles out.
22. Keep the Analyzer powered on for 2 minutes.
23. After 2 minutes, turn the Analyzer off.
Содержание Sievers 500 RL
Страница 8: ...GE Analytical Instruments 2010 8 of 226 DLM 74001 04 Rev A ...
Страница 10: ...GE Analytical Instruments 2010 10 of 226 DLM 74001 04 Rev A ...
Страница 36: ...GE Analytical Instruments 2010 36 of 220 DLM 74001 04 Rev A ...
Страница 66: ...GE Analytical Instruments 2010 66 of 226 DLM 74001 04 Rev A Chapter 3 Installation ...
Страница 152: ...GE Analytical Instruments 2010 152 of 226 DLM 74001 04 Rev A Chapter 7 Maintenance ...
Страница 170: ...GE Analytical Instruments 2010 170 of 226 DLM 74001 04 Rev A Chapter 8 Troubleshooting ...
Страница 177: ...Appendix A GE Analytical Instruments 2010 177 of 186 DLM 74001 04 Rev A Figure 51 Left Side Analyzer Dimensions ...
Страница 178: ...Appendix A GE Analytical Instruments 2010 178 of 186 DLM 74001 04 Rev A ...
Страница 185: ...Notes GE Analytical Instruments 2010 185 of 186 DLM 74001 04 Rev A 186 ...
Страница 186: ...Notes GE Analytical Instruments 2010 186 of 186 DLM 74001 04 Rev A 186 ...