


GE Analytical Instruments ©2010
107 of 226
DLM 74001-04 Rev. A
Chapter 5: Password Protection and DataGuard
6. The
Edit User
screen displays automatically. Press the
Menu
button to accept the default user settings,
or edit any of the user settings. For additional information, see Step 4 in “Editing User Information”
below.
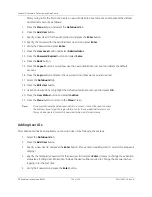
Editing User Information
Once you have created a User ID, you can edit its account settings as follows. Note that when you are adding a
new User ID, you do not need to follow Steps 1 through 3, as the
Edit User
screen automatically displays
whenever a new User ID is created.
1. Select the
DataGuard
tab.
2. Press the
Edit User
button.
3. Select a User ID from the list using the scroll buttons and then press
OK
.
4. You can modify the following User ID settings:
•
User Level
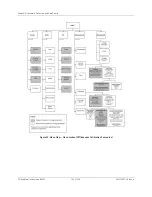
— Indicates the level of access the user has to various Analyzer menus. The options in
order of ascending access are
Operator
(default for all new User IDs),
Maintenance
,
Quality
, and
Administrator
. See Figure 22: Menu Map — Menu Lockout Off (Requires Calibration Passwords) on
page 102 for a menu map that indicates the minimum
User Level
required to access each menu.
•
User Status
— Indicates whether the User ID is
Active
(default for all new User IDs) or
Inactive
.
When you set a User ID to
Inactive
, the user will not be able to log in to the Analyzer, and the User ID
will be deleted from memory the next time you archive (see “Archiving User Accounts” on page 109
for more information). Note that if the user unsuccessfully attempts to log in to the Analyzer five
times, the account is automatically set to
Inactive
; see “Reactivating Inactivated User Accounts” on
page 109 for more information.
•
Password Expired
— Indicates whether the user will be required to establish a new Password at the
next successful log in. The default for a new user is
True
. Change this setting to
False
if you do not
want to require the user to change the Password at the next log in. This value defaults to the setting
chosen for the last User ID that was created.
•
Password
— Press the
Password
button to change the Password for the selected User ID.
5. Press the
Menu
button to save changes and return to the
DataGuard
screen.
Note:
To help a new user remember the password, and to ensure security, require a new
user to change the Password upon login.
Содержание Sievers 500 RL
Страница 8: ...GE Analytical Instruments 2010 8 of 226 DLM 74001 04 Rev A ...
Страница 10: ...GE Analytical Instruments 2010 10 of 226 DLM 74001 04 Rev A ...
Страница 36: ...GE Analytical Instruments 2010 36 of 220 DLM 74001 04 Rev A ...
Страница 66: ...GE Analytical Instruments 2010 66 of 226 DLM 74001 04 Rev A Chapter 3 Installation ...
Страница 152: ...GE Analytical Instruments 2010 152 of 226 DLM 74001 04 Rev A Chapter 7 Maintenance ...
Страница 170: ...GE Analytical Instruments 2010 170 of 226 DLM 74001 04 Rev A Chapter 8 Troubleshooting ...
Страница 177: ...Appendix A GE Analytical Instruments 2010 177 of 186 DLM 74001 04 Rev A Figure 51 Left Side Analyzer Dimensions ...
Страница 178: ...Appendix A GE Analytical Instruments 2010 178 of 186 DLM 74001 04 Rev A ...
Страница 185: ...Notes GE Analytical Instruments 2010 185 of 186 DLM 74001 04 Rev A 186 ...
Страница 186: ...Notes GE Analytical Instruments 2010 186 of 186 DLM 74001 04 Rev A 186 ...