


GE Analytical Instruments ©2010
145 of 226
DLM 74001-04 Rev. A
Chapter 7: Maintenance
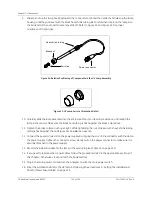
12. Reattach the sample pump tubing. Tubing on the left side of the pump head should run to either length
of the Masterflex tubing on the left; tubing on the right side of the pump head should run to either fork
of the “Y” tubing.
13. Record the installation date for the pump heads in the service log (see Table 15 on page 151).
14. If you need to replace other consumables, follow the procedures listed in the appropriate sections of
this chapter. Otherwise, close and latch the Analyzer door.
15. Restore power to the Analyzer.
16. Enter the installation date for the pump heads by following the procedures in “Setting the Installation or
Date for New Consumables” on page 149.
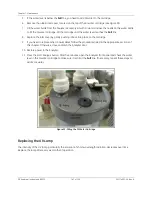
Figure 36: Replacing the Sample Pump Heads
Replacing the DI Water Cartridge
The ion exchange resin (resin bed) within the DI water cartridge depletes over time. With typical Analyzer use,
the DI water cartridge should be replaced after every 24 months of operation.
To replace the DI water cartridge, you will need the new cartridge; paper towels; and the water bottle, John
Guest fitting tool, and tray from the accessories kit. While replacing the DI water cartridge, you will need to
remove the four connections to the cartridge. All connections are labeled, but if necessary refer to Table 14 on
page 148 when reattaching the tubing.
1. If the Analyzer is taking measurements, press the
Stop Analysis
button.
2. Turn off the Analyzer by using the main power switch; also switch off the external circuit breaker for the
Analyzer.
Содержание Sievers 500 RL
Страница 8: ...GE Analytical Instruments 2010 8 of 226 DLM 74001 04 Rev A ...
Страница 10: ...GE Analytical Instruments 2010 10 of 226 DLM 74001 04 Rev A ...
Страница 36: ...GE Analytical Instruments 2010 36 of 220 DLM 74001 04 Rev A ...
Страница 66: ...GE Analytical Instruments 2010 66 of 226 DLM 74001 04 Rev A Chapter 3 Installation ...
Страница 152: ...GE Analytical Instruments 2010 152 of 226 DLM 74001 04 Rev A Chapter 7 Maintenance ...
Страница 170: ...GE Analytical Instruments 2010 170 of 226 DLM 74001 04 Rev A Chapter 8 Troubleshooting ...
Страница 177: ...Appendix A GE Analytical Instruments 2010 177 of 186 DLM 74001 04 Rev A Figure 51 Left Side Analyzer Dimensions ...
Страница 178: ...Appendix A GE Analytical Instruments 2010 178 of 186 DLM 74001 04 Rev A ...
Страница 185: ...Notes GE Analytical Instruments 2010 185 of 186 DLM 74001 04 Rev A 186 ...
Страница 186: ...Notes GE Analytical Instruments 2010 186 of 186 DLM 74001 04 Rev A 186 ...