


GE Analytical Instruments ©2010
168 of 226
DLM 74001-04 Rev. A
Chapter 8: Troubleshooting
10. Remove the John Guest fitting labeled “B” from the barb on the top of the DI water cartridge. To loosen
the fitting, use the John Guest fitting removal tool from the accessories kit to push in on the bottom ring
on the fitting, so that the ring moves toward the fitting (see Figure 44). Place the fitting into the tray or
other receptacle, to collect water.
11. Remove the rubber inlet cover from the top of the cartridge. Water will drain from the DI water
cartridge.
12. Loosen the fitting labeled D from the barb on the top of the DI water cartridge, and place it in the tray to
collect water. When water is no longer dripping from either of the connectors, carefully remove the tray
from the Analyzer, empty the water, and return the tray to the Analyzer.
13. Use the John Guest tool to remove the two John Guest fittings from the barbs on the bottom of the DI
water cartridge, labeled A and C. Drain the water from the tubing into the tray.
14. Carefully remove the tray and discard the collected water.
15. Slide the DI water cartridge into the bracket and rotate it into the retaining clip until it snaps into place.
The cartridge must be level as you rotate it inward, and the bottom of the cartridge must be
perpendicular to the bracket.
16. Replace the John Guest connections to the DI water cartridge.
17. Replace the rubber inlet cover on the DI water cartridge.
18. Disconnect the waste tubing and sample inlet tubing from the Analyzer.
19. Remove any printer, alarm, analog output, or computer cables.
20. Disconnect the power connection to the Analyzer. You will need to detach the wiring from the terminal
block inside the Analyzer. Refer to Figure on page 49 for a detailed view of the terminal block. You may
need an electrician to help you disconnect the Analyzer from the power supply.
21. If there are alarm or 4-20mA connections to the Analyzer, disconnect them from the terminal block. You
may need an electrician to help you disconnect the output connections.
22. Close and latch the Analyzer front panel.
You can now repackage the Analyzer and ship it to GE Analytical Instruments.
For international shipments, coordinate with an GE Analytical Instruments representative to ensure quick
passage through customs.
Warning
To avoid scratches, do not use a metal tool to remove the John Guest fittings on the
DI water cartridge. Always use the John guest tool provided in the Analyzer’s
accessories kit.
Содержание Sievers 500 RL
Страница 8: ...GE Analytical Instruments 2010 8 of 226 DLM 74001 04 Rev A ...
Страница 10: ...GE Analytical Instruments 2010 10 of 226 DLM 74001 04 Rev A ...
Страница 36: ...GE Analytical Instruments 2010 36 of 220 DLM 74001 04 Rev A ...
Страница 66: ...GE Analytical Instruments 2010 66 of 226 DLM 74001 04 Rev A Chapter 3 Installation ...
Страница 152: ...GE Analytical Instruments 2010 152 of 226 DLM 74001 04 Rev A Chapter 7 Maintenance ...
Страница 170: ...GE Analytical Instruments 2010 170 of 226 DLM 74001 04 Rev A Chapter 8 Troubleshooting ...
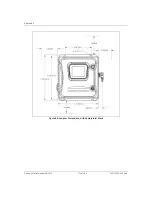
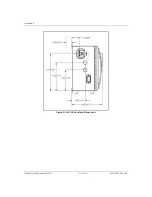
Страница 177: ...Appendix A GE Analytical Instruments 2010 177 of 186 DLM 74001 04 Rev A Figure 51 Left Side Analyzer Dimensions ...
Страница 178: ...Appendix A GE Analytical Instruments 2010 178 of 186 DLM 74001 04 Rev A ...
Страница 185: ...Notes GE Analytical Instruments 2010 185 of 186 DLM 74001 04 Rev A 186 ...
Страница 186: ...Notes GE Analytical Instruments 2010 186 of 186 DLM 74001 04 Rev A 186 ...