11 Job Status
366
Job St
a
tu
s
11
Print and Save
Starts printing the job. After printing, the job remains undeleted.
Cancel
Cancels printing the job.
Sample Set
Before printing multiple sets of a document, you can first print one set for trial, and then
print the remaining sets from the machine.
The following describes how to print or delete jobs stored with the Sample Set feature.
For information on how to operate a Sample Set job, refer to the print driver's help.
Note
•
When [Save as Private Charge Print Job] or [Save as Charge Print Job] is selected in [Receive Control]
under [Charge/Private Print Settings], jobs will not be saved in [Sample Set] under [Secure Print Jobs
& More] even if you select [Sample Set] on the print driver.
•
When you select the paper type from the Multi-model Print Driver 2 and execute a print job, the
paper type is converted to the paper type which is supported on your machine and the job will be
started. For information on how to convert paper types, refer to "Print Features Using Authentication
Information" (P.386).
For more information, refer to "Charge/Private Print Settings" (P.549).
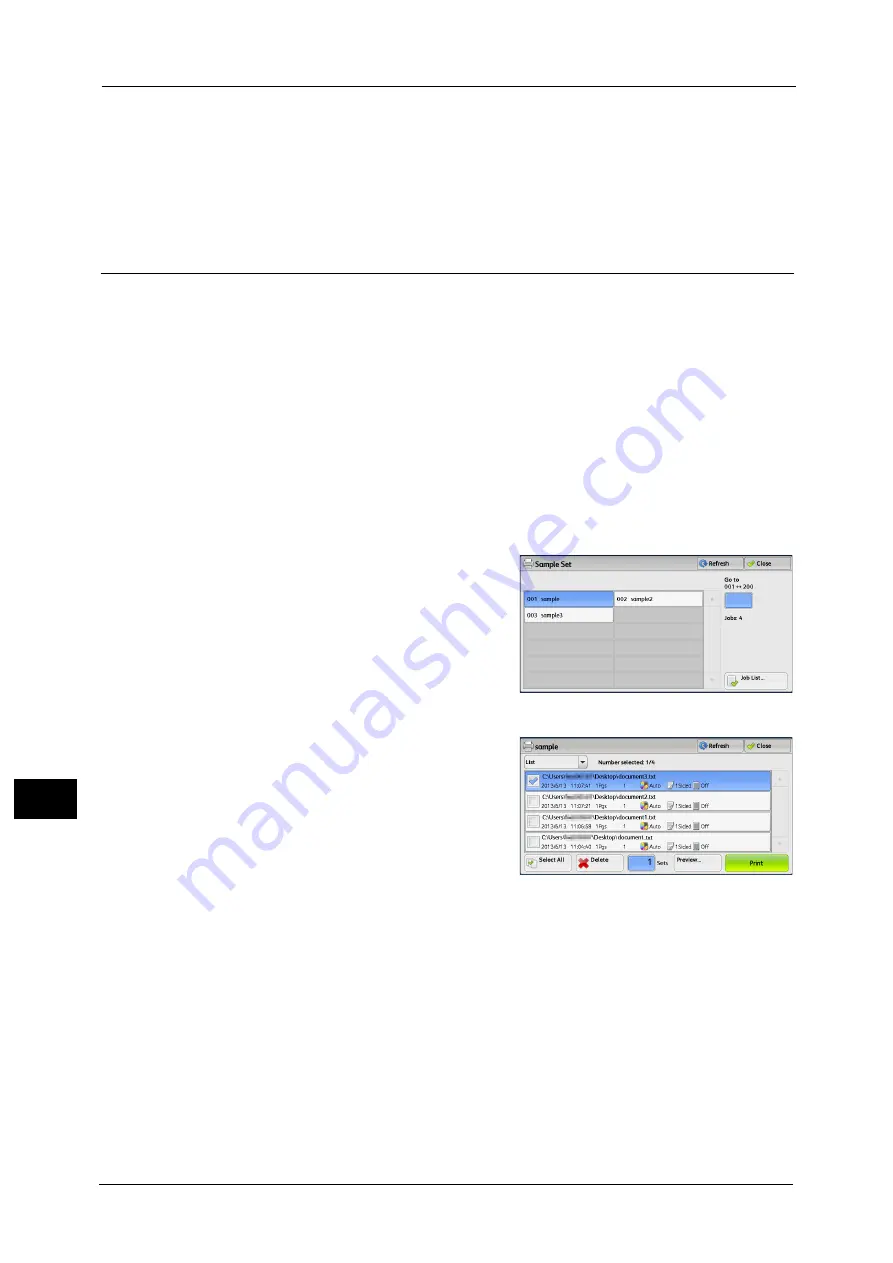
1
Select [Sample Set].
2
Select the user you want to check, and select
[Job List].
Note
•
Select [Refresh] to display the updated
information.
•
Scroll the list by drag or flick operation to
switch the screen to be displayed. For
information on how to drag or flick, refer to
"Touch Screen" (P.88).
•
You can enter a user ID in [Go to] using the
numeric keypad to display the user ID at the top of the list.
3
Select the job to be printed or deleted.
Note
•
You can select up to 100 files simultaneously
to print or delete the files. If you select
multiple files, they are printed in the selected
order.
•
Stored files can be displayed in a list or
thumbnailed view. You can also preview the
files.
•
You can set whether or not to display detailed information in the list screen of the stored files. For
more information, refer to "Display Details of Stored Print Job List" (P.514).
4
Select any option.
5
When printing, specify the number of print sets using the numeric keypad.
Select All
Selects all jobs. To deselect all the jobs, select this button again.
Delete
Deletes the Sample Set job.
Refer to "When [Delete] is Selected" (P.367).
Содержание Versant 80 Press
Страница 1: ...User Guide Versant 80 Press ...
Страница 18: ...18 Index 1007 ...
Страница 159: ...Image Quality 159 Copy 4 2 Select a button to adjust the color tone ...
Страница 214: ...4 Copy 214 Copy 4 ...
Страница 304: ...5 Scan 304 Scan 5 ...
Страница 382: ...11 Job Status 382 Job Status 11 ...
Страница 562: ...14 CentreWare Internet Services Settings 562 CentreWare Internet Services Settings 14 ...
Страница 580: ...16 E mail Environment Settings 580 E mail Environment Settings 16 ...
Страница 618: ...18 Encryption and Digital Signature Settings 618 Encryption and Digital Signature Settings 18 ...
Страница 916: ...22 Problem Solving 916 Problem Solving 22 ...
Страница 980: ...23 Appendix 980 Appendix 23 11 Click Reboot Machine After rebooting the machine the setting will be enabled ...
Страница 1018: ...1018 Index ...
Страница 1019: ...Versant 80 Press User Guide ME6843E2 2 Edition 1 September 2014 Fuji Xerox Co Ltd Copyright 2014 by Fuji Xerox Co Ltd ...


