217
Composing i-mode Mail/Deco-mail
Menu 12
Composing and sending i-mode Mail
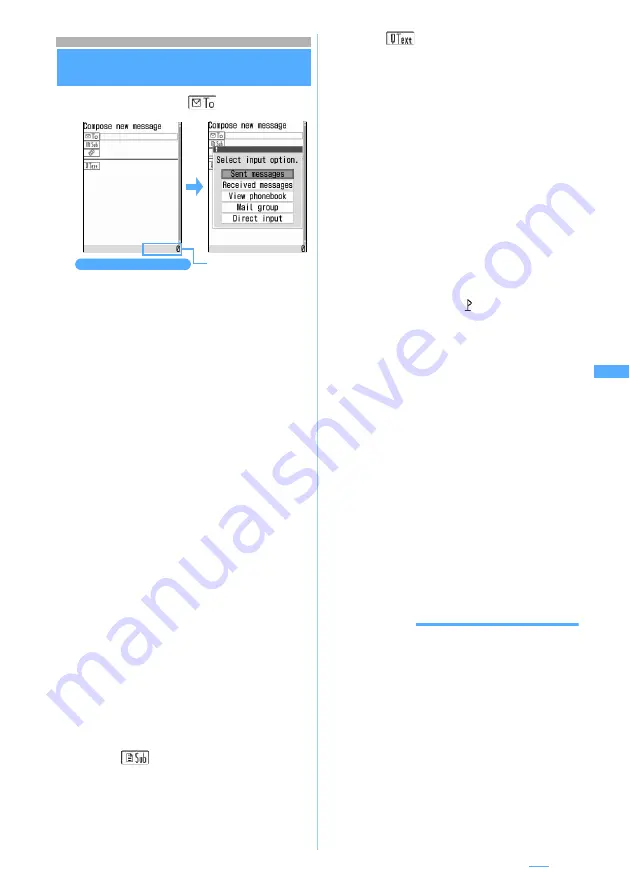
Compose Message
1
a2
z
Select
field
2
Select
Direct input
z
Enter the address
(up to 50 one-byte characters)
・
When sending mail to an i-mode terminal, you
may omit “@docomo.ne.jp” in the mail address.
・
In 5-touch Input Method, press
1
repeatedly
in the alphabet input mode to enter “ . ”, “@”,
“ - ”, etc. In addition, “.com”, “.ne.jp”, “.co.jp”,
etc. can be entered by pressing
(
repeatedly
in the alphabet input mode.
・
When the other party has registered a secret code,
enter the other party’s i-mode terminal phone
number followed by the 4-digit secret code.
■
Selecting from the sent message log:
Select
Sent messages
z
Select a log
・
The address of mail receiver is set.
■
Selecting from the received message log:
Select
Received messages
z
Select a log
・
The address of mail sender is set.
■
Searching the phonebook: Select
View
phonebook
z
Select a party
■
Using a mail group: Select
Mail group
z
Select a mail group
・
If the total of entered addresses exceeds 5,
the mail group cannot be added.
・
Highlight a mail group and press
m
to
check the mail group details.
3
Select
field
z
Enter the subject (up
to 30 one-byte or 15 two-byte characters)
4
Select
z
Enter the message (up to
10,000 one-byte or 5,000 two-byte characters)
・
Line feeds can be inserted in the message.
Press
#
to enter a line feed in 5-touch Input
Method (except for the one-byte/two-byte
numeric modes).
・
A space of one- or two-byte or a line feed is
also counted as a character in the message.
・
If Deco-mail pictogram (pictogram D) is inserted
in the message, it will become Deco-mail.
・
Text can be decorated.
☛
P218
■
Pasting URL of location information:
m55
・
Follow the procedure from Step 2 in “Adding
location information to the mail, phonebook
or Own Number”.
☛
P301
・
If URL of location information is pasted to
the mail message,
is added before the
URL of location information.
■
Inserting a signature:
m56
・
Signature must be registered beforehand.
5
Press
p
・
Pressing
o
on the connecting screen or
pressing
p
on the sending screen stops
sending and saves the i-mode Mail to the
Unsent messages
folder of
Unsent messages
.
Even when saved in the
Unsent messages
folder,
the i-mode Mail may be sent depending on the
operation timing.
・
When you are outside the service area and the
auto-send mails already saved is 4 or less,
a confirmation screen appears asking whether
to send mail automatically in the service area.
When you select
Yes
, the mail is saved as auto-
send mail in the
Unsent messages
folder of
Unsent messages
.
INFORMATION
●
When mail exceeding 10,000 bytes was automatically
saved due to start of other functions, part of the mail
being composed may not be saved.
●
Depending on signal conditions, characters may not be
displayed correctly at the receiver side.
●
When transmission is completed correctly, the i-mode
Mail is saved in the
Outbox
folder of
Outbox
. However,
when the sent mail matches the criteria specified in Sort
Criteria, it is saved in the specified folder. When the
memory is not enough, or the maximum number of saved
items is exceeded, the oldest sent mail is overwritten. Be
sure to protect sent mail you want to keep.
●
When transmission fails, an error message is displayed
and the i-mode Mail is saved in the
Unsent messages
folder of
Unsent messages
. You can edit and send i-mode
Mail from
Unsent messages
.
Mail composition screen
The number of total
bytes of the characters
and decoration data in
the message (1 two-byte
character is 2 bytes)
Next
▲


