10-5
Cisco Wireless LAN Controller Configuration Guide
OL-17037-01
Chapter 10 Managing User Accounts
Creating Guest User Accounts
Step 4
Perform one of the following:
•
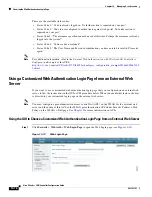
If you want to generate an automatic password for this guest user, check the
Generate
Password
check box. The generated password is entered automatically in the Password and Confirm Password
fields.
•
If you want to create a password for this guest user, leave the
Generate Password
check box
unchecked and enter a password in both the Password and Confirm Password fields.
Note
Passwords can contain up to 24 characters and are case sensitive.
Step 5
From the Lifetime drop-down boxes, choose the amount of time (in days, hours, minutes, and seconds)
that this guest user account is to remain active. A value of zero (0) for all four fields creates a permanent
account.
Default:
1 day
Range:
5 minutes to 30 days
Note
The smaller of this value or the session timeout for the guest WLAN, which is the WLAN on
which the guest account is created, takes precedence. For example, if a WLAN session timeout
is due to expire in 30 minutes but the guest account lifetime has 10 minutes remaining, the
account is deleted in 10 minutes upon guest account expiry. Similarly, if the WLAN session
timeout expires before the guest account lifetime, the client experiences a recurring session
timeout that requires reauthentication.
Note
You can change a guest user account with a non-zero lifetime to another lifetime value at any
time while the account is active. However, to make a guest user account permanent using the
controller GUI, you must delete the account and create it again. If desired, you can use the
config
netuser lifetime
user_name
0
CLI command to make a guest user account permanent without
deleting and recreating it.
Step 6
From the WLAN SSID drop-down box, choose the SSID that will be used by the guest user. The only
WLANs that are listed are those for which Layer 3 web authentication has been configured.
Note
Cisco recommends that the system administrator create a specific guest WLAN to prevent any
potential conflicts. If a guest account expires and it has a name conflict with an account on the
RADIUS server and both are on the same WLAN, the users associated with both accounts are
disassociated before the guest account is deleted.
Step 7
In the Description field, enter a description of the guest user account. You can enter up to 32 characters.
Step 8
Click
Apply
to commit your changes. The new guest user account appears in the list of guest users on
the Guest Users List page (see

