


9-19
Cisco Wireless LAN Controller Configuration Guide
OL-17037-01
Chapter 9 Managing Controller Software and Configurations
Transferring Files to and from a Controller
Uploading PACs
Protected access credentials (PACs) are credentials that are either automatically or manually provisioned
and used to perform mutual authentication with a local EAP authentication server during EAP-FAST
authentication. When manual PAC provisioning is enabled, the PAC file is manually generated on the
controller.
Note
See the
“Configuring Local EAP” section on page 5-38
for information on configuring local EAP.
Follow the instructions in this section to generate and load PACs from the controller through the GUI or
CLI. However, before you begin, make sure you have a TFTP or FTP server available for the PAC upload.
Keep these guidelines in mind when setting up a TFTP or FTP server:
•
If you are uploading through the service port, the TFTP or FTP server must be on the same subnet
as the service port because the service port is not routable, or you must create static routes on the
controller.
•
If you are uploading through the distribution system network port, the TFTP or FTP server can be
on the same or a different subnet because the distribution system port is routable.
•
A third-party TFTP or FTP server cannot run on the same computer as WCS because the WCS
built-in TFTP or FTP server and the third-party TFTP or FTP server require the same
communication port.
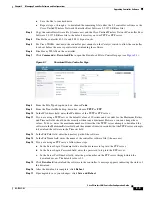
Using the GUI to Upload PACs
Follow these steps to upload a PAC from the controller using the controller GUI.
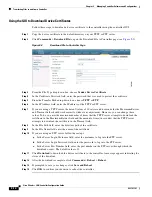
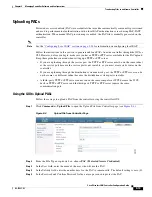
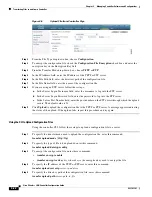
Step 1
Click
Commands
>
Upload File
to open the Upload File from Controller page (see
Figure 9-4
Upload File from Controller Page
Step 2
From the File Type drop-down box, choose
PAC (Protected Access Credential)
.
Step 3
In the User field, enter the name of the user who will use the PAC.
Step 4
In the Validity field, enter the number days for the PAC to remain valid. The default setting is zero (0).
Step 5
In the Password and Confirm Password fields, enter a password to protect the PAC.


