


8-28
Cisco Wireless LAN Controller Configuration Guide
OL-17037-01
Chapter 8 Controlling Mesh Access Points
Adding Mesh Access Points to the Mesh Network
•
Trunk mode—This mode requires the user to configure a native VLAN and an allowed VLAN list
(no defaults). In this mode, both tagged and untagged packets are accepted. Untagged packets are
always accepted and are tagged with the user specified native VLAN. Tagged packets are accepted
if they are tagged with a VLAN in the allowed VLAN list. For this mode to take effect, the global
VLAN mode should be non-VLAN transparent.
–
This option is used for bridging applications such as forwarding traffic between two MAPs
resident on separate buildings within a campus.
•
The switch port connected to the RAP must be a trunk.
–
The trunk port on the switch and the RAP trunk port must match.
•
A configured VLAN on a MAP Ethernet port cannot function as a Management VLAN.
•
The RAP must always connect to the native VLAN (ID 1) on a switch.
–
The RAP’s primary Ethernet interface is by default the native VLAN of 1.
Note
You cannot bridge VLAN ID 1 when using VLAN-Opaque Ethernet bridging because VLAN 1
is the internal native VLAN within a mesh network. This setting cannot be changed.
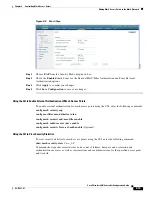
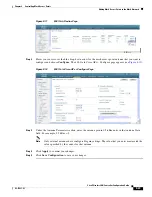
Using the GUI to Enable Ethernet Bridging and VLAN Tagging
Using the controller GUI, follow these steps to enable Ethernet bridging on a RAP or MAP.
Step 1
Click
Wireless
>
Access Points
>
All APs
to open the All APs page.
Step 2
Click the name of the access point for which you want to enable Ethernet bridging.
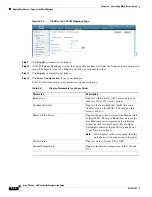
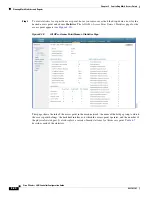
Step 3
Click the
Mesh
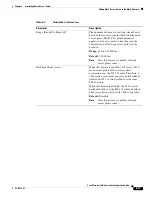
tab to open the All APs > Details for (Mesh) page (see
Figure 8-15
All APs > Details for (Mesh) Page


