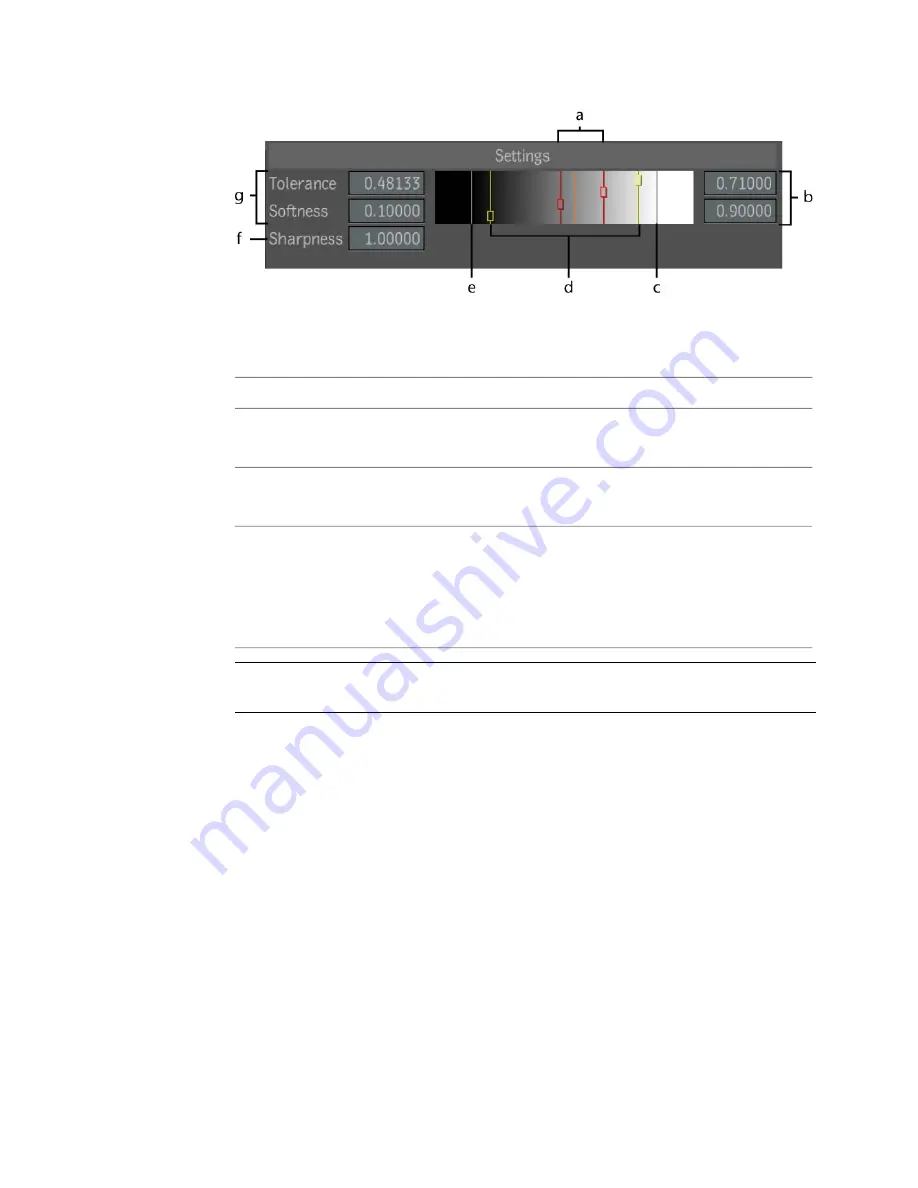
(a) Tolerance sliders (b) Tolerance and Softness value fields (white range) (c) 1.0 white
indicator (d) Softness sliders (e) 0.0 black indicator (f) Sharpness value field
(g) Tolerance and Softness value fields (black range)
To:
Use:
Change the tolerance's luma range (drag the cursor or enter a value in
the Tolerance value field).
Tolerance
Change the luma range of the softness (drag the cursor or enter a value
in the Softness value field).
Softness
Change the sharpness of a key. Sharpness filters the softness range in-
dependently of the pixel sampled from the key-in composition. There-
Sharpness
fore, the softness range is filtered according to its luma values in the
generated matte. Increasing sharpness reduces softness, decreasing
sharpness increases softness.
NOTE
Tolerance, Softness and Sharpness are animatable attributes—see
Marking
Attributes for Keyframing
on page 674.
Creating a Difference Matte Using the
Difference Tool
The Difference tool lets you generate a matte image from two source images
with the same background, but different foreground elements. This allows
you to remove an image from one context and add it to another. You can
even generate a composite image while creating the difference matte.
When you generate a difference matte, the difference between corresponding
pixels of the two source images is calculated. The value of the pixel in the
back image is subtracted from the value of the corresponding pixel in the
front image, and the resulting value is used in the difference matte.
Creating a Difference Matte Using the Difference Tool | 517
Содержание 495B1-05A111-1301 - 3ds Max Design 2010
Страница 1: ...Composite User Guide ...
Страница 16: ...4 ...
Страница 18: ...6 ...
Страница 88: ...76 ...
Страница 92: ...6 A new composition has been created 80 Chapter 4 Start Compositing Now ...
Страница 101: ...8 The Render dialog appears Click the Start button to start the rendering process To Render the Composition 89 ...
Страница 102: ...90 ...
Страница 122: ...110 ...
Страница 126: ...114 ...
Страница 186: ...174 Chapter 9 Getting Familiar with Your Workspace ...
Страница 195: ...UdaTextField XML Resource Files 183 ...
Страница 196: ...UdaValueEditor UdaMenu 184 Chapter 9 Getting Familiar with Your Workspace ...
Страница 197: ...UdaPushedToggle XML Resource Files 185 ...
Страница 198: ...UDA Declaration 186 Chapter 9 Getting Familiar with Your Workspace ...
Страница 200: ...188 ...
Страница 250: ...238 ...
Страница 309: ...The stereo rig is ready to use You can adjust left and right eye convergence Setting up a Stereo Camera Rig 297 ...
Страница 310: ...298 ...
Страница 348: ...336 ...
Страница 399: ...About Blurs 387 ...
Страница 411: ...Output Controls The Output UI allows you to control the following parameters About Blurs 399 ...
Страница 450: ...438 ...
Страница 478: ...466 ...
Страница 520: ...508 ...
Страница 548: ...536 ...
Страница 578: ...566 ...
Страница 596: ...The last step is to add the sun s reflection to the water 584 Chapter 24 Raster Paint ...
Страница 606: ...594 ...
Страница 670: ...658 ...
Страница 710: ... a Tool time cursor b Global time frame markers 698 Chapter 28 Time Tools ...
Страница 722: ...710 ...
Страница 729: ...Backward vectors Forward and backward vectors The Show Vectors tool has the following parameters Show Vectors 717 ...
Страница 805: ...8 Add any correction using the Translation Rotation Scale parameters Simultaneous Stabilizing and Tracking 793 ...
Страница 806: ...794 ...
Страница 828: ...816 ...
Страница 870: ...858 ...
Страница 888: ...876 ...
Страница 898: ...886 ...


