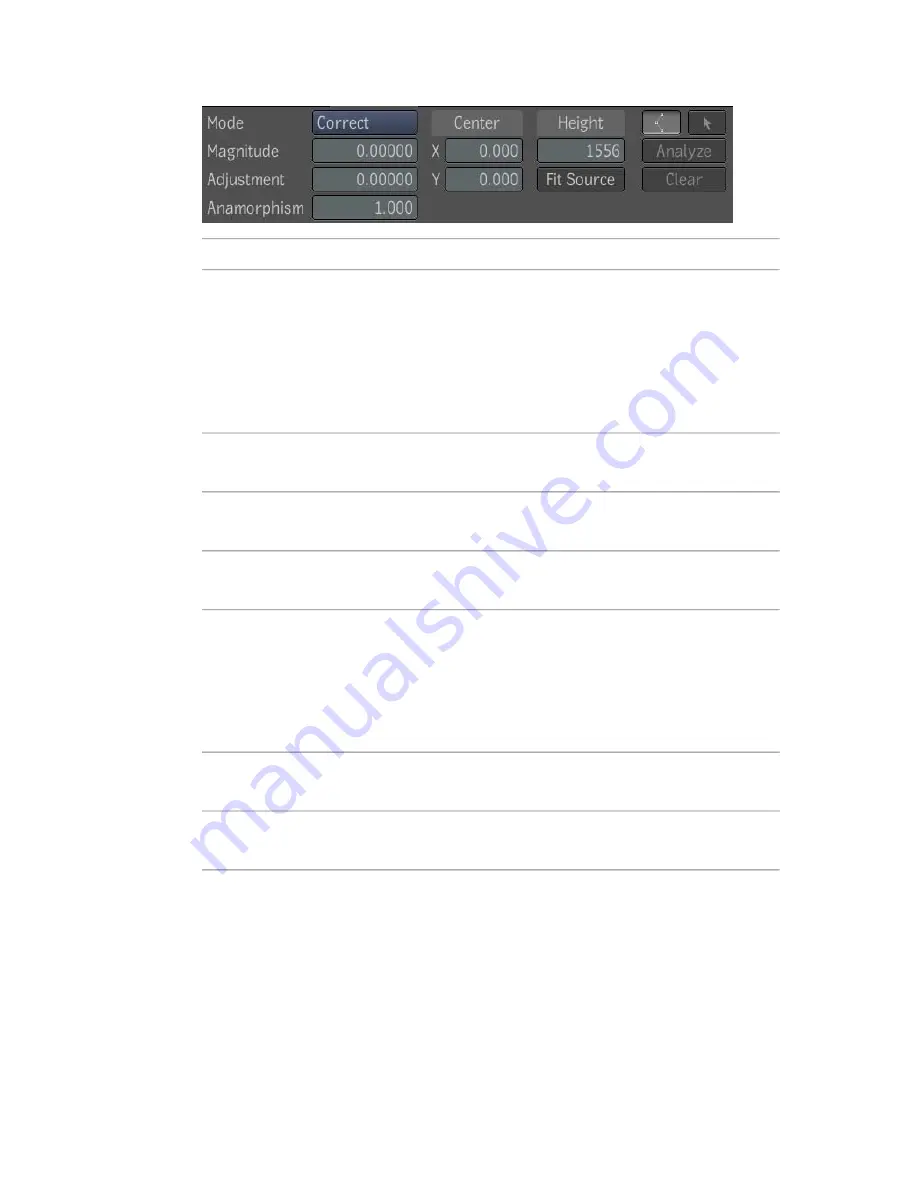
To:
Use:
Select either lens correction or distortion. This affects all other
parameters. The other parameters will be considered either in a
Mode
distortion or in a correction work flow. The distortion transforma-
tion is exactly the inverse of the correction, so keeping the same
parameters and putting back to back distortion plus rectification
will give back the original result, but filtered twice at each trans-
formation resulting in possible degradation in image quality.
Set the first parameter (k1) of the lens distortion equation: rd = r
+ k1 * r^3 + k2 * r^5.
Magnitude
Set the second parameter (k2) of the lens distortion equation: rd
= r + k1 * r^3 + k2 * r^5.
Adjustment
Characterize anamorphic asymmetry. Note that this has nothing
to do with the pixel aspect ratio of the captured image.
Anamorphism
Set the X and Y coordinates of the center of the distortion. Those
parameters are expressed in pixels. The lens center can also be
Center
changed by clicking directly in the player. The center manipulator
is always active in the player. The look of the manipulator is a
cross. The cross can be manipulated by selecting it and moving
it.
To determine the region where the lens distortion or correction
is applied. This parameter is initialized to the composition height.
Height
To set the height input to the input height.This parameter is
needed to be able to perfectly inverse a lens correction.
Fit Source
Expected Workflows
The following are common use cases for lens distortion or correction:
■
Footage to be used as a background layer has noticeable lens distortion
and footage to be composited over the background does not. The Lens
488 | Chapter 19 Warping
Содержание 495B1-05A111-1301 - 3ds Max Design 2010
Страница 1: ...Composite User Guide ...
Страница 16: ...4 ...
Страница 18: ...6 ...
Страница 88: ...76 ...
Страница 92: ...6 A new composition has been created 80 Chapter 4 Start Compositing Now ...
Страница 101: ...8 The Render dialog appears Click the Start button to start the rendering process To Render the Composition 89 ...
Страница 102: ...90 ...
Страница 122: ...110 ...
Страница 126: ...114 ...
Страница 186: ...174 Chapter 9 Getting Familiar with Your Workspace ...
Страница 195: ...UdaTextField XML Resource Files 183 ...
Страница 196: ...UdaValueEditor UdaMenu 184 Chapter 9 Getting Familiar with Your Workspace ...
Страница 197: ...UdaPushedToggle XML Resource Files 185 ...
Страница 198: ...UDA Declaration 186 Chapter 9 Getting Familiar with Your Workspace ...
Страница 200: ...188 ...
Страница 250: ...238 ...
Страница 309: ...The stereo rig is ready to use You can adjust left and right eye convergence Setting up a Stereo Camera Rig 297 ...
Страница 310: ...298 ...
Страница 348: ...336 ...
Страница 399: ...About Blurs 387 ...
Страница 411: ...Output Controls The Output UI allows you to control the following parameters About Blurs 399 ...
Страница 450: ...438 ...
Страница 478: ...466 ...
Страница 520: ...508 ...
Страница 548: ...536 ...
Страница 578: ...566 ...
Страница 596: ...The last step is to add the sun s reflection to the water 584 Chapter 24 Raster Paint ...
Страница 606: ...594 ...
Страница 670: ...658 ...
Страница 710: ... a Tool time cursor b Global time frame markers 698 Chapter 28 Time Tools ...
Страница 722: ...710 ...
Страница 729: ...Backward vectors Forward and backward vectors The Show Vectors tool has the following parameters Show Vectors 717 ...
Страница 805: ...8 Add any correction using the Translation Rotation Scale parameters Simultaneous Stabilizing and Tracking 793 ...
Страница 806: ...794 ...
Страница 828: ...816 ...
Страница 870: ...858 ...
Страница 888: ...876 ...
Страница 898: ...886 ...


