


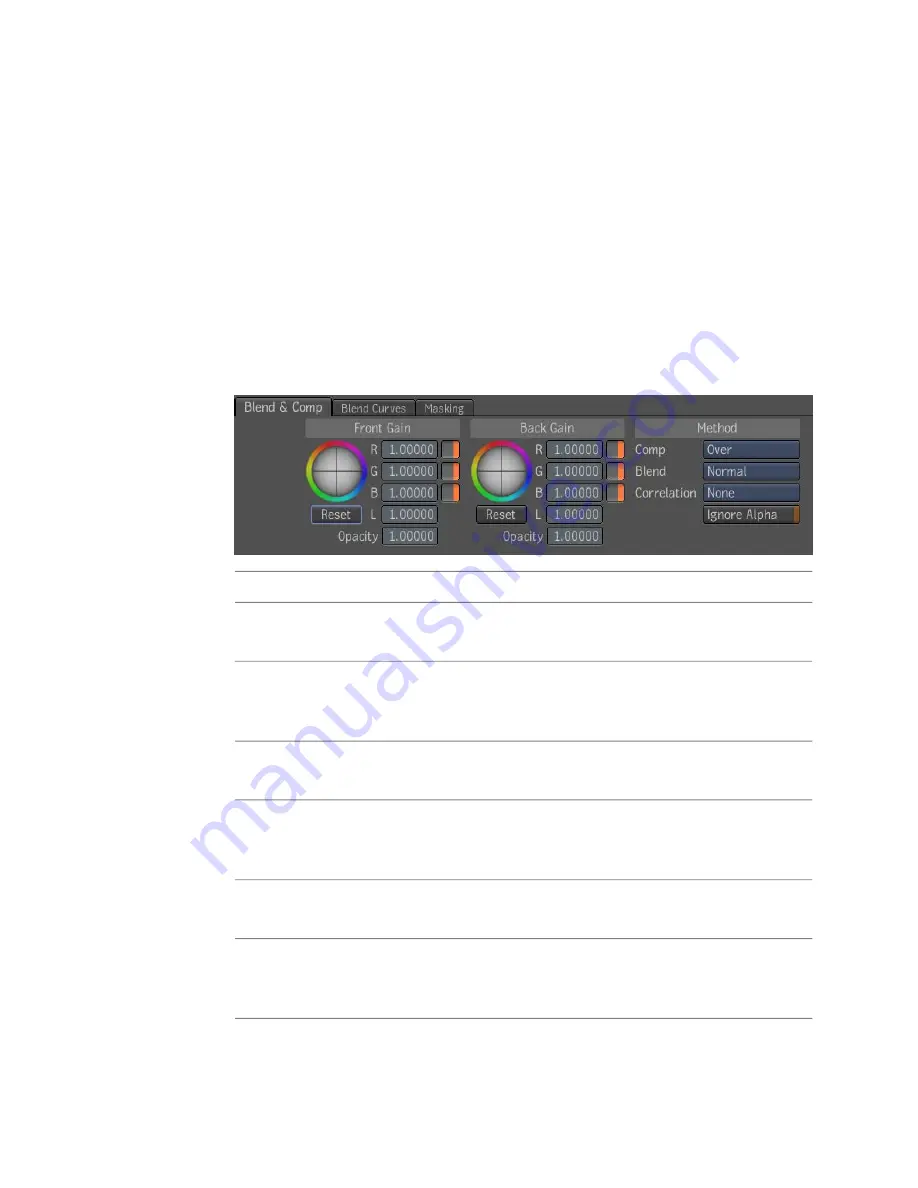
Blend & Comp
The Blend & Comp tool is used to composite front and back RGBA images.
While most compositing tools composite a front layer over an opaque
background under the direction of a matte image, this tool offers full support
for RGBA images, both for the front and back inputs, and computes an RGBA
result.
You can specify a compositing operator to control the shape of your output
and a blend mode to determine how the front and back are combined in the
areas where they overlap.
The Blend & Comp tool is in the Composition folder in the Tools tab, and
has the following parameters:
To:
Use:
Multiply the front by a color factor prior to using it in the blend. The
default is 100%; the range is [0,10].
Front Gain
Control the opacity of the front in the compositing. If the opacity is less
than one, the front will be more transparent and you will start seeing
the back through it. The default is 100%; the range is [0,1].
Front Opa-
city
Multiply the back by a color factor prior to using it in the blend. The
default is 100%; the range is [0,10].
Back Gain
Control the opacity of the back in the compositing. If the opacity is less
than one, the front will be more transparent and you will start seeing
the back through it. The default is 100%; the range is [0,1].
Back Opacity
Determine which compositing mode will be used (the default is
Over)—see
Compositing Operators
on page 352.
Comp
Determine which blend mode will be used (the default is Normal). Click
the Blend button to view other available modes—see
Blend Modes
on
page 345.
Blend
Blend & Comp | 367
Содержание 495B1-05A111-1301 - 3ds Max Design 2010
Страница 1: ...Composite User Guide ...
Страница 16: ...4 ...
Страница 18: ...6 ...
Страница 88: ...76 ...
Страница 92: ...6 A new composition has been created 80 Chapter 4 Start Compositing Now ...
Страница 101: ...8 The Render dialog appears Click the Start button to start the rendering process To Render the Composition 89 ...
Страница 102: ...90 ...
Страница 122: ...110 ...
Страница 126: ...114 ...
Страница 186: ...174 Chapter 9 Getting Familiar with Your Workspace ...
Страница 195: ...UdaTextField XML Resource Files 183 ...
Страница 196: ...UdaValueEditor UdaMenu 184 Chapter 9 Getting Familiar with Your Workspace ...
Страница 197: ...UdaPushedToggle XML Resource Files 185 ...
Страница 198: ...UDA Declaration 186 Chapter 9 Getting Familiar with Your Workspace ...
Страница 200: ...188 ...
Страница 250: ...238 ...
Страница 309: ...The stereo rig is ready to use You can adjust left and right eye convergence Setting up a Stereo Camera Rig 297 ...
Страница 310: ...298 ...
Страница 348: ...336 ...
Страница 399: ...About Blurs 387 ...
Страница 411: ...Output Controls The Output UI allows you to control the following parameters About Blurs 399 ...
Страница 450: ...438 ...
Страница 478: ...466 ...
Страница 520: ...508 ...
Страница 548: ...536 ...
Страница 578: ...566 ...
Страница 596: ...The last step is to add the sun s reflection to the water 584 Chapter 24 Raster Paint ...
Страница 606: ...594 ...
Страница 670: ...658 ...
Страница 710: ... a Tool time cursor b Global time frame markers 698 Chapter 28 Time Tools ...
Страница 722: ...710 ...
Страница 729: ...Backward vectors Forward and backward vectors The Show Vectors tool has the following parameters Show Vectors 717 ...
Страница 805: ...8 Add any correction using the Translation Rotation Scale parameters Simultaneous Stabilizing and Tracking 793 ...
Страница 806: ...794 ...
Страница 828: ...816 ...
Страница 870: ...858 ...
Страница 888: ...876 ...
Страница 898: ...886 ...


