


To:
Select:
Change the width and height of the crop box. You can either type
the dimensions into the respective Width and Height attribute value
Width and
Height
fields, or you can grab the edges of the crop box with the cursor and
resize.
Fit the crop box to the source image.
Fit To Source
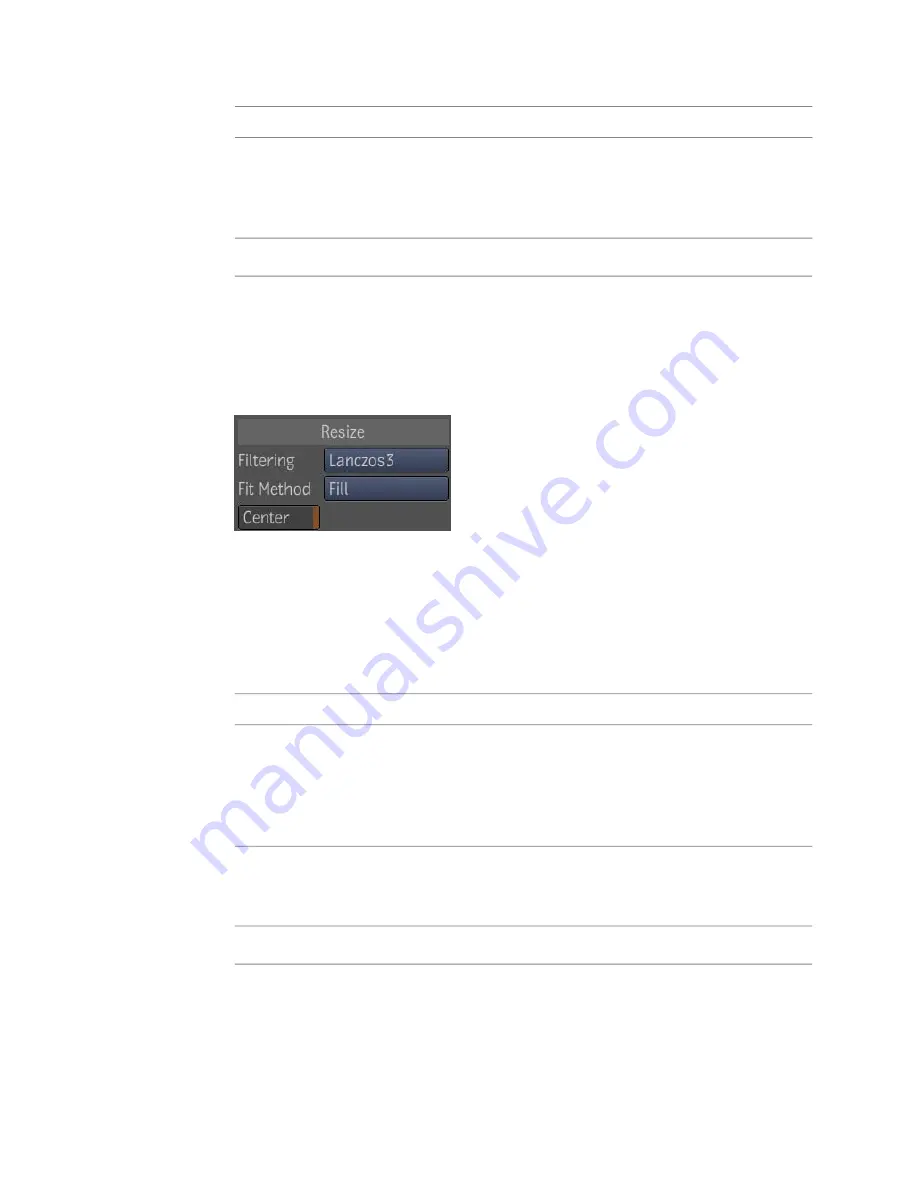
Resize Area
Use the Resize area settings to define the destination format into which the
source sample is fit.
The Resize area has the following parameters:
Pictures often appear fuzzy when scaled to a different size. The fuzziness of
an image is controlled by two processes: resampling and filtering.
The filtering processes attempt to smooth the transformed pixels. When an
image is being resampled to a different resolution, the old pixel map needs
to be interpolated to a new one. This requires some form of image interpolation
and a number of interpolation methods can be used.
To:
Use:
Select a filter type. You can choose from; Box, Triangle, Bell, B-spline,
Lanczos3, or Mitchell. These filters range in quality from the Box filter
Filtering
being of the lowest (unsuitable for further processing, but with the least
amount of processing time), to the Mitchell filter producing the best
possible results.
Select a fit method. You can choose: Fill, Crop, Letterbox, or Crop Edges.
If you select Letterbox or Crop Edges, you can also select or deselect
the Keep Aspect parameter.
Fit Methods
Select to center the destination resolution.
Center
Resize Tool | 417
Содержание 495B1-05A111-1301 - 3ds Max Design 2010
Страница 1: ...Composite User Guide ...
Страница 16: ...4 ...
Страница 18: ...6 ...
Страница 88: ...76 ...
Страница 92: ...6 A new composition has been created 80 Chapter 4 Start Compositing Now ...
Страница 101: ...8 The Render dialog appears Click the Start button to start the rendering process To Render the Composition 89 ...
Страница 102: ...90 ...
Страница 122: ...110 ...
Страница 126: ...114 ...
Страница 186: ...174 Chapter 9 Getting Familiar with Your Workspace ...
Страница 195: ...UdaTextField XML Resource Files 183 ...
Страница 196: ...UdaValueEditor UdaMenu 184 Chapter 9 Getting Familiar with Your Workspace ...
Страница 197: ...UdaPushedToggle XML Resource Files 185 ...
Страница 198: ...UDA Declaration 186 Chapter 9 Getting Familiar with Your Workspace ...
Страница 200: ...188 ...
Страница 250: ...238 ...
Страница 309: ...The stereo rig is ready to use You can adjust left and right eye convergence Setting up a Stereo Camera Rig 297 ...
Страница 310: ...298 ...
Страница 348: ...336 ...
Страница 399: ...About Blurs 387 ...
Страница 411: ...Output Controls The Output UI allows you to control the following parameters About Blurs 399 ...
Страница 450: ...438 ...
Страница 478: ...466 ...
Страница 520: ...508 ...
Страница 548: ...536 ...
Страница 578: ...566 ...
Страница 596: ...The last step is to add the sun s reflection to the water 584 Chapter 24 Raster Paint ...
Страница 606: ...594 ...
Страница 670: ...658 ...
Страница 710: ... a Tool time cursor b Global time frame markers 698 Chapter 28 Time Tools ...
Страница 722: ...710 ...
Страница 729: ...Backward vectors Forward and backward vectors The Show Vectors tool has the following parameters Show Vectors 717 ...
Страница 805: ...8 Add any correction using the Translation Rotation Scale parameters Simultaneous Stabilizing and Tracking 793 ...
Страница 806: ...794 ...
Страница 828: ...816 ...
Страница 870: ...858 ...
Страница 888: ...876 ...
Страница 898: ...886 ...


