USO
RESTRITO
130
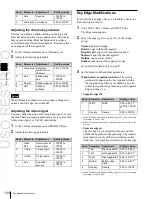
Key Setting Operations Using Menus
Knob
Parameter
Adjustment
Setting values
1
Size
Pattern size
0.00 to 100.00
2
Soft
Softness of the
edge of the
pattern
0.00 to 100.00
Knob
Parameter
Adjustment
Setting values
1
Luminance Luminance
0.00 to 100.00
2
Saturation Saturation
0.00 to 100.00
3
Hue
Hue
359.99 to 0.00
Ch
a
p
te
r 4
K
e
y
s
Carrying out a color mix for key fill
When [Matte] is selected for key fill, you can combine
color 1 and color 2. For the combination, you can use not
only a key wipe generator pattern, but also the dedicated
pattern for key edge color mix.
1
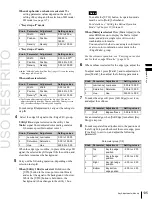
In the <Key Fill> group of the Type menu, select
[Matte] and press [Matte Adjust].
The Matte Adjust menu appears.
2
Select [Mix Color] in the <Fill Matte> group.
3
Adjust the following parameters.
4
Select the combining pattern in the <Mix Pattern>
group.
Key Wipe:
The wipe pattern selected for an
independent key transition is used for
combination. You can change this pattern by
pressing [Pattern Select] to open the menu for key
wipe pattern selection (Pattern Select menu), and
make adjustments by pressing [Pattern Adjust] to
open the menu for pattern adjustment (Wipe
Adjust menu).
Key Edge Pattern:
Combine using the dedicated
pattern selected for the color mix in the key edge
fill. You can change this pattern by pressing
[Pattern Select] to open the menu for edge color
mix dedicated wipe pattern selection (Mix Pattern
Select menu), and make adjustments by pressing
[Pattern Adjust] to open the menu for pattern
adjustment (Matte Adjust menu).
For details, see “Carrying out a color mix for the
key edge fill matte” (page 136).
5
In the Type menu, adjust color 1 and color 2.
To adjust color 1, select [Color1], and to adjust color
2, select [Color2], then adjust the following
parameters.
6
To interchange color 1 and color 2, press [Color
Invert], turning it on.
Chroma Key Composition and Basic
Settings
In creating a chroma key image, either a normal mix or an
additive mix can be used. To select which, use the Type
>Chroma Adjust menu for the keyer.
Normal mix:
The foreground is cut out with the key
signal, and then combined with the background, which
has also been cut out with the key signal.
Additive mix:
The background, which has been cut out
with the key signal, is combined with the unshaped
foreground. This is effective for a natural-looking
composite when the scene includes glass or other
translucent objects.
Plane function
In an additive mix, the foreground is not shaped by the key
signal, and variations in the (blue) background appear in
the composite image. To prevent this, it is possible to set a
particular luminance level for the background, and any
parts below this level are cut forcibly.
Composing an image by chroma keying
1
In the M/E-1 >Key1 menu, select HF1 ‘Type.’
2
Select [Chroma] in the <Key Type> group.
It becomes possible to adjust the key density
.
3
Select [Chroma Adjust].
The Chroma Adjust menu appears.
4
Carry out auto chroma key adjustments.
Also carry out manual adjustments if necessary to
obtain an optimum chroma key image.
5
In the <Mix Mode> group, select [Normal Mix] or
[Additive Mix] depending on the desired type of
chroma key composition.
When using an additive mix for chroma keying, the
(typically blue) background parts of the foreground video
must be converted to black. For this, use the color cancel
function
Using the plane function
In an additive mix, since no key is applied to the
foreground, any variations in the (typically blue)
background may appear in the composite image. To avoid
this, a particular luminance level can be set for the (blue)
background, and regions of lower luminance forcibly cut.
1
In the Chroma Adjust menu, set [Plane] on.
Summary of Contents for MVS-8000X SystemMVS-7000X System
Page 358: ...USO RESTRITO 358 Wipe Pattern List Appendix Volume 1 Enhanced Wipes Rotary Wipes ...
Page 360: ...USO RESTRITO Random Diamond DustWipes 360 1 w pe PaternLO ...
Page 362: ...USO RESTRITO 362 DME Wipe Pattern List Appendix Volume 1 Door 2D trans 3D trans ...
Page 364: ...USO RESTRITO 364 DME Wipe Pattern List Appendix Volume 1 Page turn Page roll ...
Page 377: ...USO RESTRITO Menu Tree 377 Appendix Volume 1 AUX Menu AUX button CCR Menu CCR button ...
Page 379: ...USO RESTRITO Menu Tree 379 Appendix Volume 1 DME Menu DME button ...
Page 381: ...USO RESTRITO Menu Tree 381 Appendix Volume 1 Macro Menu MCRO button ...
Page 382: ...USO RESTRITO 382 Menu Tree Appendix Volume 1 Key Frame Menu KEY FRAME button ...
Page 383: ...USO RESTRITO Menu Tree 383 Appendix Volume 1 Effect Menu EFF button ...
Page 384: ...USO RESTRITO 384 Menu Tree Appendix Volume 1 Snapshot Menu SNAPSHOT button ...
Page 385: ...USO RESTRITO Menu Tree 385 Appendix Volume 1 Shotbox Menu SHOTBOX button ...
Page 386: ...USO RESTRITO 386 Menu Tree Appendix Volume 1 File Menu FILE button ...
Page 391: ...USO RESTRITO Menu Tree 391 Appendix Volume 1 ENG SETUP button to previous pages ...
Page 413: ...USO RESTRITO MVS 8000X System MVS 7000X System SY 4 470 637 01 1 Sony Corporation 2013 ...
Page 706: ...USO RESTRITO MVS 8000X System MVS 7000X System SY 4 470 637 01 1 Sony Corporation 2013 ...


