USO
RESTRITO
256
Multi Program 2
Ch
a
p
te
r 10
S
p
e
c
ia
l Fun
c
ti
o
n
s
For details, see “Assigning Functions to User Preference
Buttons” or “Assigning a Function to a Memory Recall
Button in the Utility/Shotbox Control Block” in
Chapter 19 (Volume 2).
Examples of Operations in the Multi
Program 2 Mode (When Sharing a
Switcher Bank)
To create video on the M/E or PGM/PST bank assigned to
both main and sub operations, use the following procedure.
1
Press the [MAIN] button, turning it on, and turning off
the [SUB] button.
2
With the normal operations, create the main video.
3
Press the [SUB] button, turning it on, and turning off
the [MAIN] button.
Now you can create the sub video.
4
Create the sub video.
The basic method of operation is the same as for the
main video, except that the utility 2 bus signal is
assigned to background A, and the utility 3 bus signal
is assigned to background B.
For sub, only keys 2 to 8 can be used, and for wipes,
standard wipe patterns only. There are also other
differences in operation from standard mode.
For details, see “Differences between Multi Program
2 Mode and Standard Mode” (page 259) and
“Restrictions on Using Multi Program 2 Mode” (page
259).
5
Press the [MAIN] and [SUB] buttons simultaneously,
turning them on.
If both buttons are lit, the control panel shows the
status of main.
6
Carry out the transition.
Both main and sub video images are switched.
Optional Operations
Making separate main and sub
assignments for buttons in the transition
control block
If you are using two switcher M/E banks dedicated to main
and sub for Multi Program 2 operations, you can make
separate transition control block button assignments for
main and sub.
Notes
When using one M/E bank as “Main&Sub”, separate
settings are not possible.
The following example describes the operation for the left
part (Transition Module1 menu), but operations in the
Transition Module2 and Transition Module3 menus are
similar.
1
In the Engineering Setup >Panel >Config menu, press
[Link/Program Button].
The Link/Program Button menu appears.
2
Press [Transition Module1].
The Transition Module1 menu appears.
3
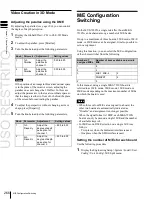
Press [Main] in the <Bank Select> group.
4
Select the bank of the transition control block you
want to set.
Here, by way of example, press [M/E-1 Main].
The current assignment of the buttons appears in the
screen.
5
Set the assignment for main.
For details of settings, see “Setting Transition Control
Block Button Assignments” in Chapter 19 (Volume 2).
6
Press [Sub], and set the assignment for sub.
This makes separate assignments for main and sub.
Making cross-point settings
Cross-point assign tables can be set not only for main
output but also for sub output.
You can set cross-point assign tables for the following
banks.
M/E-1 SUB to M/E-5 SUB
P/P SUB
The table actually used is that for which the control panel
delegation button is lit.
Summary of Contents for MVS-8000X SystemMVS-7000X System
Page 358: ...USO RESTRITO 358 Wipe Pattern List Appendix Volume 1 Enhanced Wipes Rotary Wipes ...
Page 360: ...USO RESTRITO Random Diamond DustWipes 360 1 w pe PaternLO ...
Page 362: ...USO RESTRITO 362 DME Wipe Pattern List Appendix Volume 1 Door 2D trans 3D trans ...
Page 364: ...USO RESTRITO 364 DME Wipe Pattern List Appendix Volume 1 Page turn Page roll ...
Page 377: ...USO RESTRITO Menu Tree 377 Appendix Volume 1 AUX Menu AUX button CCR Menu CCR button ...
Page 379: ...USO RESTRITO Menu Tree 379 Appendix Volume 1 DME Menu DME button ...
Page 381: ...USO RESTRITO Menu Tree 381 Appendix Volume 1 Macro Menu MCRO button ...
Page 382: ...USO RESTRITO 382 Menu Tree Appendix Volume 1 Key Frame Menu KEY FRAME button ...
Page 383: ...USO RESTRITO Menu Tree 383 Appendix Volume 1 Effect Menu EFF button ...
Page 384: ...USO RESTRITO 384 Menu Tree Appendix Volume 1 Snapshot Menu SNAPSHOT button ...
Page 385: ...USO RESTRITO Menu Tree 385 Appendix Volume 1 Shotbox Menu SHOTBOX button ...
Page 386: ...USO RESTRITO 386 Menu Tree Appendix Volume 1 File Menu FILE button ...
Page 391: ...USO RESTRITO Menu Tree 391 Appendix Volume 1 ENG SETUP button to previous pages ...
Page 413: ...USO RESTRITO MVS 8000X System MVS 7000X System SY 4 470 637 01 1 Sony Corporation 2013 ...
Page 706: ...USO RESTRITO MVS 8000X System MVS 7000X System SY 4 470 637 01 1 Sony Corporation 2013 ...


