


15
CHANGING THE DISPLAY OF ONE-TOUCH KEYS IN
THE ADDRESS BOOK SCREEN
You can show destinations of only a specific transmission mode in the address book screen, or change the displayed
index tabs from the alphabetical tabs to the custom tabs. The procedure for selecting destinations does not change.
• Icons appear in the one-touch keys in the address book to indicate which mode is used for transmission.
☞
RETRIEVING A DESTINATION FROM THE ADDRESS BOOK
• For information on storing addresses in the address book, see "
STORING DESTINATION ADDRESSES FOR EACH
" (page 9).
• To store destinations for Scan to Desktop, Network Scanner Tool must be installed from the CD-ROM that accompanies
the machine. For more information on storing destinations for Scan to Desktop, see "
•
System Settings: Address Book
This is used to store Scan to E-mail and Internet fax addresses in one-touch keys.
•
System Settings (Administrator): The Number of Direct Address Keys Displayed Setting
This is used to change the default setting for the number of one-touch keys displayed in the address book screen.
•
System Settings (Administrator): Bcc Setting
This setting enables or disables Bcc delivery. When enabled, the [Bcc] key appears in the address book screen.
•
System Settings (Administrator): Default Display Settings
One of the following screens can be selected for the initial screen that appears when the [IMAGE SEND] key is touched.
• Base screen of each mode (scan, Internet fax, fax, or data entry mode)
• Address book screen (alphabetical/custom index)
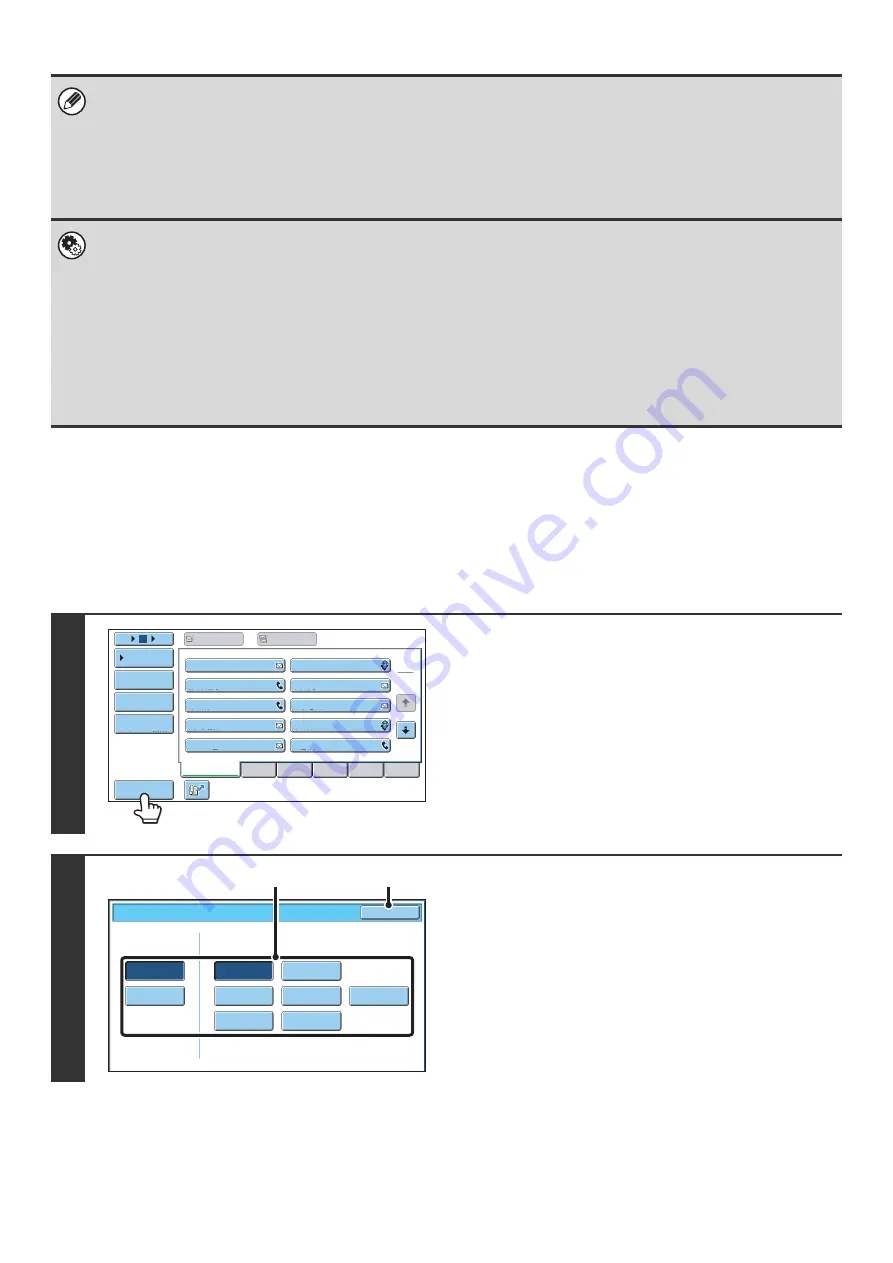
1
Touch the [Sort Address] key.
2
Change the display mode.
(1) Touch the key of the mode or tab that you
wish to display.
• To show only the one-touch keys of a particular send
mode, touch the desired mode key under "Address
Type".
• To change the index tabs to the custom indexes, touch
the [User] key under "Tab Switch".
(2) Touch the [OK] key.
III III
GGG GGG
EEE EEE
CCC CCC
AAA AAA
JJJ JJJ
HHH HHH
FFF FFF
DDD DDD
BBB BBB
ABCD
Frequent Use
EFGHI
JKLMN
OPQRST
UVWXYZ
1
2
5
15
10
Global
Address Search
Address Entry
Sort Address
Address Review
Condition
Settings
To
Cc
Sort Address
OK
Group
FTP/Desktop
Network Folder
Fax
All
ABC
User
Address Type
Tab Switch
Internet Fax
(1)
(2)
Summary of Contents for MX 5500N - Color Laser - Copier
Page 1: ...User s Guide MX 5500N MX 6200N MX 7000N MODEL ...
Page 2: ...System Settings Guide MX 5500N MX 6200N MX 7000N MODEL ...
Page 108: ...MX7000 US SYS Z2 System Settings Guide MX 5500N MX 6200N MX 7000N MODEL ...
Page 109: ...Document Filing Guide MX 5500N MX 6200N MX 7000N MODEL ...
Page 157: ...MX7000 US FIL Z2 Document Filing Guide MX 5500N MX 6200N MX 7000N MODEL ...
Page 158: ...Scanner Guide MX 5500N MX 6200N MX 7000N MODEL ...
Page 279: ...MX7000 US SCN Z2 Scanner Guide MX 5500N MX 6200N MX 7000N MODEL ...
Page 280: ...Printer Guide MX 5500N MX 6200N MX 7000N MODEL ...
Page 351: ...MX7000 US PRT Z2 Printer Guide MX 5500N MX 6200N MX 7000N MODEL ...
Page 352: ...Copier Guide MX 5500N MX 6200N MX 7000N MODEL ...
Page 499: ...MX7000 US CPY Z2 Copier Guide MX 5500N MX 6200N MX 7000N MODEL ...
Page 576: ...MX7000 US USR Z2 User s Guide MX 5500N MX 6200N MX 7000N MODEL ...