


12
(7)
Customized keys
The keys that appear here can be changed to show
settings or functions that you prefer.
☞
(8)
key
Touch this key to specify a destination using a search
number
*
.
* 3-digit number assigned to a destination when it is
stored.
☞
USING A SEARCH NUMBER TO RETRIEVE A
DESTINATION
(9)
[Resend] key/[Next Address] key
The destinations of the most recent 8 transmissions by
Scan to E-mail, fax and/or Internet fax are stored. Touch
this key to select one of these destinations. After a
destination is selected, this key changes to the [Next
Address] key.
☞
(page 27)
(10) Image settings
Image settings (original size, exposure, resolution, file
format, and color mode) can be selected.
☞
(11)
key
This key appears when a special mode or 2-sided
scanning is selected. Touch the key to display the
selected special modes.
☞
Checking what special modes are selected
(12) [Special Modes] key
Touch this key to use a special mode.
☞
(page 70)
(13) [File Name] key
Touch this key to enter a file name when storing a file to
USB memory.
☞
(page 41)
(14) [I-Fax Manual Reception] key
Touch this key to receive an Internet fax manually.
☞
MANUALLY RECEIVING INTERNET FAXES
(page
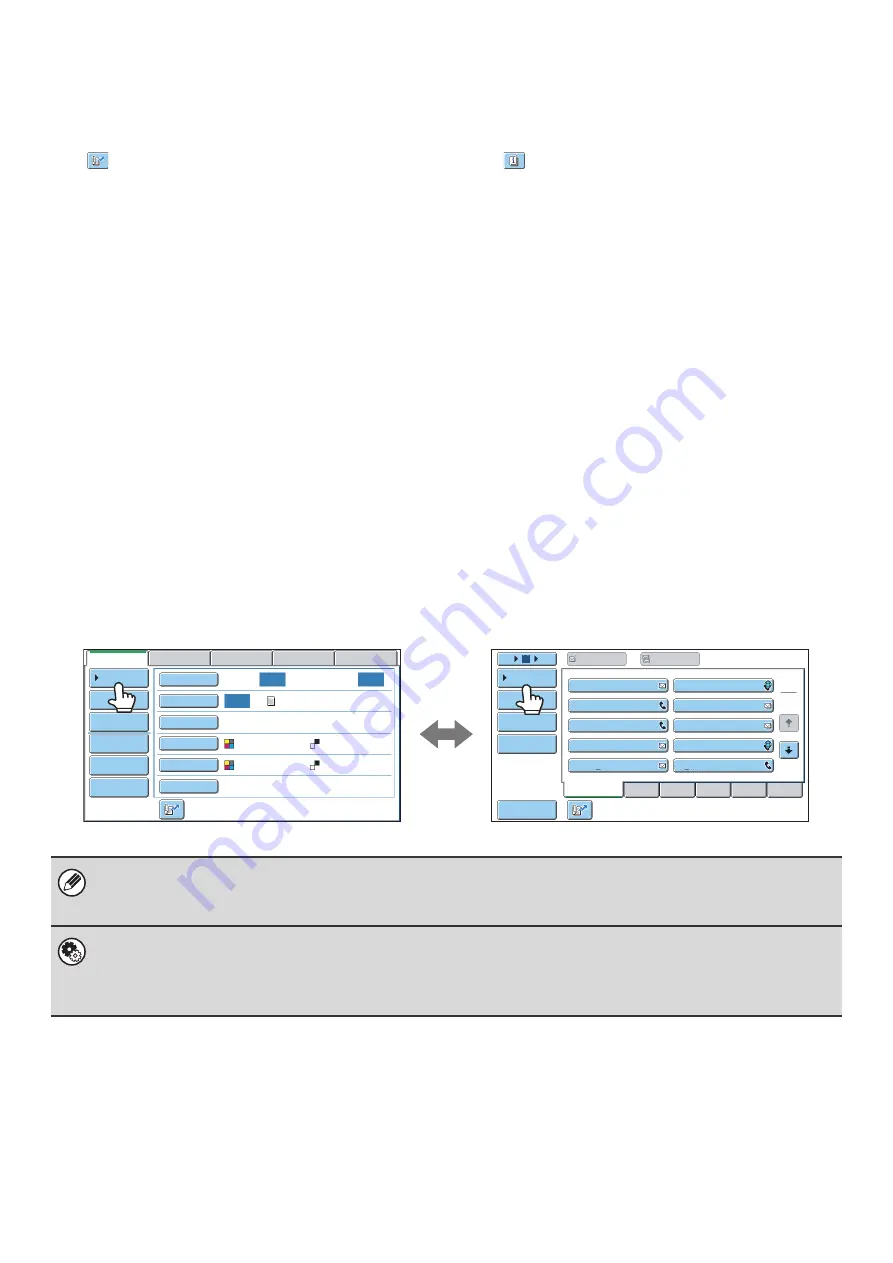
When sending an image, you can retrieve and use a stored transmission destination from the address book screen. The
address book screen is shared by scan mode, Internet fax mode, and fax mode.
Touch the [Address Book] key in the base screen to switch to the address book screen. Touch the [Condition Settings]
key in the address book screen to switch to the base screen.
• This manual uses the base screen of scan mode as an example when operations common to all modes are explained.
• The procedures in this manual assume that the base screen of scan mode appears when the [IMAGE SEND] key is
touched.
System Settings (Administrator): Default Display Settings
One of the following screens can be selected for the initial screen that appears when the [IMAGE SEND] key is touched.
• Base screen of each mode (scan, Internet fax, fax, or data entry mode)
• Address book screen (alphabetical/custom index)
Auto
Auto
Auto
File
Quick File
Address Review
Send Settings
Address Entry
Address Book
USB Mem. Scan
Fax
Internet Fax
PC Scan
Special Modes
Color Mode
File Format
Resolution
Exposure
Original
Scan:
Scan
Send:
Text
200X200dpi
Auto/Grayscale
Mono2
ABCD
Frequent Use
EFGHI
JKLMN
OPQRST
UVWXYZ
1
2
5
15
10
Global
Address Search
Address Entry
Sort Address
Address Review
Condition
Settings
To
Cc
III III
GGG GGG
EEE EEE
CCC CCC
AAA AAA
JJJ JJJ
HHH HHH
FFF FFF
DDD DDD
BBB BBB
Base screen of scan mode
Address book screen
Summary of Contents for MX 5500N - Color Laser - Copier
Page 1: ...User s Guide MX 5500N MX 6200N MX 7000N MODEL ...
Page 2: ...System Settings Guide MX 5500N MX 6200N MX 7000N MODEL ...
Page 108: ...MX7000 US SYS Z2 System Settings Guide MX 5500N MX 6200N MX 7000N MODEL ...
Page 109: ...Document Filing Guide MX 5500N MX 6200N MX 7000N MODEL ...
Page 157: ...MX7000 US FIL Z2 Document Filing Guide MX 5500N MX 6200N MX 7000N MODEL ...
Page 158: ...Scanner Guide MX 5500N MX 6200N MX 7000N MODEL ...
Page 279: ...MX7000 US SCN Z2 Scanner Guide MX 5500N MX 6200N MX 7000N MODEL ...
Page 280: ...Printer Guide MX 5500N MX 6200N MX 7000N MODEL ...
Page 351: ...MX7000 US PRT Z2 Printer Guide MX 5500N MX 6200N MX 7000N MODEL ...
Page 352: ...Copier Guide MX 5500N MX 6200N MX 7000N MODEL ...
Page 499: ...MX7000 US CPY Z2 Copier Guide MX 5500N MX 6200N MX 7000N MODEL ...
Page 576: ...MX7000 US USR Z2 User s Guide MX 5500N MX 6200N MX 7000N MODEL ...