C HECKING THE IMAGE BEFORE PRIN TING
*
Overview
Check the image of received data on the touch panel before printing.
This function is available when [System Settings] → [Operation Settings] → [Preview
Setting] → [Received Data Image Check Setting] is enabled
*
in "Setting mode".
The factory default setting is disabled.
Operation
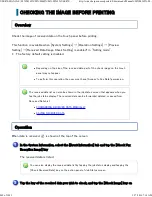
When data is received,
is shown at the top of the screen.
The received data is listed.
De pending on the size of th e re c e ived data, part of th e che c k image on th e touc h
pan e l may n ot appe ar.
To pe rform th is operation , the u se r mus t h ave [Ac c e ss to Fax D ata] pe rmis sion .
Th e rec e ived data list can also be s ho wn in th e job s tatus s cre en that appe ars whe n you
tap th e j ob s tatu s display. Th e re ceived data c an be forwarded, de lete d, or saved fro m
Re c eived D ata List.
FORW ARD ING RECEIVED DATA MANUALLY
SAVING RECEIVED D ATA
In the System Information, select the [Event Inf orm ation] tab and t ap the [C heck Fax
Reception Image] key
You can also display the re ce ive d data list by tappin g th e job status display an d tapping th e
[Ch ec k Rece ived Data] k ey on th e action pan e l of Job Statu s sc ree n.
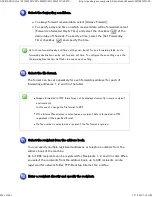
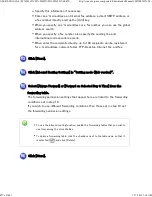
Tap the key of the received data you wish to check , and tap the [Check Im age] key on
USER'S MANUAL | MX-M365N/MX-M465N/MX-M565N USER'S ...
http://siica.sharpusa.com/portals/0/downloads/Manuals/MX-M365N-M...
849 of 1441
3/17/2016 7:14 AM


