
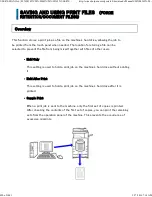


The
icon is displayed to the left of keys of folders in the USB memory
device. To display a folder or a file in a folder, tap this key.
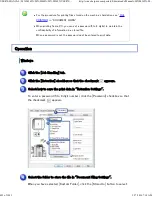
Select the print conditions.
If you have selected multiple files in step 3, you can select only the number
of prints.
If you have selected a file that includes print conditions (i.e., PCL, PS, or
XPS files) in step 3, the settings will be applied.
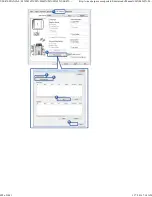
Tap the [Start ] key.
Printing begins after the selected file is transferred.
Remove the U SB mem ory device from the m achine.
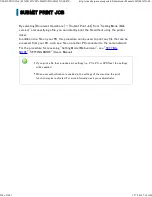
A total of 1 0 0 ke ys of file s an d folders c an be displaye d.
Tap
to move u p on e folder le ve l.
Wh e n you move down a folder le ve l by tappin g a folde r ke y,
appears.
Tap th is ke y to re tu rn to th e file or folde r n ame se lection s creen .
Tap th e [File or Folde r Name ] ke y to c h an ge th e orde r of th e file s an d folde rs
displaye d on th e sc ree n . Eac h time the ke y is tappe d, the orde r c h an ge s be twe e n
asc e n ding and de sc en ding.
Wh e n th e [Prin t on Glossy Pape r] c h e ck box is se le cted, [Pape r S ele c t] is se t to [Glossy
Pape r] (bypass tray) an d [Ou tput Resolu tion] is se t to [6 0 0 dpi (High Qu ality)].
USER'S MANUAL | MX-M365N/MX-M465N/MX-M565N USER'S ...
http://siica.sharpusa.com/portals/0/downloads/Manuals/MX-M365N-M...
503 of 1441
3/17/2016 7:14 AM