


Operation
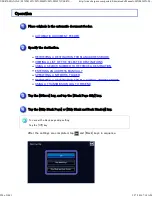
Place the original.
Place the original in the document feeder tray of the automatic document feeder,
or on the document glass.
AUTOMATIC DOCUMENT FEEDER
DOCUMENT GLASS
Specify the des tination.
RETRIEVING A DESTINATION FROM AN ADDRESS BOOK
VIEWING A LIST OF THE SELECTED DESTINATIONS
USING A SEARCH NUMBER TO RETRIEVE A DESTINATION
ENTERING AN ADDRESS MANUALLY
If a ratio se ttin g is u sed in combin ation with an erase setting , the eras e w idth will c h an ge
ac c ordin g to th e sele c te d ratio.
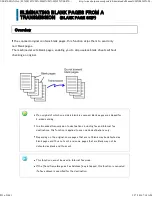
Th is fu nction e rase s th e parts of th e image whe re shadows te nd to form, bu t doe s n ot
de tec t s hadows and e rase only th e sh adows.
Fo r example , if you s e t an erase width of 1/ 2 " (1 0 mm) an d re du c e the imag e to 70 %
be fore s c an n ing it, the e ras e width w ill be redu ce d to 7 mm.
To ch an ge th e de fau lt e rase width se ttin g:
In "S e ttin g mode ", se lec t [System Se ttin gs] → [Image Se n d S etting s] → [Operation
Se ttin gs ] → [De fault Se ttin gs] → [Eras e Width Adju stme n t].
Th e w idth c an be set from 0 " to 1 " (0 mm to 20 mm). The factory de fau lt se ttin g is 1 /2"
(1 0 mm). Th e se ttin g c hang ed h ere will apply to [System S e ttings] → [Copy Se ttin gs] →
[Copy S ettin g] → [Erase W idth Adj ustme n t] in "S etting mode ".
USER'S MANUAL | MX-M365N/MX-M465N/MX-M565N USER'S ...
http://siica.sharpusa.com/portals/0/downloads/Manuals/MX-M365N-M...
818 of 1441
3/17/2016 7:14 AM