


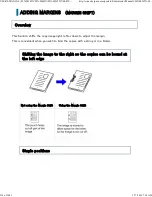


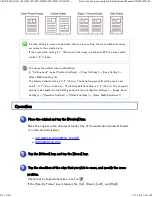


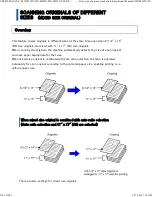


Operation
Place the original and tap the [Preview] key.
Place the original in the document feeder tray of the automatic document feeder,
or on the document glass.
AUTOMATIC DOCUMENT FEEDER
DOCUMENT GLASS
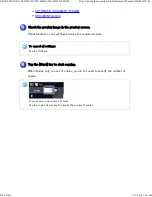
Tap the [Others] key, and tap the [Erase] key.
Tap the checkbox of the edge t hat you wish to erase, and specif y the erase
position.
Check that he tapped checkbox is set to
.
If the [Specify Frame] key is tapped, the [Up], [Down], [Left], and [Right]
If a ratio se ttin g is u sed in combin ation with an erase setting , the eras e w idth will c h an ge
ac c ordin g to th e sele c te d ratio.
If th e e rase width se ttin g is 1" (2 0 mm) and th e image is re du c e d to 5 0 % , the e ras e width
will be 1/ 2" (1 0 mm).
To ch an ge th e de fau lt e rase width se ttin g:
In "S e ttin g mode ", se lec t [System Se ttin gs] → [Copy Se ttin gs] → [Copy Se ttin g ] →
[Erase W idth Adj ustme n t].
Th e fac tory de fault se ttin g is 2 / 5" (1 0 mm). The de fau lt marg in sh ift s ettin g can be se t
from 0 " to 1 " (0 mm to 20 mm) . Th e fac tory defau lt se tting is 1 /2" (10 mm). The ch ang ed
se ttin g is als o applie d to th e Se tting mode s ele c tion of [S ystem Se tting s] → [Image Se nd
Se ttin gs ] → [Operatio n Se ttin gs] → [De fau lt Se ttings] → [Erase W idth Adjustme nt].
USER'S MANUAL | MX-M365N/MX-M465N/MX-M565N USER'S ...
http://siica.sharpusa.com/portals/0/downloads/Manuals/MX-M365N-M...
318 of 1441
3/17/2016 7:14 AM