


Follow the steps below to configure OCSP validation.
Instal l all certificates in the trust chain of the C A certif icate that issued the
user certifi cate.
On your com puter, prepare the certif icate file that you wi sh to install.
Click the [Import] button in "Security Settings" → [C AC Certificate
Managem ent] in the Web page menu.
Select the certificate file that you wish to install and click the [Execute] button.
Up to 20 certificates can be imported.
Instal l all certificates in the trust chain of CA certificate which issued the OCSP
signature certificate.
Follow the procedure in Step 1 to install the OCSP signature certificate.
Set the U RL of the OC SP responder.
Set the OCSP Server Service URL in "Security Settings" → [OCSP Settings] in
the Web page menu.
For example: http://ocsp.example.com/
Con fi den tial Printing
When "Force Retention" is enabled in the CAC configuration settings with the DSK and
CAC option installed, all the "Sharing Mode" settings except for Printer are checked
(Disabled) as a default value in "Disabling of Document Filing", which appears after
selecting [Security Settings] → [System Settings] in the Web page menu. (Administrator
rights are required.). Make sure that the "Sharing Mode" setting for Printer is still
unchecked (enabled), in order to store jobs other than jobs with a password to the Main
Folder.
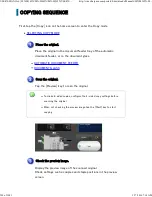
LO GIN PROC EDURE W HEN USING CA C A UTHENTICATION
Up to thre e OCSP respon de r URLs can be set.
USER'S MANUAL | MX-M365N/MX-M465N/MX-M565N USER'S ...
http://siica.sharpusa.com/portals/0/downloads/Manuals/MX-M365N-M...
196 of 1441
3/17/2016 7:14 AM