A–12
Power Paper Stacker Maintenance
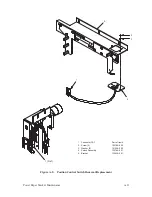
Emitter Assembly
(Figure A–6)
NOTE: The emitter is mounted on the center panel directly behind the
blower assembly/card cage and opposite the stacker column.
Removal
1. Remove the left and right side panels as described on page 6–4 of
Chapter 6, Replacement Procedures.
2. Disconnect P1 (1) of the logic cable assembly (2) from J1 (3) on the
emitter (4).
3. Remove two screws (5).
4. Remove the emitter.
Installation
1. Install the emitter on the center panel (6) behind the blower assembly
and secure it with two #6–32 hex screws with lockwashers. Make sure
the connector side is up.
2. Connect P1 of the logic cable to J1 on the emitter.
NOTE: Connector P1 must be installed with the locking tab (7) facing the
center panel.
3. Test the operation of the power paper stacker and, if necessary, adjust the
emitter as described on page A–18.
4. Install the left and right side panels as described on page 6–4 of Chapter
6, Replacement Procedures.
Summary of Contents for P9012
Page 1: ...P N 132305 001 Rev E P9012 Multifunction Line Printer...
Page 49: ...2 31 Principles of Operation Power Supply PCBAs 1 3 SHORT OPEN Figure 2 21 Power Supply PCBA...
Page 58: ...2 40 Principles of Operation...
Page 84: ...4 18 Troubleshooting...
Page 118: ...5 34 Alignments and Adjustments...
Page 203: ...6 85 Replacement Procedures This page intentionally left blank...
Page 214: ...6 96 Replacement Procedures...
Page 236: ...A 22 Power Paper Stacker Maintenance...
Page 246: ...D 2 Torque Table...
Page 254: ...Index 6...
Page 255: ......
Page 256: ...132305 001 Rev E...

