4–7
Troubleshooting
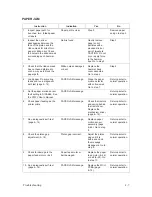
PAPER JAM
Instruction
Indication
Yes
No
1.
Inspect paper path for
bunched, torn, folded paper
or labels.
Paper path is clear.
Step 2.
Remove paper
and go to step 2.
2.
Inspect the narrow
passageway between the
face of the platen and the
ribbon mask for bits of torn
paper or ribbon lint. Check
the holes in the ribbon mask
surrounding each hammer
tip.
Debris found.
Gently remove
paper or lint
particles with a
wooden stick or
pair of tweezers.
CAUTION: Do not
pry or apply force
to the hammer
tips. Go to step 3.
Step 3.
3.
Check that the ribbon mask
has not been deformed in
such a way as to block the
paper path.
Ribbon mask damaged
or bent.
Replace the
hammer bank
cover assembly.
Go to step 4.
Step 4.
4.
Load paper. Do some line
feeds and run a diagnostic
self–test (page 4–14).
PAPER JAM message.
Clean the paper
motion detector
with cotton swab.
Go to step 7.
Return printer to
normal operation.
5.
Set the paper motion sensor
fault setting to DISABLE. See
the
P9012 User’s Manual.
PAPER JAM message.
Return printer to
normal operation.
6.
Check paper feeding as the
printer prints.
PAPER JAM message.
Check the tractors
and spring behind
the tractor door.
Replace the
mechanism driver
(page 6–72).
Return printer to
normal operation.
7.
Run a diagnostic self–test
(page 4–14).
PAPER JAM message.
Replace paper
motion sensor
assembly (page
6–62). Go to step
8.
Return printer to
normal operation.
8.
Check the platen gap
adjustment (5–18).
Platen gap incorrect.
Adjust the platen
gap until it is
within spec and
the message
disappears. Go to
step 9.
Return printer to
normal operation.
9.
Check for damage to the
paper feed motor or belt.
Paper feed motor or
belt damaged.
Replace the paper
feed motor (6–56)
or belt (6–52). Go
to step 10.
Return printer to
normal operation.
10. Run a diagnostic self–test
(page 4–14).
PAPER JAM message.
Replace the MCU
PCBA (page
6–72).
Return printer to
normal operation.
Summary of Contents for P9012
Page 1: ...P N 132305 001 Rev E P9012 Multifunction Line Printer...
Page 49: ...2 31 Principles of Operation Power Supply PCBAs 1 3 SHORT OPEN Figure 2 21 Power Supply PCBA...
Page 58: ...2 40 Principles of Operation...
Page 84: ...4 18 Troubleshooting...
Page 118: ...5 34 Alignments and Adjustments...
Page 203: ...6 85 Replacement Procedures This page intentionally left blank...
Page 214: ...6 96 Replacement Procedures...
Page 236: ...A 22 Power Paper Stacker Maintenance...
Page 246: ...D 2 Torque Table...
Page 254: ...Index 6...
Page 255: ......
Page 256: ...132305 001 Rev E...

