C70 Setup Manual
2.2 GT Designer2
31
(1)
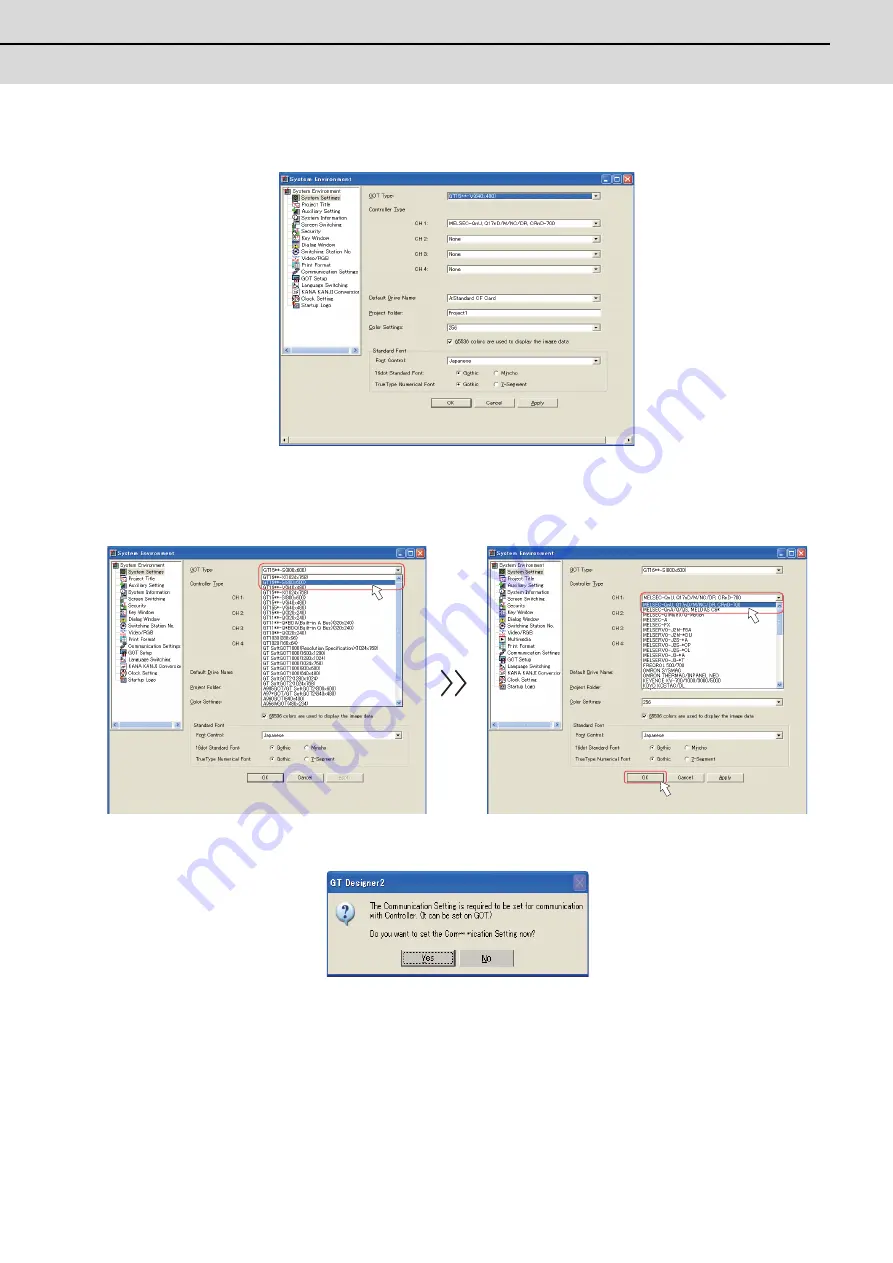
Start GT Designer2. Select "New". Or open the project which is already created. The "System Environment"-
"System Settings" dialog box will appear.
(2)
Select the following items from among the pull-down menu, and click "OK".
GOT type: Select the model name of the GOT to use ("GT16**-...")
Controller type: MELSEC-QnU, Q17nD/M/NC/DR, CRnD-700
A dialog box appears to confirm the communication setting. Click "Yes".
Summary of Contents for C70
Page 1: ......
Page 3: ......
Page 9: ......
Page 11: ......
Page 13: ......
Page 18: ...1 1 Outline ...
Page 21: ...1 Outline MITSUBISHI CNC 4 ...
Page 22: ...5 2 GOT Initial Setup ...
Page 73: ...2 GOT Initial Setup MITSUBISHI CNC 56 ...
Page 74: ...57 3 PLC CPU Initial Setup ...
Page 91: ...3 PLC CPU Initial Setup MITSUBISHI CNC 74 ...
Page 92: ...75 4 CNC CPU Initial Setup ...
Page 105: ...4 CNC CPU Initial Setup MITSUBISHI CNC 88 ...
Page 106: ...89 5 Connecting and Setting up Multiple CNC CPU Modules ...
Page 115: ...5 Connecting and Setting up Multiple CNC CPU Modules MITSUBISHI CNC 98 ...
Page 116: ...99 6 Setting Machine Parameters ...
Page 130: ...113 7 Setting the Position Detection System ...
Page 153: ...7 Setting the Position Detection System MITSUBISHI CNC 136 ...
Page 154: ...137 8 Deceleration Check ...
Page 159: ...8 Deceleration Check MITSUBISHI CNC 142 ...
Page 160: ...143 9 Setting the Tool Entry Prohibited Range ...
Page 169: ...9 Setting the Tool Entry Prohibited Range MITSUBISHI CNC 152 ...
Page 170: ...153 10 Data Backup and Restoration ...
Page 184: ...167 Appendix 1 Explanation of Parameters ...
Page 435: ...Appendix 1 Explanation of Parameters MITSUBISHI CNC 418 ...
Page 436: ...419 Appendix 2 Explanation of Alarms ...
Page 608: ...591 Appendix 3 Display on 7 segment LED ...
Page 624: ......
Page 628: ......


