3-12 System Preparation
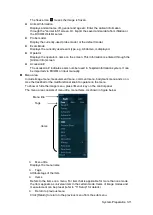
The multifunction knob can be used to operate the menu. Press the knob to open
the menu; rotate the know to navigate through the items one by one.
Depending on the item types, the multifunction knob can:
For a commanding item or command optional item: press the knob to directly
activate the item.
For a parameter item or ON/OFF item: press the knob to lock and select the item,
then rotate the knob to switch among the available values; press the knob again
to release and deselect the item.
For an item with sub-menu: press the knob to extend the sub-menu, and the
cursor navigates to the first sub-item. At the same time, you can exit from the sub-
menu to the previous item by clicking [Return] in the sub-menu.
For tag items in the menu: e.g. the “Right” and “Left” tag in the measurement
menu. Rotate the multifunctional knob to navigate the tag, and press the knob to
select the tag.
Parameter area
Displays the image parameters for the activating window. If there are more than one
imaging modes, the parameters are displayed by each mode. For detailed parameters
displayed in this area, please refer to the corresponding imaging mode (s).
Image area
The image area displays the ultrasound images, probe mark (or activating window mark),
time line (in M mode), coordinate axis (including depth, time, velocity/frequency), focus
position (located at depth axis in the form of
), besides, the annotation, bodymark,
measurement calipers, grayscale bar are also displayed here.
Thumbnail preview & Zoom Window (image-in-image)
In the zoom status, this area displays the thumbnail of a complete image, and a
rectangular frame is used to highlight the currently magnified area. This feature is called
image-in-image.
Help information area
The help information area displays various help information or progress bar in the
current status.
Besides, the system can provide help for each key. Press [Help] to enter key-help status,
you can see the cursor changes into an arrow with a question mark on it. Press any key
on the control panel, the screen displays the key-relevant information, meanwhile, the
system exits the key-help status.
Tips: in terms of help information,
“TB” refers to “Trackball”, “Knob refers to Multifunction
knob.
Thumbnail area of images stored
Displays the thumbnail images stored under the current animal.
Image manage area
Page-turning: when there are more than one page images have been stored, you can
turn to the next or preview page by
or
respectively.
Delete: select a thumbnail image, and click to delete it.
Send to: select a thumbnail image, and click
to send it to other devices.
System status icon
This area displays the relevant system icons, such as USB memory device, printer,
network, Chinese / English entry, and current system time, etc.
Summary of Contents for DP-50 Exp Vet
Page 2: ......
Page 34: ...2 6 System Overview 2 6 Introduction of Each Unit Right View Left View...
Page 42: ......
Page 68: ......
Page 128: ......
Page 148: ......
Page 166: ...10 18 DICOM For details on tast manager see 9 6 Animal Task Manager...
Page 180: ......
Page 220: ......
Page 224: ......
Page 236: ......
Page 242: ......
Page 248: ......
Page 342: ...D 2 Printer Adapter Type Model SONY X898MD...
Page 343: ...P N 046 017713 02 1 0...


