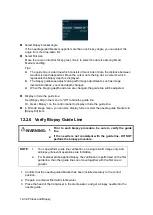
12-26 Probes and Biopsy
3.
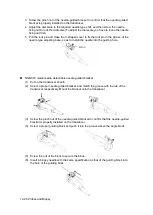
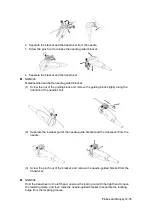
Screw the pinch nut of the needle-guided bracket to confirm that the needle-guided
bracket is properly installed on the transducer.
4.
Adjust the dial scale to the required needle type shift, and then screw the needle
fixing nut to lock the dial scale (To adjust the dial scale you have to loose the needle
fixing nut first.)
5.
Pull the lock pin and close the V-shaped cover to fix the lock pin in the groove of the
needle type adjusting base, so as to install the needle into the guiding hole.
NGB-003 metal/needle detachable needle-guided bracket
(1) Put on the transducer sheath.
(2) Select a proper needle-guided bracket, and match the groove with the tab of the
transducer respectively. Mount the bracket onto the transducer.
(3) Screw the pinch nut of the needle-guided bracket to confirm that the needle-guided
bracket is properly installed on the transducer.
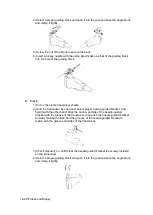
(4) Select a proper guiding block and push it into the groove above the angle block.
(5) Screw the nut of the block to secure the block.
(6) Insert a biopsy needle with the same specification as that of the guiding block into
the hole of the guiding block.
Summary of Contents for DP-50 Exp Vet
Page 2: ......
Page 34: ...2 6 System Overview 2 6 Introduction of Each Unit Right View Left View...
Page 42: ......
Page 68: ......
Page 128: ......
Page 148: ......
Page 166: ...10 18 DICOM For details on tast manager see 9 6 Animal Task Manager...
Page 180: ......
Page 220: ......
Page 224: ......
Page 236: ......
Page 242: ......
Page 248: ......
Page 342: ...D 2 Printer Adapter Type Model SONY X898MD...
Page 343: ...P N 046 017713 02 1 0...

