11-8 Setup
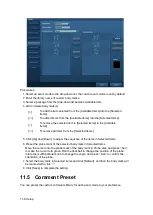
Procedures:
1. Select an exam mode in the drop-down list, the current exam mode is set by default.
2. Enter the library name of custom body marks.
3. Select a package from the drop-down list besides Available Item.
4. Add or delete body mark(s)
[>]
To add the item selected from the [Available Items] into the [Selected
Items].
[>>]
To add all items from the [Available Items] into the [Selected Items].
[<]
To remove the selected item in [Selected Items] to the [Available
Items].
[<<]
To remove all items from the [Selected Items].
5. Click [Up] and [Down]: to adjust the sequence of the items in Selected Items.
6. Preset the probe mark of the selected body mark in Selected Items
Move the cursor onto the probe mark of the body mark in Probe area and press <Set>
to make the cursor turn green. Roll the trackball to change the position of the probe,
rotate the multifunctional knob to change the angle, and press <Set> to confirm the
orientation of the probe.
7. Select the body mark in Selected Items and click [Default], and then the body mark will
be
marked with a tick ”√”.
8. Click [Save] to complete the setting.
11.5 Comment Preset
You can preset the custom comments library for each exam mode to your preference.
Summary of Contents for DP-50 Exp Vet
Page 2: ......
Page 34: ...2 6 System Overview 2 6 Introduction of Each Unit Right View Left View...
Page 42: ......
Page 68: ......
Page 128: ......
Page 148: ......
Page 166: ...10 18 DICOM For details on tast manager see 9 6 Animal Task Manager...
Page 180: ......
Page 220: ......
Page 224: ......
Page 236: ......
Page 242: ......
Page 248: ......
Page 342: ...D 2 Printer Adapter Type Model SONY X898MD...
Page 343: ...P N 046 017713 02 1 0...


