Probes and Biopsy 12-25
Bracket model
To set the default bracket for a probe.
(1) Select a probe model in the Probe Model list, all the supported bracket models will
be displayed in the “Bracket Model” list on the right side. (If the selected probe has
no bracket matched, no model is displayed.)
(2) Click to select a bracket model on the Bracket Model list.
(3) Click [Save] to confirm the setting and return to Setup menu.
Parameter
To set if to display/hide guide line.
(1) Check [Guide Line Display] to set the guide line display, otherwise, the guide line is
hidden when enters biopsy status.
(2) Click [Save] to confirm the setting and return to Setup menu.
12.2.4 Needle-guided Bracket Inspection and
Installation
Inspection of the Needle-guided Bracket
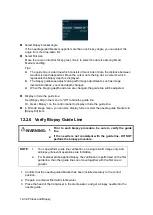
Be sure to perform inspections before and after use of the needle-guided bracket. If an
abnormality is found on the needle-guided bracket, immediately stop using it and contact
MINDRAY Customer Service Department or sales representative.
1. Sterilize the needle-guided bracket before and after use.
2. Confirm that the needle-guided bracket is free of damage, deformation, stripping,
malfunction, loose or missing parts.
3. Confirm that the needle-guided bracket is securely mounted in the correct position.
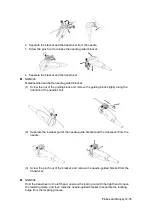
Installing the Needle-guided Bracket
NGB-001, NGB-002, NGB-003 and NGB-005 metal/needle un-detachable needle-guided
bracket (taking NGB-001 as example)
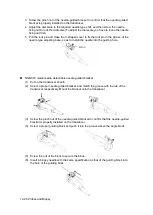
(1) Put on the sterile transducer sheath.
(2) Inosculate the locating groove on the clamp with the two raised edges on the
transducer head and aligning the locating pit of the clamp to the convex point on the
transducer head.
(3) Turn the grip knob at the tail of the needle-guided bracket tightly.
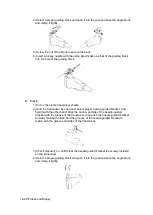
NGB-001
1.
Put on the sterile transducer sheath.
2.
Hold the transducer by one hand, select the proper needle-guided bracket, and hold
it with the other hand. Match the groove of the bracket with the tab of the transducer.
Amount the bracket onto the transducer.
Summary of Contents for DP-50 Exp Vet
Page 2: ......
Page 34: ...2 6 System Overview 2 6 Introduction of Each Unit Right View Left View...
Page 42: ......
Page 68: ......
Page 128: ......
Page 148: ......
Page 166: ...10 18 DICOM For details on tast manager see 9 6 Animal Task Manager...
Page 180: ......
Page 220: ......
Page 224: ......
Page 236: ......
Page 242: ......
Page 248: ......
Page 342: ...D 2 Printer Adapter Type Model SONY X898MD...
Page 343: ...P N 046 017713 02 1 0...


