211
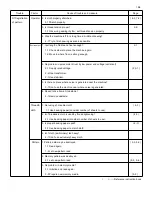
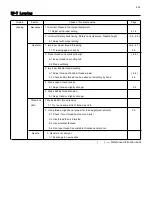
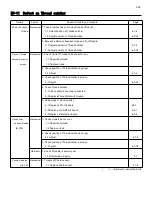
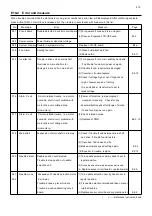
No. message Error measure page
024 Needle center Stop position of needle bar is off center
(1)Turn needle selection cam by hand to set to
regular position.
(2)If trouble occurs repeatedly, fix mechanical
trouble in needle selection & its vicinity.
025 Needle over Specified needle number went beyond Adjust position of needle selection cam (poten-
needle number of the machine. tiometer) and needle number of moving head.
E2-5
026 Needle differ
As needle number differed from memory
(1)Turn power off once and turn on again.
when power turned on, it was renewed.
(2)
Let the machine recognize needle number.
E2-5
030 Slow mismatch Inadequate adjustment of number of
(1)Make automatic speed setting.
E4-3
low speed revolution.
(2)If not solved even after speed adjustment, E3-2
Low speed revolution doesn't come replace LCD-CE board.
below 100rpm.
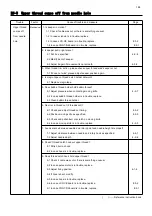
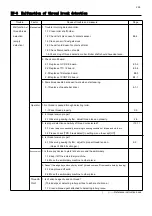
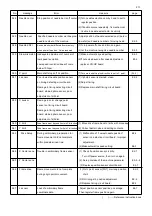
050 C point Main shaft stops off its position.
(1)
Turn main shaft to plus direction to set to C point.
( 24-5 )
051 L sensor Poor lowest needle position sensor
(1)If photo sensor is stained, clean.
E2-2
on timing detecting circuit board.
(2)Adjust timing.
Damage in timing detecting circuit
(3)Replace main shaft timing circuit board.
board, stained photo sensor, poor
adjustment of slit disc.
052 C sensor
Damage in color change point
sensor on timing circuit board.
Damage in timing detecting circuit
board, stained photo sensor, poor
adjustment of slit disc.
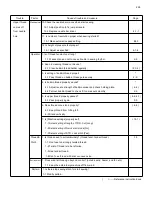
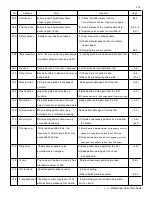
060 X limit
Drive frame went beyond limits in X direction.
(1) Move drive frame back to limits with move key.
061 Y limit
Drive frame went beyond limits in Y direction.
(2) Correct pattern size and setting contents.
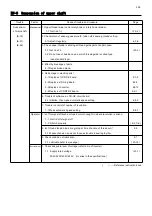
063 Drive Setup During embroidery, preparation for (1) Malfunction of "Lowest needle position" E2-2
frame movement did not complete sensor on detection circuit board, Improper
within predetermined time. adjustment.
(2)Make automatic speed setting.
E4-3
064 X Center sens. Trouble in embroidery frame sensor (1) Check if position sensor is dirty. E2-7
Turn off power source, then turn on again.
065 Y Center sens. (2) Setup mistake of the machine parameter E5-5,-6
(3) Replace position sensor circuit board. E2-7
066 Frame drive
Frame movement did not complete
(1) Dirt L point sensor [PH1] or wrong position E2-2
during origin point movement. of slit.
(2) Dirt timing slit, position adjustment E2-2
(3) Replace timing circuit board. E2-2
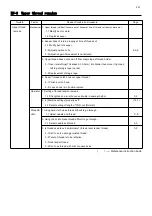
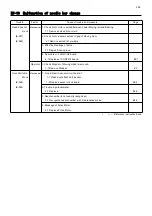
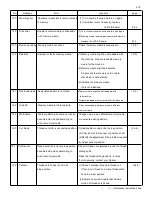
067 L sensor Loss of embroidery frame Adjust position sensor position on carriage. E2-7
coordinate data. Then register frame position again.
( ) ----- Reference instruction book
Summary of Contents for HCR3-1502
Page 1: ... Maintenance Manual for Embroidery Machine HCR3E SERIES Version 1 2 HappyJapan Inc ...
Page 104: ...105 4 7 3 Adjustment of timing detecting unit 8 Finally put the cover back on ...
Page 107: ...107 ...
Page 172: ...172 E7 Electric system diagram E7 1 Pulse motor driver PMD wiring ...
Page 173: ...173 E7 2 Pulse motor driver PMD setup ...
Page 174: ...174 E7 3 Inverter wiring ...
Page 175: ...175 E7 4 Electrical connection diagram ...
Page 176: ...176 ...
Page 177: ...177 ...
Page 178: ...178 E7 5 List of electrical connection diagram ...
Page 179: ...179 ...
Page 180: ...180 E7 6 Explanation of function clrcuit board HCD8122 LCD CE MX Board Ass y ...
Page 181: ...181 HCD8116 TP SW Circuit Board Ass y CN No Function CN1 Switch output LED input ...


