110
E2 Exchange and Setting of electric related component
<note>
Please take electric plug, when you exchange electric component.
E
E2
2-
-1
1
E
Ex
xc
ch
ha
an
ng
ge
e
a
an
nd
d
S
Se
et
tt
ti
in
ng
g
o
of
f
C
CO
ON
NT
T-
-R
R2
2
B
Bo
oa
ar
rd
d
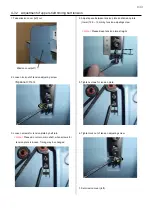
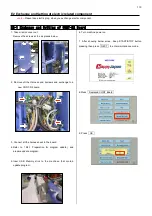
1. Take mission cover out.
Remove the screws at the six places below.
2. Remove all the Harness and 4screws and exchange to a
new CONT-R2 board.
3. Connect all the harness back to the board.
4.Refer to
「
E4-1 Preparation for program update
」
and
prepare update program.
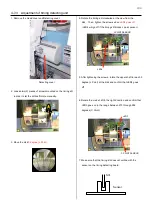
5.Inser USB Memory stick to the machinee that contain
update program.
6. Turn machine power on
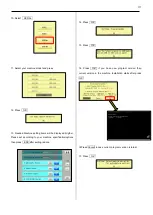
7. After showing below scree, Keep START/STOP button
pressing then press NEXT to enter maintenance mode.
8.Press Replaced CONT Board
9. Press OK
Summary of Contents for HCR3-1502
Page 1: ... Maintenance Manual for Embroidery Machine HCR3E SERIES Version 1 2 HappyJapan Inc ...
Page 104: ...105 4 7 3 Adjustment of timing detecting unit 8 Finally put the cover back on ...
Page 107: ...107 ...
Page 172: ...172 E7 Electric system diagram E7 1 Pulse motor driver PMD wiring ...
Page 173: ...173 E7 2 Pulse motor driver PMD setup ...
Page 174: ...174 E7 3 Inverter wiring ...
Page 175: ...175 E7 4 Electrical connection diagram ...
Page 176: ...176 ...
Page 177: ...177 ...
Page 178: ...178 E7 5 List of electrical connection diagram ...
Page 179: ...179 ...
Page 180: ...180 E7 6 Explanation of function clrcuit board HCD8122 LCD CE MX Board Ass y ...
Page 181: ...181 HCD8116 TP SW Circuit Board Ass y CN No Function CN1 Switch output LED input ...

