background image

1038 

ProChannel (Producer and Studio only)

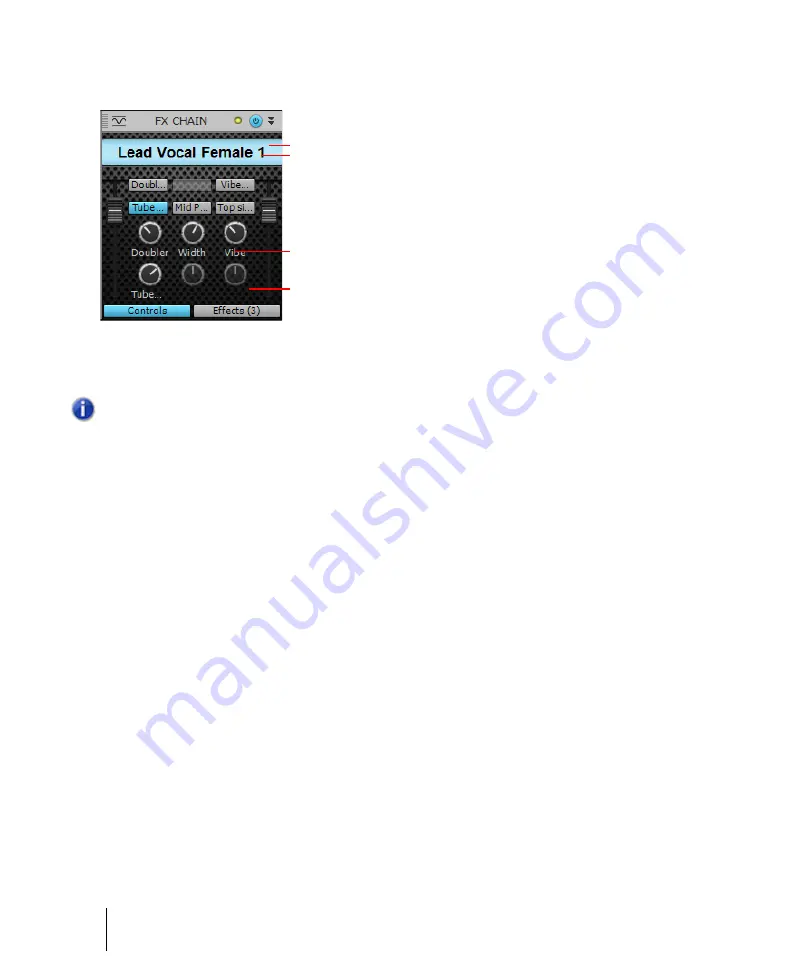
Figure 330. 

FX Chain UI.

A.

Preset Background Image

B.

Preset Text Color

C.

Label Text Color

D.

Background Image

See also:

“Using FX Chain presets (.fxc)”

 on page 626

“Effects chains”

 on page 932

See:

“ProChannel (Producer and Studio only)”

 on page 999

“Using ProChannel”

 on page 1003

“ProChannel modules and controls”

 on page 1008

“PC76 U-Type Channel Compressor module (Producer only)”

 on page 1014

“PC4K S-Type Bus Compressor module (Producer only)”

 on page 1016

“QuadCurve Equalizer module”

 on page 1019

“Tube Saturation module (Producer only)”

 on page 1026

“Console Emulator module (Producer only)”

 on page 1027

“Tape Emulator module (Producer only)”

 on page 1039

Note: 

The Fader Cap, Button Image, and Rotary Image settings can not be customized from the 

FX Chain module. To customize all images, create the FX Chain preset in a track’s effects bin 
(see 

“Effects chains”

 on page 932

 and


“Customizing the FX Chain UI”

 on page 942), then load 

the FX Chain preset into ProChannel.

A

B

C

D

Summary of Contents for sonar x3

Page 1: ...SONAR X3 Reference Guide...

Page 2: ...agreement No part of this document may be reproduced or transmitted in any form or by any means electronic or mechanical including photocopying and recording for any purpose without the express writte...

Page 3: ...n page 125 Tutorial 5 Working with music notation on page 133 Tutorial 6 Editing your music on page 143 Tutorial 7 Mixing and adding effects on page 151 Tutorial 8 Working with video on page 161 Tutor...

Page 4: ...4 Getting started...

Page 5: ...ring 55 Film and video scoring and production 55 Publishing music on the Internet 56 Burning audio CDs 56 Flexibility 56 Computers sound and music 56 MIDI 56 Digital audio 57 Setup 58 Audio connection...

Page 6: ...e Browser 113 Finding and previewing audio loops 116 Previewing MIDI groove clips 117 Adding audio loops to your project 118 4 Tutorial 3 Recording vocals and musical instruments 119 Troubleshooting 1...

Page 7: ...74 Uploading audio to SoundCloud 175 Uploading your songs to YouTube 178 11 Controlling playback 181 The Now time and how to use it 182 The Now time marker 184 The Track view Now Time display 185 Disp...

Page 8: ...es in sequence with the Play List 245 The Play List interface 246 Using the Play List 248 Video playback import and export 251 Importing and playing back videos 252 Exporting video 256 Uploading your...

Page 9: ...nd waveform preview 295 Input monitoring 296 Live Input PDC override 300 The Audio Engine button 302 Loop recording 303 Punch recording 305 Step recording 308 Step record keyboard Shortcuts 314 Step p...

Page 10: ...t tool 350 Moving and copying clips 352 Aim Assist line 357 Reverting clip s to original time stamp 358 Locking Clips 359 Auto scroll lock in Clips pane 360 Clip groups 361 Nudge 366 Nudge settings 36...

Page 11: ...19 Using the Tempo view 421 Undo redo and the undo history 425 Slip editing non destructive editing 426 Using slip editing 427 Slip editing multiple clips 429 Fades and crossfades 430 Using fades and...

Page 12: ...p transients 534 15 Control Bar overview 537 Tools module 541 Snap module 544 Transport module 547 Loop module 550 Mix module 552 ACT module 554 Screenset module 556 Performance module 558 Punch modul...

Page 13: ...sabling AudioSnap 651 Using the AudioSnap palette 652 Synchronizing audio and the project tempo 656 Editing a clip s tempo map 659 Changing a project s tempo 662 Fixing timing problems in audio clips...

Page 14: ...ject5 patterns 719 20 Editing MIDI events and continuous controllers CC 721 Event Inspector 723 The Piano Roll view 724 Note Map pane 726 Drum Grid pane 726 Notes pane 726 Controller pane 726 Track Li...

Page 15: ...rescendos and decrescendos 765 Changing the timing of a recording 766 Quantizing 767 Fit Improvisation 775 Snap to Scale 778 Searching for events 781 Event filters 782 Controllers RPNs NRPNs and autom...

Page 16: ...Previewing a mapped sound 816 The Note Map pane 817 Changing mapped note settings 817 The Drum Grid pane 819 Grid lines 819 22 Editing audio 821 Digital audio fundamentals 822 Basic acoustics 822 Exam...

Page 17: ...synths in the Synth Rack view 863 Multi port soft synths 864 Converting your soft synth tracks to audio 864 Using the Assignable Controls feature 866 Automating controls from the Synth Rack 867 Displa...

Page 18: ...y 901 Segmented and non segmented meters 904 Changing the meters performance 904 MIDI activity indicators 906 Peak markers 906 Waveform preview for buses and synth tracks 908 Freeze tracks and synths...

Page 19: ...tudio only 975 Surround basics 976 Configuring SONAR for surround mixing 976 Using surround format templates 977 Choosing a surround format 979 Surround buses 980 Routing in surround 981 Downmixing 98...

Page 20: ...g Region FX 1043 ARA Audio Random Access 1046 Melodyne Producer and Studio only 1048 Using Melodyne 1049 V Vocal Region FX clips 1063 V Vocal Editor 1065 Playing back V Vocal Region FX clips 1067 Pitc...

Page 21: ...elope mode and Offset mode 1131 Converting MIDI controllers to envelopes 1134 Snapshots 1135 Automating effects 1136 Automating individual effects parameters 1136 Recording automation data from an ext...

Page 22: ...195 Changing the way notes are displayed 1196 Using enharmonic spellings 1197 MIDI Channels and the Fretboard 1198 Chords and marks 1200 Adding chord symbols 1200 Adding expression marks 1203 Adding h...

Page 23: ...opying name lists 1239 Assigning the Bank Select method 1240 Assigning patch names 1241 Assigning note names 1243 Assigning controller RPN and NRPN names 1245 SONAR flags in instrument definitions 124...

Page 24: ...ing SMPTE MTC sync 1280 MIDI Machine Control MMC 1281 38 Audio file management 1283 The Project Files dialog 1284 Project files and bundle Files 1285 Audio folders 1286 Global audio folders 1286 Per p...

Page 25: ...ion 1319 Using audio devices in Windows 7 1320 WASAPI support 1320 MMCSS task profile support 1321 WaveRT updates 1322 40 External devices 1323 Roland A PRO controllers 1324 Setting up control surface...

Page 26: ...ard 1366 Configuring an audio interface 1367 Audio dropouts or crashes during playback 1368 My MP3 encoder stopped working 1368 When I play a file I don t hear anything MIDI project 1369 I can t recor...

Page 27: ...mpensation re sync 1383 SONAR x64 1383 Backwards compatibility 1384 Windows 7 1385 43 Hardware setup 1387 Connect your MIDI equipment 1387 Set up to record digital audio 1390 44 MIDI files 1395 Timeba...

Page 28: ...ack color customization 1449 YouTube Publisher 1450 Overloud Tape Emulator ProChannel module Producer only 1453 Tone2 BiFilter2 Producer only 1454 XLN Audio Addictive Drums Producer only 1455 AAS Loun...

Page 29: ...9 Keyboard shortcuts in Cyclone 1531 Undo and redo 1531 50 Menu reference 1533 File New 1533 File Open 1533 File Revert 1533 File Close 1533 File Save 1534 File Save As 1534 File Import Audio 1534 Fil...

Page 30: ...ack Envelopes with Clips 1540 Edit Aim Assist 1540 Edit Cut 1541 Edit Cut Special 1541 Edit Copy 1541 Edit Copy Special 1542 Edit Paste 1542 Edit Paste Special 1542 Edit Delete 1543 Edit Delete Specia...

Page 31: ...w in Header 1550 Views Icons Track View Show Custom in Header 1550 Views Icons Track View Show in Strip 1551 Views Icons Track Inspector Show Icons 1551 Views Icons Track Inspector Show Large Icons 15...

Page 32: ...Views Screensets Duplicate Current Screenset to Screenset 8 1556 Views Screensets Duplicate Current Screenset to Screenset 9 1557 Views Screensets Duplicate Current Screenset to Screenset 10 1557 Vie...

Page 33: ...s Find Change 1566 Process Length 1567 Process Scale Velocity 1567 Process Retrograde 1568 Process Deglitch 1568 Process Fit to Time 1568 Process Fit Improvisation 1569 Process Run CAL 1569 Project In...

Page 34: ...range Icons 1575 Help Keyboard Shortcuts 1575 Help SONAR Online Support 1590 Help SONAR Online User s Forum 1590 Help SONAR Online Videos 1590 Help Audio Configuring your audio interface 1590 Help Tro...

Page 35: ...oints 1596 Punch On Off 1596 Loop On Off 1596 Set Punch Points 1596 Select Punch Region 1597 Jump 1597 Linear 1597 Fast Curve 1597 Slow Curve 1597 Drag and Drop Options 1598 Associated Audio Files 159...

Page 36: ...1603 Playback Meters 1603 Output Bus Meters 1604 Record Meter Options Peak 1604 Record Meter Options RMS 1604 Record Meter Options Peak RMS 1604 Record Meter Options Show Labels 1604 Record Meter Opti...

Page 37: ...acks and Buses 1608 Undo View Change 1608 Redo View Change 1609 Create Track Envelopes Using Linear Shapes 1609 Snap to Grid 1609 Select tool 1609 Erase tool 1609 Draw tool 1610 Open Clip Effects Bin...

Page 38: ...ssfade Type Default Fade In Curve Fast Curve 1617 Track view Options Crossfade Type Default Fade Out Curve Linear 1617 Track view Options Crossfade Type Default Fade Out Curve Slow Curve 1617 Track vi...

Page 39: ...how Numeric Peak Values 1622 Track view Options Meter Options Show Track Peak Markers 1622 Track view Options Meter Options Show Bus Peak Markers 1622 Track view Options Meter Options Reset All Meters...

Page 40: ...ew Options Meter Options Bus Meter Options Post Fader 1629 Track view Options Meter Options Bus Meter Options Pre Fader Post FX 1629 Track view Options Meter Options Bus Meter Options 12 dB 1629 Track...

Page 41: ...ips Select All Siblings 1636 Track view Clips Unlink 1636 Track view Clips Unlink Step Sequencer Clips 1636 Track view Clips Convert MIDI Clip s to Step Sequencer 1637 Track view Clips Convert MIDI Co...

Page 42: ...ution Quarter Triplet 1643 Piano Roll View Grid Resolution Eight 1643 Piano Roll View Grid Resolution Eight Triplet 1643 Piano Roll View Grid Resolution Sixteenth 1643 Piano Roll View Grid Resolution...

Page 43: ...ved 1648 Console view Strips Frozen 1648 Console view Strips Widen All Strips 1648 Console view Strips Narrow All Strips 1648 Event List view View Event Manager 1649 Event List view View Notes 1649 Ev...

Page 44: ...File Clear 1653 Sysx view Edit Edit Data 1654 Sysx view Edit Name 1654 Sysx view Settings Auto Send on off 1654 Sysx view Settings Output 1654 Left Click Positions Rectangle 1655 Horz Zoom Level 1 16...

Page 45: ...d clips 1669 Controlling which sounds you hear 1671 Audio 1673 Audio playback in SONAR 1674 Tracks 1676 Clips 1677 Track by track playback 1678 Audio recording 1680 Connecting an instrument home stere...

Page 46: ...gs dialog 1711 Convert MIDI To Shapes dialog 1711 Convert MIDI Clip s To Step Sequencer dialog 1712 Copy dialog 1712 Create Fx Envelopes dialog 1713 Crossfade dialog 1714 Controller Surface Settings d...

Page 47: ...e 1734 Fade Envelope dialog 1734 Fade Selected Clips dialog 1735 File Info dialog 1736 File Statistics dialog 1736 File Options dialog 1737 Find Missing Audio dialog 1737 Fit to Time dialog 1738 Folde...

Page 48: ...Format Encode Options dialog 1762 MIDI Envelope dialog 1763 MIDI Event Type dialog 1763 MIDI Input Presets dialog 1764 Migrate Cakewalk Preferences dialog 1764 Missing Plug ins dialog 1765 MP3 Export...

Page 49: ...File Advanced 1816 File Advanced Advanced 1818 Project Record 1820 Project MIDI 1823 Project Metronome 1826 Project AudioSnap 1828 Project Clock Advanced 1830 Project Surround Advanced 1832 Customizat...

Page 50: ...Fretboard Track dialog 1884 Set Timecode at Now Time 1885 Slide dialog 1885 SONAR Quick Start dialog 1886 Sort Tracks dialog 1887 Split Clips dialog 1888 Staff View Layout dialog 1889 Staff View Print...

Page 51: ...909 Usage Logging dialog 1910 Loop Properties dialog Audio Stretching 1910 Loop Properties dialog Audio Files 1913 Control Properties dialog 1913 Settings dialog 1914 Fault Reporter dialog 1914 Rename...

Page 52: ...ff view 1968 Lyrics view 1970 Console view 1971 The Console view interface 1972 Channel strips 1974 Modules 1987 Console view menu 1993 Customizing the Console view 1996 Using the Console view 1999 Vi...

Page 53: ...and efficiently SONAR is more than an integrated MIDI and digital audio authoring software package it s an expandable platform that can function as the central nervous system of your recording studio...

Page 54: ...y of those performances and edit arrange and experiment with the music With a few simple clicks of the mouse you can arrange orchestrate and audition your composition Fully integrated sequencing allow...

Page 55: ...t floating point for faster processing and high quality sound reproduction Many effects now support 64 bit processing for pristine quality Next topic Web authoring on page 55 Web authoring SONAR is th...

Page 56: ...software interfaces for common studio hardware Next topic Computers sound and music on page 56 Computers sound and music This section provides some background on the different ways that computers sto...

Page 57: ...rmation on notes tempos and key signatures that makes it possible to display and edit the piece using standard musical notation The primary disadvantage of MIDI is that the quality of the sound a list...

Page 58: ...that runs Windows 7 and has a sound card or built in sound module If you want to hook up other devices like a MIDI keyboard an electric guitar or a microphone you need the right cables and you need t...

Page 59: ...dio interfaces sound cards CardBus PCI USB USB2 and FireWire are the most common Laptops can use an audio PCMCIA card Many audio interfaces also have MIDI inputs and some have built in MIDI synthesize...

Page 60: ...e Type Description 1 4 inch TRS Balanced analog connection XLR Balanced analog connection Microphones professional audio equipment 1 4 inch TS Unbalanced analog connection Guitar cable Hi Z 1 8 inch M...

Page 61: ...ne input jack on your computer sound card If you are connecting a keyboard the audio cable must go from the keyboard s audio out or line out jack to the sound card input jack 1 8 inch stereo adapters...

Page 62: ...card or audio hardware interface has a 1 4 inch input jack plug the mic cable into an XLR to quarter inch adapter and then plug your mic cable into your audio hardware If your audio hardware has an XL...

Page 63: ...ck on your stand alone MIDI interface or sound card and one to connect the MIDI IN jack on your MIDI instrument to the MIDI OUT jack on your stand alone MIDI interface or sound card Many stand alone M...

Page 64: ...rm or cancel the change If you click Yes playback stops and the audio and MIDI engines reload Preserve selected audio devices on device changes Enabled inputs and outputs are persisted per device and...

Page 65: ...ng Audio Outputs dialog box will suggest default assignments for any missing devices You can click OK to accept the assignments or click Cancel to preserve the original missing device assignments You...

Page 66: ...wing effect Enabling a new output port All MIDI tracks and control surfaces retain their current output port assignments Disabling an unassigned output port All MIDI tracks and control surfaces retain...

Page 67: ...remap the missing devices to available devices Control surfaces Control surface output ports are assigned to None Automatic MIDI port remapping for control surfaces SONAR persists the names of MIDI p...

Page 68: ...a SONAR project from the menu Double click the SONAR program or any SONAR document from the Windows Explorer or the Find menu When starting SONAR you will see the Quick Start dialog box Figure 5 The...

Page 69: ...rder to access this content Getting Started Click here to view the Getting started on page 3 topic in the Help file This topic has links to a glossary of terms as well as some basic procedures Note Do...

Page 70: ...settings Setting up the MIDI In and MIDI Out devices When you start SONAR for the first time it checks your computer to find all the MIDI input and output devices you have installed such as sound card...

Page 71: ...the devices in this window The device on top is on Output 1 the one below it is on Output 2 and so on 3 Check one device at a time in the Outputs window and click Move Checked Devices to Top to change...

Page 72: ...vides quick access to many common operations The project is the center of your work in SONAR If you re a musician a project might contain a song a jingle or a movement of a symphony If you re a post p...

Page 73: ...AR can be saved as a project file with the extension cwp or as a Bundle file with the extension cwb For a complete description of the differences between project files and bundle files see Project fil...

Page 74: ...he project you want to open is located and select it 4 Click the Open button 5 If you are opening an OMF file the Unpack OMF dialog box appears Set the initial tempo and specify the directory where yo...

Page 75: ...ject SONAR closes the file The Track view is divided into several sections menu bar at the top the Navigator pane the Video Thumbnails pane the Track pane the Inspector pane the Clips pane the Bus pan...

Page 76: ...o show or hide the Bus pane at the bottom of the Track view The Navigator pane displays a large part of your project so you can see an overview of your song The Navigator pane displays all of your pro...

Page 77: ...s Figure 8 Use the Track Inspector and Properties Inspector to configure track and clip settings A Dock undock Inspector B Show hide Clip Properties Inspector C Show hide Track Properties Inspector D...

Page 78: ...r overview on page 592 The Properties Inspector has two modes Clip The Clip Properties Inspector displays settings for the currently selected clip s For details see Properties Inspector Clip Propertie...

Page 79: ...lay back your project The Control Bar consists of several modules that each contain various related controls You can re arrange and show hide each individual module which allows you to only show the f...

Page 80: ...an individual track combinations of tracks or the final mix The Console view contains several modules of controls There is one channel strip for each track and bus in your project You can use bus send...

Page 81: ...a player piano roll You can move the notes around make them longer or shorter and change their pitches by just dragging them with the mouse You can also use the Piano Roll view to display and edit MI...

Page 82: ...print whole scores or individual parts to share with other musicians Figure 12 The Staff view A Staff view menu B Zoom in out C Staff pane D Editing tools E Time and pitch locator F Dock undock and e...

Page 83: ...ain presets effect plug ins and instruments You can drag content and plug ins directly into tracks Figure 14 The Browser A Media Browser B Plug in Browser C Synth Rack Browser The Event List view disp...

Page 84: ...dd and display lyrics for a track For more information see Lyrics view on page 1970 Video To display a loaded video file For more information see Video view on page 2005 Navigator Manage the Now Time...

Page 85: ...rtical Zoom fader for Bus pane F Zoom Bus pane in vertically G Zoom in horizontally H Horizontal zoom fader I Zoom out horizontally The Zoom tools are used as described in the following table Tool How...

Page 86: ...Auto Zoom allows you to show more tracks or buses simultaneously as a result of having all but one zoomed out vertically Key What it does CTRL UP ARROW Zoom out vertically CTRL DOWN ARROW Zoom in vert...

Page 87: ...owing Drag up down to zoom horizontally Zooming is centered around the Aim Assist line To zoom faster hold down the SHIFT key while dragging Right click and drag up down to zoom tracks vertically The...

Page 88: ...NAR allows only one instance of each view but you can lock the contents of most views preserving the current view by forcing a new instance of the view to appear if necessary Locking views is the only...

Page 89: ...the Assigned to field that is just under the window reads Unassigned It s a good idea to find two unassigned options that are next to each other or easy to remember 3 Once you ve decided on two keys o...

Page 90: ...cking and holding the or button to adjust the amount of time that an X Rayed window takes to reach its final opacity percentage value Fade In Time Adjust this value by clicking and holding the or butt...

Page 91: ...start and finish For example if the last entry in the EffectProps View section was Waves SSL EQ Stereo XRayExclude11 1397510483 XRayExclude12 E451379E F7E1 4E82 98D9 BEB87AC45E90 And you wanted to ex...

Page 92: ...s that are used for virtually all parts of the program using the Edit Preferences Customization Colors command This command also lets you change the background bitmap that is displayed in the SONAR wi...

Page 93: ...OK SONAR uses the default colors for all selected screen elements To change the wallpaper 1 Choose Edit Preferences to display the Preferences dialog box then click Customization Colors 2 Choose the d...

Page 94: ...he form of clr files so that SONAR users can share color layouts And you can back up or export all of your presets with a single command and import a group of presets that you or another SONAR user cr...

Page 95: ...e to the folder where you want to store your new color set file 5 Type a name for your color set file in the File Name field 6 Make sure that the Export Current Color Set check box is enabled 7 Click...

Page 96: ...Navigate to the folder where you want to store your the exported file This file will contain all or your color presets 4 Type a name for your file in the File Name field Use a file name that you will...

Page 97: ...nd entering d AutoRun exe where d is your disc drive 4 Click the Install SONAR button 5 Follow the installation instructions on the screen You can also install SONAR by choosing Start Run and running...

Page 98: ...page 113 Tutorial 3 Recording vocals and musical instruments on page 119 Tutorial 4 Playing and recording software instruments on page 125 Tutorial 5 Working with music notation on page 133 Tutorial...

Page 99: ...med with them Whenever you write or record music in SONAR you are writing it to be saved into a project A project can contain a variety of elements including Audio tracks MIDI tracks Instrument tracks...

Page 100: ...of the list to open the project Create a New Project Click this button to open the New Project File dialog box which lets you create a new project based on any available template Online Videos and mo...

Page 101: ...roject Audio in its own Folder Select this check box if you want to store the project s audio files in a separate folder It is recommended that you select this option Template This list shows all avai...

Page 102: ...ays this can be done in SONAR Click the Open a Project button in the Quick Start dialog box that is first presented when SONAR starts Select File Open from the menu bar across the top of SONAR s scree...

Page 103: ...Navigate to the Cakewalk Content folder default location is C Cakewalk Content SONAR X3 Producer or Studio Tutorial Projects Tutorial Projects and locate the project named SONAR_AudioDemo cwb You can...

Page 104: ...iguring your sound device on page 104 Configuring your sound device Before we can get any sound we need to ensure that SONAR is communicating with your computer s sound card or audio interface To do s...

Page 105: ...the output on your sound card that has either speakers or headphones connected to it In the Record Timing Master list select the input on your sound card that you plan to plug devices into such as a...

Page 106: ...ls click the Track Control button to the left of the Track view time ruler and select All from the menu You can also hold down the SHIFT key and press the Left ARROW and RIGHT ARROW keys to cycle thro...

Page 107: ...able track parameters during playback are recorded For more details see Tutorial 7 Mixing and adding effects This is the Freeze button It is used to temporarily convert a synth or instrument track int...

Page 108: ...about the Control Bar see Control Bar overview on page 537 For now simply click the Play button to hear the project Experiment with the Mute and Solo buttons on each track If you solo multiple tracks...

Page 109: ...module When enabled the Loop button is lit Take note of the measure numbers displayed in the following image The first number 10 01 000 indicates the start of the loop region and second number 19 01...

Page 110: ...n For this exercise we are going to look at the different types of project files you can save with SONAR Take a look at the drop down list labeled Save as type Click the Save as type arrow to see a li...

Page 111: ...into a single track This is compatible with many older sequencers and keyboards MIDI Format 1 files can store up to 7256 tracks and are a better choice if you plan to use your MIDI file with another c...

Page 112: ...112 Tutorial 1 Creating playing and saving projects Saving project files...

Page 113: ...an drag content and plug ins directly into tracks By default the Browser is docked on the right side of the screen To show or hide the Browser click the Views menu and choose Browser or press B Now th...

Page 114: ...menu D Dock undock E Docking options F Expand collapse G Move up one level to the parent directory H Search filter I File list J Play Stop K Delete content preset L Save content preset Control Descrip...

Page 115: ...h button to open the Synth Rack The Synth Rack contains the following controls Figure 20 Synth Rack Browser A Insert Synth B Delete Synth C Insert Synth Options D Show Synth Rack Browser E Synth Setti...

Page 116: ...elect Audio Library 5 Double click the Loops folder to open the folder 6 Double click the Loopmasters folder 7 Double click the ROCK AND FUNK folder 8 Double click the RAW POWER and click the loop nam...

Page 117: ...d give them a listen 1 Click the Media button to show the Media Browser 2 In the Browser click the Content Location drop down list and select MIDI Library 3 Double click the Smart Loops folder and sel...

Page 118: ...a MIDI track 3 When you drag a loop or groove clip into a project it will only show one repetition You can extend how long a loop is by pointing the mouse pointer to the clip s right edge then drag t...

Page 119: ...ll need a new audio track Follow these steps to insert one 3 Do one of the following Click Insert and then click Audio Track Right click on the Tracks pane and select Insert Audio Track on the pop up...

Page 120: ...even comes close to the maximum increase the input level If the meter even occasionally reaches the maximum decrease the input level Input levels are usually adjusted via a knob next to the input jack...

Page 121: ...ming at the beginning of the third count 15 When you finish recording click the Stop button or press the SPACEBAR A new audio clip appears 16 Press Play to play back the project If you would like to r...

Page 122: ...d Sound Volume Control The Volume Control window appears 2 On the Options menu click Properties The Properties dialog box appears 3 In the Adjust Volume For section click Recording 4 Click OK to close...

Page 123: ...o Tutorial 1 Creating playing and saving projects on page 99 Tutorial 2 Using the Browser on page 113 Tutorial 4 Playing and recording software instruments on page 125 Tutorial 5 Working with music no...

Page 124: ...124 Tutorial 3 Recording vocals and musical instruments...

Page 125: ...hat way messages sent from one drum machine can be fed to another made by a different company It will play the same beat but using the drum sounds from the different module The standard they establish...

Page 126: ...r 4 Click DropZone The Insert Soft Synth Options dialog box appears 5 Select the following options Simple Instrument Track Synth Property Page Recall Assignable Controls Ask This Every Time A new trac...

Page 127: ...of its sounds we can make use of these sounds in our project This is where you can get creative You have the option of recording a performance that you play on a MIDI keyboard also referred to as a co...

Page 128: ...ntrol Bar s Transport module The Now Time cursor starts to roll Play some notes and click the Stop button when you re done You have just recorded your first MIDI performance through a software instrum...

Page 129: ...click on the grid To create a note click on the grid at measure 1 If you click on various sections of a note the Smart tool performs a different function Left edge Adjusts the start time Right edge Ad...

Page 130: ...ed Latin cwp and click OK If you press Play you are not likely to hear anything That s because this project does not contain a software synth for the MIDI tracks to play through Since there are 11 tra...

Page 131: ...ember it needs to be on its own discreet MIDI channel In this project MIDI channels 1 11 are already used so let s assign this track to channel 12 in the Track Inspector or Console view You can also s...

Page 132: ...132 Tutorial 4 Playing and recording software instruments...

Page 133: ...king with notation Let s start by opening the Staff view in a new project 1 On the File menu click New The New Project File dialog box appears 2 Select the Normal template specify a project name and s...

Page 134: ...oject menu click Insert Meter Key Change The Meter Key Signature dialog box appears 2 Change Beats per Measure to 3 and Key Signature to 1 Sharp G then click OK to close the Meter Key Signature dialog...

Page 135: ...including using the Fretboard and the Lyrics view see Notation and lyrics on page 1179 Selecting the note value In the Control Bar s Tools module click the Duration button and hold the mouse button p...

Page 136: ...he Smart tool or Move tool in the Control Bar 2 Do one of the following With the Smart tool position the pointer over the bottom half center of the note then drag the note to the desired location With...

Page 137: ...durations and ticks with the default timebase of 960 ticks per quarter note Deleting a note 1 Select the Smart tool or the Erase tool in the Control Bar 2 Do one of the following With the Smart tool...

Page 138: ...s can be typed 4 Press the space bar to quickly jump to the next note Adding chord symbols To add a chord symbol above a note 1 Select the Smart tool or the Freehand tool in the Control Bar 2 Click th...

Page 139: ...s can be entered Adding a crescendo or decrescendo diminuendo 1 Select the Smart tool or the Freehand tool in the Control Bar 2 Click the Hairpin button in the Staff view 3 Position the pointer just b...

Page 140: ...can print out the score or individual parts 1 Select the MIDI track or tracks you want to print the notation for 2 On the Views menu click Staff View The Staff view opens 3 On the Staff view Print men...

Page 141: ...al 2 Using the Browser on page 113 Tutorial 3 Recording vocals and musical instruments on page 119 Tutorial 4 Playing and recording software instruments on page 125 Tutorial 6 Editing your music on pa...

Page 142: ...142 Tutorial 5 Working with music notation...

Page 143: ...age 144 Moving clips on page 146 Splitting clips on page 146 Cropping clips on page 147 Undo and Redo on page 143 Undo and Redo While editing a project you might make mistakes or experiment with an id...

Page 144: ...3 The track selection specifies what track s clips will be deleted while leaving its surrounding tracks unchanged In order to edit clips you must set the track s Edit Filter control to Clips Figure 2...

Page 145: ...o select the section you want to delete The selected section is highlighted 3 Press DELETE or select Edit Delete You might have noticed that you re only able to select full measures What if you need t...

Page 146: ...ct and create a new Audio track that contains the selected clip The Drag and Drop Options dialog box appears which lets you specify what to do with any existing data in the target location You can eit...

Page 147: ...e that the clips are windows that allow you to see and hear pieces of audio or MIDI You can change the size of that window so that less of the data is visible If it s not visible it won t be heard dur...

Page 148: ...rdings into well organized and great sounding projects The next step is mixing which is covered in Tutorial 7 Mixing and adding effects on page 151 See Selection on page 144 Moving clips on page 146 S...

Page 149: ...age 113 Tutorial 3 Recording vocals and musical instruments on page 119 Tutorial 4 Playing and recording software instruments on page 125 Tutorial 5 Working with music notation on page 133 Tutorial 7...

Page 150: ...150 Tutorial 6 Editing your music...

Page 151: ...r audience In this tutorial we ll discuss some general guidelines But it s important to remember that there are no rules This is another artistic stage of song creation We ll start by opening the Mixi...

Page 152: ...in the frequency spectrum and stereo field They re also all trying to be heard at the same level in the same location Normally when recording a track it is common to try to get a relatively loud signa...

Page 153: ...r right Doing so may cause the tracks to sound too separated which can take away from the fullness of the sound See Adding effects FX on page 153 Using Automation on page 158 Adding effects FX At this...

Page 154: ...n in a rhythmic musical manner These are the effects we ll be focusing on in this tutorial However other effects are available and you should experiment with each one to discover how they can be used...

Page 155: ...y happen with drums and bass If you turn down the overlapping frequency range for one of the instruments it will allow the other instrument to stand out better in the mix Let s give it a try 1 Solo th...

Page 156: ...everb effect to a bus then send each track to that bus at varying levels This is where SONAR s advanced mixing environment offers a lot of flexibility We will add a control to each track which adjusts...

Page 157: ...The Reverb property page appears 5 Set the Reverb control to 0 0 dB and the Dry control to Inf Notice that a send control named Reverb has been added to each track To enable or disable a send click th...

Page 158: ...rite Automation button to enable automation writing for that track 2 Press Play to start playback 3 During playback simply make the changes to the parameters in realtime using either your mouse or a c...

Page 159: ...s sure to provide you with inspiration for your own projects There are also many books available on the topic as well as thousands of add on plug ins that can expand your arsenal of FX For more infor...

Page 160: ...160 Tutorial 7 Mixing and adding effects...

Page 161: ...guide you through the basics of working with video inside SONAR If you are new to SONAR it is highly recommended you review Tutorial 1 Creating playing and saving projects on page 99 before going any...

Page 162: ...d then click OK If you are having trouble with this please refer to Tutorial 1 Creating playing and saving projects on page 99 3 On the File menu point to Import and select Video The Import Video dial...

Page 163: ...ojects Video Tutorial Locate and import the file named Boarding wmv You can open it by either double clicking on it or highlighting it and then clicking the Open button Notice that SONAR imported any...

Page 164: ...sed the Video view or if it did not open automatically when you imported the video you can open it by selecting Views Video or pressing ALT SHIFT 2 Changing the video properties SONAR allows you to ma...

Page 165: ...video doesn t start playing until measure 2 in your project See Working with markers on page 166 Exporting your video on page 168 Option What it does Start Time The time in your SONAR project at whic...

Page 166: ...00 00 and Trim out Time to 00 00 44 23 Let s say we want our music to start at the beginning of the video right when the sun comes out This occurs about 4 seconds into the movie Taking a closer look...

Page 167: ...sert the marker and close the Marker dialog box You can place as many markers as you need for a project to sync up all of your events The Markers view will now display the marker you just created with...

Page 168: ...thing in the project that you want to export If you want to export the entire project simply select Edit Select All or press CTRL A On the File menu point to Export and click Video The Export Video di...

Page 169: ...more specific details about different formats The Audio Mixdown Options button will bring up settings specific to the audio in your project Click the Help button for detailed instructions on how to u...

Page 170: ...170 Tutorial 8 Working with video Exporting your video...

Page 171: ...o the project named SONAR_AudioDemo cwb and click Open to load the project Now that you have opened the demo project or your own audio project click the Play button or press SPACEBAR listen to it If y...

Page 172: ...op half of this window is very similar to the Open and Save dialogs that were discussed in Tutorial 1 Creating playing and saving projects on page 99 This is used to navigate to locations on your comp...

Page 173: ...uality audio file is exported When the progress bar disappears SONAR has finished exporting your project Now we need to burn our mix to a CD SONAR features a powerful built in CD burning application t...

Page 174: ...your CD For the best compatibility with most consumer CD players you should use a CD R disc CD RW discs while compatible with some newer CD players may not play back in all systems Once you have fini...

Page 175: ...g SoundCloud CD Quality Creates a 16 bit 44 1kHz wav file SoundCloud MP3 Creates a 256kBit s mp3 file SoundCloud FLAC FLAC is a royalty free high quality lossless audio compression codec Files compres...

Page 176: ...e displayed link to view the uploaded file on SoundCloud The Upload Failed dialog box appears if the upload is not successful There are various reasons why an upload may have failed For troubleshootin...

Page 177: ...ter click Setup to configure See Sharing your songs on SoundCloud on page 1077 The Cakewalk SoundCloud interface on page 1078 Troubleshooting on page 1087 Note You can not share a track on Facebook or...

Page 178: ...Files of type list select YouTube Publish 4 Enter a file name in the File name box 5 Click Export Cakewalk YouTube Publisher opens 6 Enter the required settings in Cakewalk YouTube Publisher see Cakew...

Page 179: ...Credentials Select this check box to remember the Account and Password settings for future use Title required Enter a name for the video Description Type a description of the video Private Enable thi...

Page 180: ...aring audio for distribution on page 963 Export Audio dialog on page 1725 Exporting your video on page 168 Exporting video on page 256 Video playback import and export on page 251 See also Tutorial 1...

Page 181: ...rs to where MIDI input signals are sent once SONAR receives them See also The Now time and how to use it on page 182 Using the Transport Markers Punch and Loop modules on page 195 Controlling the tran...

Page 182: ...play time in samples The measure beat and tick number MBT identifies the Now time in musical time units Ticks are subdivisions of quarter notes and indicate the timebase of the project For more inform...

Page 183: ...an event in the Event List view You can also set the Now time by right clicking in the Clips pane if you enable the Right Click Sets Now option in Track view Options Click Behavior menu When entering...

Page 184: ...issues when editing MIDI data during playback If you prefer a slight hiccup instead of hearing the full note duration you can change the default behavior with the Set Now Time with Full Restart optio...

Page 185: ...u clear the On Stop Rewind to Now Marker option to have the Now time marker move to follow the current Now time when you stop playback Or On the Track view Options menu select the On Stop Rewind to No...

Page 186: ...n large print so that it s easier to see when you are far from your monitor for example when you re at your keyboard or another instrument or when several people need to read the Now time from a dista...

Page 187: ...G Sets the Now time to the From time the start time of the current time selection CTRL HOME Sets the Now time to the beginning of the project CTRL END Sets the Now time to the end of the project CTRL...

Page 188: ...options or formats Measures Beats and Ticks M B T Hours Minutes Seconds and Frames H M S F also called SMPTE Samples Milliseconds Figure 37 The Time ruler A M B T B H M S F C Samples D Milliseconds E...

Page 189: ...tton and select a Time ruler format from the pop up menu Click the Plus button and select a Time ruler format you would like to add from the pop up menu Click the Minus button and select from the pop...

Page 190: ...extremely loud through your monitors and also interrupt playback and recording if you open any dialog boxes or do anything that has a system sound attached to it while a project plays The quickest way...

Page 191: ...ward click the Rewind or Fast Forward button and keep the button pressed until you want to resume playback To audition a selection 1 Select the clips that you want to audition 2 Press SHIFT SPACEBAR O...

Page 192: ...ver audio playback is interrupted This can be useful to smooth out abrupt transitions while stopping and starting the transport rapidly and will reduce ear fatigue during long sessions The fade is onl...

Page 193: ...s to get stuck in the On position The Reset MIDI and Audio button in the Transport module is used to stop all notes from playing The Reset MIDI and Audio command also stops feedback from input monitor...

Page 194: ...ically jump back to the start of the loop when it reaches the end When looping is enabled the loop times are indicated by special markers in the Time ruler A Loop From B Loop Thru To move a loop in th...

Page 195: ...ge of times then right click in the Time ruler and choose Loop Set Loop Points Looping is automatically turned on when you use the Set Loop to Selection command To cancel a playback loop Click in the...

Page 196: ...o one of the following Click the Previous Marker button or Next Marker button in the Markers module Click the Marker list in the Markers module and select a marker from the drop down menu Press the G...

Page 197: ...e Auto Punch Toggle button in the Punch module to activate Auto Punch 2 To set the auto punch region do one of the following Drag in the time ruler to make a time selection then click the Set Punch Ti...

Page 198: ...play section shows useful information about the current project including the Now time sample rate and bit depth tempo and meter The following information is shown Current Now Time The Now time shows...

Page 199: ...p Start Time D Loop End Time The Loop module contains the following controls Loop on off Enable disable playback looping Set Loop Times to Selection Set the Loop Start time to the start From time of t...

Page 200: ...s Normal The track plays unless one or more of your other tracks is soloed Muted The track is not played but you can turn it on while playback is in progress Archived The track is not played and you m...

Page 201: ...ng the phase of a track on page 207 Changing tracks mono stereo status on page 208 The Mix module The Mix module lets you configure various playback settings You can quickly mute unmute solo unsolo an...

Page 202: ...all effects globally For details see Bypassing effects globally on page 920 Live Input PDC Override Enable disable delay compensation on live tracks thereby removing the latency during playback and re...

Page 203: ...Mute button in the Track Console view or Track Inspector To mute or unmute several tracks at once select the tracks and do one of the following Right click a track strip and choose MSR Mute on the po...

Page 204: ...olo individual tracks To solo or unsolo a track click its Solo button in the Track Console view or Track Inspector To solo or unsolo several tracks at once select the tracks and do one of the followin...

Page 205: ...utton in the Control Bar s Mix module Figure 45 The Mix module When Dim Solo is enabled non soloed audio tracks will play at a reduced gain rather than 0 gain mute The Dim Solo enable disable state is...

Page 206: ...clusive Solo button in the Control Bar s Mix module Figure 46 The Mix module There are several situations where soloing one track actually solos more than one track even when Exclusive solo mode is en...

Page 207: ...04 Dim Solo mode on page 205 Exclusive Solo mode on page 206 Inverting the phase of a track A waveform s exact opposite is called an inversion It is a shift of 180 degrees A waveform and its inversion...

Page 208: ...p will be increased by 3 dB if the track s output interleave mono stereo toggle is set to mono If the track has mixed stereo and mono clips The track has a synth selected as its input source Input Ech...

Page 209: ...ored in the track Both kinds of tracks contain an Automation Read button and an Automation Write button which enable or disable automation playback and recording respectively Note Enable Mono Processi...

Page 210: ...er controls A Track color B Track number C Header icon D Track name E Peak value F Maximize restore G Meter Figure 49 Audio track controls A Track number B Track name C Edit Filter D Mute E Automation...

Page 211: ...When enabled mutes the track Solo When enabled solos the track Arm When enabled arms the track for audio recording Input Echo Turns input monitoring on or off Automation Read and Write buttons Enable...

Page 212: ...k standing out disproportionately at the end of the fade out Input The input source for the track used in recording Output The output bus through which the track is played Send Enable Track Inspector...

Page 213: ...audio track controls in the Console view see Audio track controls on page 1981 Meters The recording and playback levels are displayed in the Playback and Record meters WAI display Shows a color coded...

Page 214: ...B Track name C Edit Filter D Mute E Automation Read F Solo G Automation Write H Arm for recording I Input echo J Archive K Expand collapse track L Track icon M WAI display N Track color O Expand coll...

Page 215: ...track Arm When enabled arms the track for MIDI recording Input Echo Controls whether the track will echo MIDI data or not Automation Read and Write buttons Enable disable automation playback and recor...

Page 216: ...rack Patch Track Inspector and Console view only The instrument sound that will be used for playback Time Track Inspector only An offset applied to the start time of the events in the track Key Track...

Page 217: ...ol preset from the Track Control drop down list above the track strips To choose which controls are displayed in track strips see Configuring the display of tracks in the Track view on page 334 To do...

Page 218: ...ct Views Inspector or press the I key Figure 54 The Track Inspector Control How to change the setting Volume and Pan Click on the control and move your cursor left or right to adjust values or press E...

Page 219: ...re or software synthesizer will be used to produce the sound stored in your project In a very simple equipment setup you might have only a computer equipped with a basic sound card In this case you wa...

Page 220: ...were several different devices one for each stereo pair In SONAR audio tracks are assigned to main outs or buses Each main out represents a hardware device You use the Output control to assign a trac...

Page 221: ...alog box if you enable the Use Friendly Names To Represent MIDI Devices check box at the bottom of the MIDI Devices dialog box To make up a friendly name 1 Go to Edit Preferences MIDI Devices 2 Double...

Page 222: ...to None as a result of changing the audio configuration For more information see Silent Buses Detected dialog on page 1907 To assign the same audio input port to multiple tracks 1 In the Track view s...

Page 223: ...Track view select the tracks whose audio output port you want to assign 2 Click the small drop down arrow in any selected track s Output control The Output Port menu appears 3 Choose Selected Track Ou...

Page 224: ...tput ports with the exception of the Media Browser view Loop Construction view and Import Audio dialog box Each available audio port exposes Left Right and Stereo channels Assigning stereo tracks to m...

Page 225: ...ch settings the patch of the highest numbered track will be used for all the tracks In some projects you want the sound played by a track to change while playback is in progress You can accomplish thi...

Page 226: ...bank patch change takes place You can remove a bank patch change in the Event List view To choose patches with the Patch browser 1 Do one of the following In the Track Inspector or Console view right...

Page 227: ...rack right click in the effects bin and choose a plug in from the pop up menu Click the Insert Plug in button at the top of the effects bin and choose a plug in from the pop up menu Use the effects bi...

Page 228: ...volume settings in a variety of other ways as described under Changing track settings in the Track pane on page 218 To set the initial Pan setting 1 Move your cursor to the Pan control of the track y...

Page 229: ...3dB dip in output level in either channel when the signal is center panned 6dB center linear taper This choice causes no boost in a signal that s panned hard left or right and 6dB dip in output level...

Page 230: ...channels numbered 1 through 16 Every MIDI event is assigned to a particular channel Some MIDI equipment can accept MIDI information on only a single channel This channel may be preassigned or you may...

Page 231: ...spose command If the key offset value transposes the key number MIDI note outside the allowable MIDI range 0 127 the key number will be transposed to the lowest or highest octave within that range You...

Page 232: ...the different drum parts regardless of what track they re in would be affected If you change the note velocity for one drum track it will be the only one whose volume is affected To set the velocity o...

Page 233: ...en Play Stops If this option is enabled SONAR zeros resets the pitch wheel the pedal Controller and the modulation wheel Controller on all 16 MIDI channels whenever playback is stopped It also sends a...

Page 234: ...e a custom color tint which allows you to color code your tracks and clips for better project organization When you change the track color it affects the track strip in the Track view Console view Ins...

Page 235: ...235 Changing track settings Controlling playback Figure 60 Track colors affect the Track view Console view Inspector and clip foreground color...

Page 236: ...not want to assign a custom color or follow the bus color click and hold down the Follow Bus button then select Default on the pop up menu When a track color is set to Default the track strip will not...

Page 237: ...237 Changing track settings Controlling playback Figure 61 Default track colors are defined in the Preferences dialog box...

Page 238: ...n colored tracks inherit the bus color C Bus If you do not want tracks to inherit bus colors go to Edit Preferences Customization Colors and click the Track Defaults button then click and hold down th...

Page 239: ...t to change the clip color waveform or MIDI data but not the track strip background To do so go to Edit Preferences Customization Colors and clear the Show strip colors check box If Show strip colors...

Page 240: ...Edit Preferences Customization Colors and click the Track Defaults or Bus Defaults button Figure 64 Specify a default color for all new tracks and buses See Customization Colors on page 1838 Tip By d...

Page 241: ...ers sending MIDI data to either the same synth or multiple synths Each SONAR track allows you to select what MIDI input ports and channels the track will respond to The Output field of the track deter...

Page 242: ...ck is patched to To disable the default MIDI echo setting If you want to turn off the automatic MIDI echoing of the current track disable the Always Echo Current MIDI Track in Edit Preferences MIDI Pl...

Page 243: ...an choose the preset you saved by clicking the Presets option in the track s Input drop down menu If you want to edit a preset select it in the top window of the MIDI Input Presets dialog box edit it...

Page 244: ...le Local Control automatically Most modern synthesizers respond to this message If yours does not you will need to disable Local Control every time you turn it on for use with SONAR To automatically d...

Page 245: ...work with a series of project MIDI and bundle files You can create edit and save a Play List or set of up to 999 SONAR projects As each file plays SONAR loads it and displays it in the Track view and...

Page 246: ...ong occupies a single row in the list Figure 67 Play List A Play List toolbar B Status C Play order D Project name E Path F Tempo G Key H Meter I Length J Created date K Modified date L Delay M Notes...

Page 247: ...y been played it is dimmed in the list Path The location of the song file BPM The song s initial tempo Key The song s initial key Button Command Description Shortcut Enable Play List Enable disable th...

Page 248: ...Using the Play List To create a new Play List 1 Choose File New 2 Choose Play List Set from the list 3 Click OK To open an existing Play List 1 Choose File Open 2 Choose Play List from the Files of T...

Page 249: ...n in the Play List To sort by columns Click the desired column header Click again to toggle between ascending or descending order Click the Order column header and select one of the following options...

Page 250: ...t to start with The project is opened and displayed as usual To start playback Click in the Control Bar or press the SPACEBAR If a song has already been played it appears dimmed in the list To stop pl...

Page 251: ...time giving you convenient random access to the video stream This makes it easy to align music and digitized sound to the video Commands in the Video view s right click pop up menu let you set the ti...

Page 252: ...d a video file into a project 1 Choose File Import Video or choose Insert from the Video view s pop up menu The Import Video dialog box appears In the Files of Type field select the kind of video file...

Page 253: ...ciently you can get better performance by temporarily disabling video animation during playback To set the Time display format Click the time display to cycle between MBT SMPTE Frames and None Or Righ...

Page 254: ...le click the Timecode Format list and select the desired format For more information see SMPTE MIDI time code synchronization on page 1274 To set the Video display format Right click in the Video view...

Page 255: ...imizing video performance on page 259 Option What it means Start Time The time in your SONAR project at which you want the video file to start playing Trim in Time The time in the video file at which...

Page 256: ...log box of encoding options for the kind of file you re creating Some codecs do not work click the Help button in the dialog box for help choosing options 6 Click the Audio Mixdown Options button to o...

Page 257: ...the Files of type list select YouTube Publish 4 Enter a file name in the File name box 5 Click Export Cakewalk YouTube Publisher opens 6 Enter the required settings in Cakewalk YouTube Publisher see...

Page 258: ...Login Credentials Select this check box to remember the Account and Password settings for future use Title required Enter a name for the video Description Type a description of the video Private Enabl...

Page 259: ...ame encountered if you have very few keyframes in the video performance may be slow To change the number of keyframes you may recompress the file using the File Export Video command and specify more f...

Page 260: ...ers You can resize the thumbnails while preserving the aspect ratio by dragging the splitter bar The video track strip at the top of the Track pane has display fields for Video File Name Start Time Tr...

Page 261: ...Hide Thumbnails on the pop up menu Click the Show Hide Thumbnails button in the Video Thumbnail track strip To hide or show frame numbers on frames In the video track strip click the Show Hide Frame N...

Page 262: ...your video projects on an external FireWire DV device To convert a Video project to DV AVI format 1 Use the File Export Video command The Export Video dialog box appears 2 In the File Name field type...

Page 263: ...sed default 5 frames You can also use the and keys to seek by the frame increment If your video does not play back in sync with your audio see Synchronizing external video playback to audio on page 26...

Page 264: ...to a blank area for recording 7 Close the property page and click the Save button in the Export Video dialog box to start exporting If you re printing to a device that uses tape the tape stops rollin...

Page 265: ...u skip all missing audio files you project opens without those pieces of missing audio Search Click this button to begin a search of all available hard drives for your missing audio file After locatin...

Page 266: ...ernal location To configure SONAR to always copy files to the project Audio Data folder If you want to keep all of your project s audio in one folder your project s audio data directory go to Edit Pre...

Page 267: ...material using your computer keyboard or mouse using the Piano Roll view the Staff view or the Event List view For more information about entering music using these views see The Staff view on page 11...

Page 268: ...r and Key signatures on page 270 Setting the Metronome and Tempo settings on page 272 Setting the audio sampling rate and bit depth on page 274 Using per project audio folders For ease of backing up y...

Page 269: ...that has MIDI settings predefined so that one track is set up for each of the instruments in the ensemble SONAR also includes a template with two MIDI and two audio tracks called the Normal template...

Page 270: ...ff view the Event List view and elsewhere The meter tells SONAR the number of beats per measure and the note value of each beat Common meters include 2 4 two beats per measure each quarter note gets a...

Page 271: ...The Meter Key Signature dialog box appears Figure 72 The Meter Key Signature dialog box 3 Enter the top and bottom meter values in the Beats per Measure and Beat Value fields 4 Choose the key signatu...

Page 272: ...easure and for all other beats The metronome settings are stored separately with each project so you can use different settings for each one To enable or disable the metronome during playback or recor...

Page 273: ...F3 Right click the Playback Metronome on off button or Record Metronome on off button in the Control Bar s Transport module Go to Edit Preferences Project Metronome 2 Change the metronome settings as...

Page 274: ...e default setting you must choose a sampling rate before you start recording audio SONAR lets you choose from several different sampling rates 11025 Hz 22050 Hz 44100 Hz 48000 Hz 88200 Hz 96000 Hz 176...

Page 275: ...s when a file will exceed 2GB and will dynamically switch to the new Wave 64 format The following table shows the maximum duration for a stereo WAVE file before we hit the 2GB limit as well as the max...

Page 276: ...sult in a CWB file that failed to save because a chunk was too large SONAR will automatically use the Wave 64 format if a CWB file exceeds 2GB Wave 64 file extension Wave 64 files have a w64 extension...

Page 277: ...base will be saved with the project file Preparing to record To prepare for recording you need to do the following Set the recording mode Choose your input s Arm one or more tracks for recording Check...

Page 278: ...with each project so you can save a different recording mode with each of your projects Recording mode Record button How it works Comping When recording previously recorded material on the track is no...

Page 279: ...of MIDI inputs appears 2 Choose an input from the following None This option actually sets the Input field to Omni with this setting the track will record any MIDI input coming in on any enabled port...

Page 280: ...e track in question It also turns off input monitoring for this track Left name of your sound card Choose this if you want to record a mono signal on the left channel of your sound card Right name of...

Page 281: ...Arming tracks for recording SONAR lets you record any number of tracks at one time You indicate the tracks you want to record by arming the tracks You can arm a single track or several tracks at one...

Page 282: ...ring Playback Record check box SONAR has an option that can reduce CPU overhead when the Allow Arm Changes During Playback Record option is enabled When Allow Arm Changes During Playback Record is ena...

Page 283: ...d As you record SONAR displays a clip containing the new material in the Clips pane unless you have disabled the Display Waveform Preview While Recording option in Edit Preferences Customization Displ...

Page 284: ...lution Click the track s Input Quantize resolution control in the Track Inspector then choose a resolution from the drop down menu You can also click Quantize Settings in the resolution menu to open t...

Page 285: ...track is armed for recording the track s Arm button displays Q instead of a red circle The red swath that appears in a track in the area where recording is taking place changes color You can choose a...

Page 286: ...endless variety sophisticated musical passages with simple key pressing The most significant capability of the arpeggiator is its ability to apply algorithmic variations on your input as well as MIDI...

Page 287: ...ld chord will arpeggiate for two octaves The held chord always represents the bass octave meaning that the other octaves sound in a higher register If you specify a range higher than the standard MIDI...

Page 288: ...u The arpeggiator always obeys the track s assigned output channel plus any additional channels specified in the arpeggiators Ch menu Shapes Choose a shape that specifies the direction in which curren...

Page 289: ...extension An Arpeggiator preset stores a pattern along with the current Arpeggiator parameter settings Preset files have a arp file extension You use the Arpeggiator s Preset control to load patterns...

Page 290: ...he next previous Arpeggiator preset Click the Next Preset or Previous Preset button in the Arpeggiator A Click to load the next previous preset To save an Arpeggiator preset Click the Preset control i...

Page 291: ...on to start playback 3 Adjust the arpeggiator control as desired When you are finished recording automation click the Stop button to stop playback Automation envelope data appears in the Track view To...

Page 292: ...t knob slider etc When you are finished recording automation click the Stop button to stop playback Automation envelope data appears in the Track view Recording and editing arpeggiator automation on a...

Page 293: ...range is from 0 dB to 60 dB To change the range right click on the meter and choose a new range from the menu 2 Perform at the loudest level at which you plan to record 3 Watch the meters respond Inc...

Page 294: ...lay the count in measures or beats 5 Play or perform the material you want to record As you record SONAR displays a waveform preview of the new material in the Clips pane unless you have disabled the...

Page 295: ...record meter s progress When you stop recording SONAR displays the actual waveform which is slightly different from the preview The preview is a snapshot taken at certain time intervals while the act...

Page 296: ...tton that turns that track s input monitoring on or off Global Input Echo button The Input Echo On Off All Tracks button in the Control Bar s Mix module turns input monitoring on or off on all audio t...

Page 297: ...driver passes the digital audio buffers through a digital to analog converter DAC where the audio data is converted back to an analog signal Finally this analog output signal is mixed with the origin...

Page 298: ...can eliminate the echo by muting the line in from playing back see To eliminate the echo from input monitoring on page 299 you ll send only the processed signal to the sound card outputs This techniq...

Page 299: ...n the Play Control window of the mixer check the Mute check box in the Line In column or in the column of whatever jack your instrument is plugged into and close the mixer window Now you can hear only...

Page 300: ...d by the plug ins Whenever delay compensation takes place on a track that has a live input an input monitored track or synth track it is delayed by the required amount to synchronize it with other tra...

Page 301: ...ters are modified presets are changed or internal plug in routing is changed When a plug in changes its internal delay SONAR will detect this and re sync all tracks in the project to this new delay va...

Page 302: ...ton that s just to the right of it instead or else stop recording or playback first and then click the Audio Engine button You may experience slightly better playback and recording performance by turn...

Page 303: ...ch take You have three choices for where these clips are stored All clips can be recorded in Sound on Sound mode and stored in a single track where they are stacked on top of one another You can use T...

Page 304: ...eate New Lanes on Overlap check box will create another Take lane if your new clip overlaps an existing clip 6 If you stack all takes in a single track you can audition them later by using the Expand...

Page 305: ...so you make sure you can get the feel you want However only the bars you want to correct are actually recorded That way you don t have to worry about introducing new mistakes elsewhere in the recordi...

Page 306: ...o only expose the punch region By also recording the pre roll and post roll you have more flexibility later when it comes to slip editing and cross fading the clip because you have access to audio dat...

Page 307: ...replacing any existing material Comping or Overwrite mode or blending with it Sound on Sound mode To use punch while looping 1 Choose the input for the track s you want to record and arm the track s f...

Page 308: ...the duration is longer than the step size the notes will overlap with the notes recorded at the next step SONAR displays your step recorded notes in the Staff view Piano Roll view Event List and Clips...

Page 309: ...he same step until you click the Advance button You can even record notes of different durations at the same step simply record the notes of one duration change the duration and play more notes withou...

Page 310: ...the Adv button will be showing if the Basic mode is displayed if the Bas button is showing click it 4 Set the insertion point by doing one or more of the following Click the Step Advance button to mov...

Page 311: ...l in a percentage value in the of Note Value field 7 Choose a destination track for your recording in the Destination Track field 8 If you want the insertion point to advance automatically when you pl...

Page 312: ...or use a keyboard shortcut for a smaller value To do this Do this Randomize the note duration Disable the Follow Step Size check box enter a number into the of Note Value field leave it at 100 if you...

Page 313: ...tcuts that the Step Record dialog box uses for other commands By default opening the Step Record window will automatically enable step recording SHIFT R is the default shortcut to open the Step Record...

Page 314: ...eys and commands as needed Default setting or option Default shortcut Whole note NumPad 1 Half note NumPad 2 Quarter note NumPad 4 Eighth note NumPad 8 16th note NumPad 6 32nd note NumPad 3 64th note...

Page 315: ...on of digits which represent beats that contain notes and dots which represent beats that contain rests The pattern described previously looks like this 1 2 3 4 5 6 Here is another example 1 2 4 This...

Page 316: ...ccompaniment feature that plays a drum part and an accompaniment while you play lead You want to record each of these three parts into a different track in a SONAR project You have a MIDI sequence sto...

Page 317: ...to respond to on this MIDI port Clicking the OMNI button in this row of MIDI channels clears or fills all the check boxes in this row 4 Select channels for any other MIDI port that s listed if you wa...

Page 318: ...oject files See Importing audio CD Tracks on page 321 Importing audio CD Tracks on page 321 Importing material from another SONAR project on page 321 Importing MIDI files on page 324 See also Adding B...

Page 319: ...ialog box 3 Choose the audio file you want to import SONAR displays information about the file at the bottom of the dialog box 4 Click Play to listen to the audio file before importing 5 If the new fi...

Page 320: ...Preferences File Audio Data and select the Always Import Broadcast Waves At Their Timestamp check box Otherwise set the Now Time and current track to indicate where the audio should be placed 2 Choos...

Page 321: ...orting 7 If you want to import the audio with a different bit depth than the original audio track choose the desired bit depth from the Import Bit Depth drop down list 8 Click OK SONAR loads the audio...

Page 322: ...oject files with users of other programs and platforms Support for OMFI and Broadcast Wave files provides cross platform compatibility with OMFI host applications such as Pro Tools Avid and Logic syst...

Page 323: ...h opens the Open dialog box 2 In the Files Of Type field select OMF File 3 Navigate to the folder that contains your OMF files select the OMF file you want to open and then click the Open button which...

Page 324: ...lick OK 5 Open the target project or click in the Track view for that project 6 Set the Now time and current track to indicate where the material should be placed 7 Choose Edit Paste Special to displa...

Page 325: ...ckups at fixed time intervals or every time a certain number of changes have been made to the file When the limit is reached the file is saved automatically If your original project is called MyProjec...

Page 326: ...of previously saved project files in your project folder The most recent version retains the original name of the project Previously saved versions are saved with a time stamp following the original...

Page 327: ...commands while working in the File Info window standard Windows hot keys like CTRL X CTRL C and CTRL V can be used to cut copy and paste text To display and edit project information 1 Choose Project I...

Page 328: ...contents of the project file Statistic What it means Created The date the project was first saved Editing time The total time you ve had the project open from the time it was created to the last time...

Page 329: ...clips you can easily create repetitions of your clips using your mouse Both the Track view and Console view have a full set of record and playback meters which you can configure in several ways SONAR...

Page 330: ...s why Rearrange the tracks in the Track view so that they appear in a different order This makes it easier to see and work with a subset of tracks like the rhythm section or the vocals and vocal back...

Page 331: ...s selected and all other tracks except the current track are deselected When a track is selected both the track number and all the data in the track appear highlighted Select several adjacent tracks C...

Page 332: ...ks dialog box 2 Choose the attribute by which to sort from the Sort By list Sort by What happens Name Ascending puts track in alphabetic order descending puts them in reverse order Size output or chan...

Page 333: ...fts the current track and all tracks below it down by one and inserts a blank new track at the location of the highlight Selected If you choose this attribute SONAR puts all the selected tracks at eit...

Page 334: ...ks or click Cancel to cancel the operation Your new tracks appear below any pre existing tracks with new audio tracks appearing above new MIDI tracks Configuring the display of tracks in the Track vie...

Page 335: ...zoom or fit command See To lock or unlock the height of a track on page 335 n a Show Only Selected Tracks This command hides all tracks which are not selected The remaining tracks are adjusted in size...

Page 336: ...the Clone Events Clone Properties Clone Effects and or Clone Sends boxes to indicate which items you want to copy 4 If you want copied events to become linked clips check the Link to Original Clips ch...

Page 337: ...acks you want to delete 2 Click the Track view Tracks menu and choose Delete Track s SONAR deletes the selected tracks You can also right click individual tracks and choose Delete Track from the pop u...

Page 338: ...e an icon as part of a track template To show or hide track icons To show or hide Track Icons in all views use the Views Icons Show Icons command To show or hide Track Icons in a specific view use the...

Page 339: ...directory in your SONAR program folder Track icon size s and transparency You can configure the size of small and large icons in Cakewalk ini By default small icons are 32x32 pixels and large icons ar...

Page 340: ...check all the controls you want to see for the current preset 4 To select all available controls click Select All Controls to select the default controls select Restore Defaults this will delete any...

Page 341: ...ips on page 349 Selecting clips on page 350 Moving and copying clips on page 352 Displaying clips Clips are displayed as rectangles in the Clips pane Their position and length show you at a glance the...

Page 342: ...ps are displayed Note that displaying the contents of each clip makes your computer work a little harder As a result if your computer has an older slower CPU you may want to turn off the display of cl...

Page 343: ...ollowing table describes the various clip header indicators Note Clip headers automatically disappear if the track height is less than 36 pixels Audio clip MIDI clip Description The clip is a standard...

Page 344: ...tes and phrases edit formants and add vibrato to monophonic sounds For details see Using Region FX on page 1043 n a The clip has been stretched from its original duration by the displayed percentage v...

Page 345: ...me ruler the mouse pointer should look like this then click with the right mouse button and drag up down To zoom into a selected area Use the Zoom tool to drag select an area of a clip or clips that y...

Page 346: ...heck it Fast Zoom exhibits the following behaviors ALT Mouse Wheel zooms vertically ALT SHIFT Mouse Wheel zooms faster vertically CTRL ALT Mouse Wheel zooms horizontally CTRL ALT SHIFT Mouse Wheel zoo...

Page 347: ...the Clip Inspector and show the Properties section Figure 87 The Clip Inspector 3 Choose a color as follows SONAR changes the color of the selected clips To do this Do this Use the default color Sele...

Page 348: ...he Navigator view The Track Rectangle indicates the section of your project which appears in the Clips pane of the Track view You can move the Track Rectangle or change its size To move the track rect...

Page 349: ...m Level 1 Horz Zoom Level 2 Horz Zoom Level 3 Horz Zoom Level 4 Horz Zoom Level 5 Horz Zoom to Project Opening views by double clicking clips By default double clicking a MIDI clip in the Clips pane o...

Page 350: ...once With the right mouse button drag in a rectangular pattern that touches each clip Select all the clips in a track Click on the track number in the Track view Select a portion of one or more clips...

Page 351: ...the clip Top Bottom Drag to select by time Top Bottom Click to select the clip Top Bottom Drag with the right mouse button to lasso select Select tool Top Bottom Click to select the clip Top Bottom D...

Page 352: ...ons If you drag to the edge of the Clips pane it will scroll automatically in the direction you drag If you change your mind while dragging clips press the ESC key to cancel the operation SONAR also l...

Page 353: ...wn the left mouse button A rectangle is displayed around the selected clips 6 Drag the clips to their new location and release the mouse button 7 If necessary choose the options you want from the Drag...

Page 354: ...and click OK SONAR cuts the clips from the project and places them on the Clipboard 4 Click in the Track pane to set the current track to be the one where clips should be pasted 5 Set the Now time to...

Page 355: ...e clip is set to the Musical time base the clip s M B T position stays constant and its Absolute SMPTE position shifts Absolute SMPTE If the clip is set to the Absolute SMPTE time base its Absolute po...

Page 356: ...s you want to copy 2 Choose Edit Copy Special to display the Copy dialog box 3 Choose the options you want and click OK SONAR copies the clips to the Clipboard 4 Click in the Track pane to set the cur...

Page 357: ...current Snap to Grid settings rather than the mouse pointer position The following rules apply when selecting and moving a clip with the Smart tool Edit tool Select tool or Move tool Click the front l...

Page 358: ...ated with a clip The Original Time clip property is based on absolute time not tempo This allows you to freely re arrange clips and later revert them back to their original time SONAR automatically as...

Page 359: ...es you want to lock Position and Data This choice locks position and data and causes a lock icon to appear on the clip Position Only This choice locks position only and causes a yellow lock icon with...

Page 360: ...rom the edit location When the Left Click Locks Scroll option is enabled default behavior the Clips pane will not scroll if you click any object in the Clips pane When you are done with the edit and w...

Page 361: ...group clips during multitrack recording You can specify how clips should be grouped when recording multiple tracks simultaneously 1 Go to Edit Preferences Project Record or right click the Record butt...

Page 362: ...rranging and editing Clip groups The following example shows two takes of a five track loop recording The first clip group is selected Note The Group Clips Across Tracks setting is stored with each pr...

Page 363: ...sired group from the pop up menu All selected clips are placed in a new clip group To remove clips from a clip group 1 Select the clips you want to remove from the group 2 Right click any selected cli...

Page 364: ...r clips in the same group that intersect the split time If a previous selection exists clicking will split only the clips in the selection Selecting a range will split all clips in the group that inte...

Page 365: ...a clip group you can specify if the pasted clips should be placed in a new clip group or continue to be grouped with the original clip group By default a new clip group is created You can change the b...

Page 366: ...Nudge Left 1 3 from the menu to move the clip left or Process Nudge Right 1 3 to move the clip right The amount the clip or note moves is determined by the settings in Edit Preferences Customization N...

Page 367: ...f frames The default frame count is 30 frames per second The number of frames varies depending on the setting in Edit Preferences Project Clock Samples A very small amount of time For CD quality audio...

Page 368: ...iting commands To select a portion of several clips Select the Smart tool or Select tool in the Control Bar then click in the bottom half of a clip and drag across several clips in adjacent tracks SON...

Page 369: ...th key time points in your project See Showing grid lines on page 369 Defining and using the Snap Grid on page 370 Snap offsets on page 372 Creating and using markers on page 372 Showing grid lines Di...

Page 370: ...ber of ticks from the snap target The closer the object gets to the snap target the more strongly the object is pulled to the target You can set the strength of magnetic snap to low medium high or off...

Page 371: ...ssings check box 5 Click OK to close the dialog box All time selections and drag and drop editing operations use the new snap grid resolution s To use a secondary Snap to Grid resolution By default SO...

Page 372: ...erties section 3 Click the Snap Offset field and type 0 Creating and using markers Markers are a way of associating a name with a time point in your project You use markers to name sections of a proje...

Page 373: ...e Markers view choose Views Markers From the Markers view you can use the File Print and File Print Preview commands to print a listing of markers Figure 96 The Markers view You can add markers while...

Page 374: ...he Now time and displays it in the Time Ruler the Markers view and the Markers module To edit a marker 1 Either right click on the marker in the Time Ruler or choose a marker in the Markers view and c...

Page 375: ...ou make a mistake To jump to a marker There are many different ways to jump to a specific marker Choose a marker from the drop down list in the Control Bar s Markers module Press G twice to display a...

Page 376: ...ers you can toggle through which of the overlaid markers you d like to move For example if the Now Time marker a regular Marker a Loop point and a Punch point are all at measure 5 pressing Tab while h...

Page 377: ...g the Select All Siblings command in the Clips pane context menu You can easily unlink linked clips and then edit them individually You have two options when unlinking linked clips Once you have unlin...

Page 378: ...o options Linked Repetitions If you choose this option only the new copies of the original clip are linked together Edits you make to the new copies do not affect the original and vice versa Link to O...

Page 379: ...ounce to Clip s If the selected clips are in separate tracks one clip is created for each track All clip automation is applied destructively to the new clip Table 55 Note Combining a stereo and mono c...

Page 380: ...ences Customization Editing 2 Under Clips select the desired option in the Selection after single split list To split clips into smaller clips 1 Select the clips you want to split 2 Right click on any...

Page 381: ...solo individual takes Better workflow for creating a final composite take out of many separate takes To show a track s Take lanes click the track s Expand collapse Take lanes button Figure 98 Take la...

Page 382: ...entical to the controls found in tracks Figure 100 Take lane controls A Expand collapse Take lanes B Select lane C Delete Take lane D Add Take lane E Lane name F Edit Filter G Mute H Solo I Arm for re...

Page 383: ...ed envelopes are displayed in bold text at the top of the menu Name Take lanes are automatically named with a sequential take number You can rename Take lanes just like regular tracks Solo Solo the Ta...

Page 384: ...ke lanes and Automation lanes can be displayed simultaneously Take lanes are always displayed immediately below the parent track and Automation lanes are displayed below the Take lanes The Expand coll...

Page 385: ...e all empty Take lanes in a track 1 Click a track s Expand collapse Take Lanes button 2 Right click the Comp clip see Editing Comp clips on page 408 and select Remove Empty Take Lanes on the pop up me...

Page 386: ...track not an existing Take lane 6 Set your loop boundaries and start recording multiple passes through the looped area 7 Stop recording To select a lane Click the top left corner of the Take lane To...

Page 387: ...m have been renamed Do one of the following To adjust the same control in all tracks Hold down the CTRL key and adjust a control in a track that is not selected SONAR automatically adjusts the same co...

Page 388: ...tion you can also play back only selected data if you want by pressing the SHIFT key and the SPACEBAR at the same time To mute a time range 1 Select the Mute tool in the Control Bar 2 If you want to m...

Page 389: ...k on page 389 Isolating clip soloing on page 390 Audition selection playback To audition the current selection press SHIFT SPACEBAR Only the selected data plays back See Isolating clip soloing on page...

Page 390: ...and click the clip to isolate the entire clip lane To isolate a take in a Take lane 1 Select the Smart tool or Comping tool in the Control Bar 2 Set the track s Edit Filter control to Clips 3 Click th...

Page 391: ...ds you can use to comp in SONAR Comping record mode The default recording mode in SONAR is called Comping When recording previously recorded material on the track is not heard When a recording is done...

Page 392: ...ioning takes on page 396 Comping methods on page 397 Comping with the Smart tool and Comping tool on page 400 Speed comping on page 404 Adjusting crossfades on page 407 Editing Comp clips on page 408...

Page 393: ...g across the takes you want to keep SONAR automatically mutes all other overlapping takes on the same track For details see Comping with the Smart tool and Comping tool on page 400 You can also use sp...

Page 394: ...corded to a lane any clip data already in that area will be cropped or removed to accommodate the new data Loop recording multiple takes to a single track 1 Go to Edit Preferences Project Record or ri...

Page 395: ...button or press SHIFT T so Take lanes are visible 3 Click the top lane s Add Take Lane button to create a new empty Take lane 4 Click the new Take lane s Record button to arm the lane for recording 5...

Page 396: ...on different takes Select the desired clip s or time region then press SHIFT SPACEBAR You can use the LEFT RIGHT UP DOWN ARROW keys to audition adjacent takes then press the ENTER key to isolate the s...

Page 397: ...ng tool on page 400 Speed comping After recording multiple takes you can audition any individual take use keyboard shortcut keys to audition other takes and then select which take you want to use For...

Page 398: ...e Set Loop Points to Selection button in the Control Bar s Loop module 8 Click the Record button in Control Bar s Transport module 9 When recording is complete click the Stop button Each repetition ap...

Page 399: ...of the new material Overwrite No No new material overwrites existing material No unless global Store Takes in Separate Tracks option is enabled in Edit Preferences Project Record The new material rep...

Page 400: ...muted Figure 104 Click the take you want to isolate When a clip is split the two resulting clips contain identical data but are cropped differently SONAR will intelligently create as few clips as pos...

Page 401: ...fine the isolate mute regions Figure 107 Drag to isolate another region and SONAR automatically heals previous splits if necessary You can also manually heal abutting healable clips To do so select th...

Page 402: ...ips The cropped points of the clicked clip are the zone boundaries All comping gestures work across clips in clip selection groups including isolating and healing The mouse pointer shows you which edi...

Page 403: ...the Smart tool in Take lanes on page 459 Using the Comping tool in Take lanes on page 481 Note Only the Smart tool changes its functionality when editing in a Take lane The other tools function in the...

Page 404: ...playback Audition will loop continuously You will see temporary Loop markers in the time ruler 3 Press the UP ARROW or DOWN ARROW key to audition the next or previous take Take lanes are numbered sequ...

Page 405: ...r s Mix module For details see Dim Solo mode on page 205 Tip Before speed comping you may first want to use the Smart tool or Comping tool to drag across each musical phrase in order to split the take...

Page 406: ...nd empty Take lanes on page 413 Comping on page 391 See also Take lanes on page 381 Clip muting and isolating clip soloing on page 388 Using the Smart tool in Take lanes on page 459 Using the Comping...

Page 407: ...tion the mouse pointer near the bottom where two clips abut When the mouse pointer looks like drag up or down to increase or decrease the crossfade duration Drag left or right to adjust the crossfade...

Page 408: ...can contain multiple Comp clips if there are time gaps between takes When you hide Take lanes Comp clips are also hidden and the takes are shown as regular clips Each Comp clip has a blue unifying hea...

Page 409: ...re no other overlapping unmuted takes Multiclip region If multiple unmuted takes overlap the Comp clip automatically shows a multiclip which displays the combined waveform or MIDI data of the overlapp...

Page 410: ...n all takes Deletes region on all takes Only deletes crossfade clip Crop Equivalent to cropping the corresponding take The clip region is bounded by the underlying clip so you cannot extend a clip reg...

Page 411: ...inuous take To flatten all isolated clips in a track 1 Click the track s Expand collapse Take Lanes button to show Take lanes 2 Right click the Comp clip and select Flatten Comp on the pop up menu The...

Page 412: ...Comping with the Smart tool and Comping tool on page 400 Speed comping on page 404 Adjusting crossfades on page 407 Editing Comp clips on page 408 Removing all unused takes and empty Take lanes on pag...

Page 413: ...l empty Take lanes in a track 1 Click the track s Expand collapse Take Lanes button to show Take lanes 2 Right click the Comp clip and select Remove Empty Take Lanes on the pop up menu See Basic compi...

Page 414: ...site clip selects data in all the enclosed tracks in the same time range now you can edit all the tracks in the folder by editing the selected area of the composite clip You can hide tracks in a folde...

Page 415: ...k folder has focus Or Right click a track that s not in a track folder and select Move to Folder Track Folder n from the pop up menu Or Select the tracks you want to add to the folder right click on t...

Page 416: ...e tracks in the track folders SONAR moves these tracks to the top level To open or close a track folder Click the folder icon that s just left of the track folder s name To select or deselect all the...

Page 417: ...effects pop up menu appears SONAR displays MIDI effects if you are editing a MIDI track and audio effects for an audio track 2 Select an effect from the menu The name of the effect appears in the eff...

Page 418: ...low Project Pitch option in the Loop Construction view Otherwise the MIDI tracks will speed up or slow down while the audio tracks will play at the same speed For more information about Groove clips s...

Page 419: ...ansport module 3 Type a new value and press ENTER or use the spinners to change the tempo value SONAR changes the current tempo to the desired value Using the Tempo commands The Project Insert Tempo C...

Page 420: ...n any audio clips that you want to follow the tempo changes Do this by selecting one or more clips right clicking a selected clip and choosing Groove Clip Looping from the pop up menu Each clip that h...

Page 421: ...Clip Looping on any selected clip that has Groove Clip Looping enabled 2 Choose Project Insert Tempo Change to display the Tempo dialog box 3 Check the Change the Most Recent Tempo box 4 Enter a new...

Page 422: ...s its own tools for editing tempo changes Tool Name What it s for Select Drag the Select tool in either the Tempo list or graphic display to select tempos to edit Freehand Draw a custom curve indicati...

Page 423: ...tool in the Control Bar 3 Drag a line in the graph from the starting time and tempo to the ending time and tempo SONAR introduces a linear series of tempo changes To draw a series of tempo changes in...

Page 424: ...g one or more clips right clicking a selected clip and choosing Groove Clip Looping from the pop up menu Each clip that has Groove Clip Looping enabled has beveled edges instead of sharp corners The s...

Page 425: ...Figure 116 The Undo History dialog A Most recent change B Click to clear the undo history C Adjust the number of steps you can undo The History command is grayed out until you make a change to the cur...

Page 426: ...dden material remains intact and can be restored All slip editing movements correspond to the current snap to resolution For more information about the snap to grid see Defining and using the Snap Gri...

Page 427: ...nning and end of clips To slip edit a clip 1 Set an appropriate snap resolution in the Control Bar s Snap module 2 Select the Smart tool or Edit tool in the Control Bar 3 If you are slip editing an au...

Page 428: ...he top third of the clip you want to edit The cursor changes to look like this 2 Click and drag the clip to the left or right as desired As in the case of slip editing the hidden information in the cl...

Page 429: ...want to delete 2 Select the Track view Clips Apply Trimming command SONAR permanently deletes the slip edited data from the clips you selected Slip editing multiple clips You can slip edit multiple cl...

Page 430: ...nd end times You can set the type of fade in or fade out you want to use as a default Linear A straight line raising or lowering the volume at a steady rate Slow Curve A curved fade which starts to ch...

Page 431: ...a quarter of the way up the blue vertical line A Cursor above horizontal blue line B Horizontal blue line To move only the starting point of the fade in drag below the horizontal blue line To delete a...

Page 432: ...nd Drop Options dialog box check the Blend Old With New check box and click OK 6 The two clips now overlap with a crossfade looking something like this A First clip B Fade out C Fade in D Second clip...

Page 433: ...iseconds you want the fade in to last Fade Out mS Select the number of milliseconds you want the fade out to last Fade In Curve Choose a fade in type Options are linear slow or fast curve Fade Out Cur...

Page 434: ...on page 436 Scroll Zoom Select see Selecting with a keyboard on page 438 Clip select Time select Edit see Editing with a keyboard on page 439 Trim crop Fade To enable disable editing with a QWERTY ke...

Page 435: ...Enable disable keyboard editing when NumLock is enabled 1 Enable Zoom Scroll mode 2 Down 3 Enable Select mode 4 Left 5 Center edit cursor 6 Right 7 8 Up 9 Enable Edit mode Table 63 EDIT MODE RIGHT SE...

Page 436: ...a keyboard 1 On your QWERTY keyboard press the NumLock key to enable NumLock mode 2 On the numeric keypad press 0 to enable keyboard editing 3 On the numeric keypad press 1 to enable Zoom Scroll mode...

Page 437: ...method is Zoom around the selection If there is no selection the next zoom method is Zoom around the edit cursor 4 Scroll left in large steps Zoom in horizontally in large steps based on selection 5...

Page 438: ...o the next lane or track Press 2 To center the edit cursor Press 5 To move to the previous clip Press CTRL 4 To move to the next clip Press CTRL 6 To move to the closest clip on the previous track Pre...

Page 439: ...l automatically select the clip that is under the edit cursor To enable clip editing with a keyboard 1 On your QWERTY keyboard press the NumLock key to enable NumLock mode 2 On the numeric keypad pres...

Page 440: ...of the following to adjust the selected fade Turn the rotary encoder Press PLUS or MINUS To crop clips with a keyboard 1 In Select mode select the clips that you want to crop 2 Press 9 to enable Edit...

Page 441: ...Using keyboard shortcuts to select tools on page 448 Figure 118 Global tools are accessed from the Tools module in the Control Bar Each tool serves a specific purpose and the most suitable tool depen...

Page 442: ...Move tool on Audio clips MIDI clips PRV notes Automation AudioSnap transients Edit tool on page 473 F8 cycle through Edit tools The Edit tool lets you adjust data You can slip edit clips adjust note...

Page 443: ...ools The Square Pattern tool lets you edit automation envelopes by drawing square shapes Using the Pattern tools on automation on page 493 Saw tool on page 492 F9 cycle through all Draw tools The Saw...

Page 444: ...one J The Scrub tool lets you play all displayed tracks as you drag the mouse pointer forward or backward at the desired speed To scrub A single track All displayed tracks Zoom tool on page 504 None Z...

Page 445: ...it Clips Audio Transients audio tracks only Notes MIDI tracks only Track Automation including ProChannel Arpeggiator plug in parameters and MIDI continuous controllers Clip Automation Figure 119 Use t...

Page 446: ...ools module on page 541 Accessing grouped tools Related tools are grouped together in the Tools module Several buttons in the Tools module display a small triangle in the bottom right corner The trian...

Page 447: ...e 121 If a button displays a small triangle in the bottom right corner click and keep the mouse button pressed to access additional tools or options Figure 122 Tools module expanded view A Smart tool...

Page 448: ...ollowing keyboard shortcuts to select tools Tools that belong to the same group share the same shortcut Press a shortcut repeatedly to cycle through all tools in a group Tip You can press the middle m...

Page 449: ...ool on page 492 F9 Triangle tool on page 492 F9 Square tool on page 492 F9 Saw tool on page 492 F9 Random tool on page 493 F9 Cycle through Erase tools Erase Mute F10 Erase tool on page 495 F10 Mute t...

Page 450: ...as a shaded rectangle A modifier key such as CTRL ALT or SHIFT may also be used in some cases to extend a tool s function See Selecting the data type to edit on page 450 Selecting the data type to ed...

Page 451: ...olume Pan etc in a track strip Hold down the SHIFT key and right click to toggle between the two most recently selected data types Click the middle mouse button to show the Tools HUD then scroll the m...

Page 452: ...ect to switch a track s current Edit Filter setting This is a quick way to toggle between editing clips and automation envelopes Figure 125 Use the Edit Filter control to specify what type of data the...

Page 453: ...15 To crop a clip s start end on page 515 To select audio clips on page 516 To mute unmute a clip on page 517 To move a clip on page 518 To stretch an audio clip on page 518 To erase a clip on page 51...

Page 454: ...PRV notes on page 501 To split a MIDI note on page 528 To scrub MIDI notes on page 525 To adjust a MIDI note s velocity on page 525 To adjust a MIDI note s start end on page 525 To select MIDI notes...

Page 455: ...463 Using the Select tool on AudioSnap transients on page 468 Using the Move tool on AudioSnap transients on page 472 Using the Timing tool on AudioSnap transients on page 479 Using the Freehand tool...

Page 456: ...following Click the Smart tool button in the Control Bar Press T to display the Tools HUD then select the Smart tool Press F5 Clip headers and the Smart tool Clips are drawn with a header which can be...

Page 457: ...g the top half to crop clip start and move the fade in or drag the bottom half to only crop the clip without moving the fade in does not apply when editing in Take lanes Stretch clip Crop clip start a...

Page 458: ...de out or drag the bottom half to only crop the clip without moving the fade out E Select by time Drag to lasso select F Click to set the Now time and clear the selection drag to select by time Split...

Page 459: ...to isolate Drag to lasso select F Click to isolate clip Drag to split across lanes and Isolate clip Split clip Click to toggle clip mute status Move data within clip Drag to lasso select G Click the...

Page 460: ...p data C Select by time Drag to lasso select D Click to set the Now time and clear the selection drag to select by time Split clip Move data within clip Drag to lasso select E Click to set the Now tim...

Page 461: ...en Note Propertie s dialog Erase note Split note Add note to selection Toggle selection Mute note D Adjust note end E Insert a new note before releasing mouse button drag left right to change duration...

Page 462: ...click A Move node Reset node B Drag up down to adjust selected nodes Insert nodes at the selection points C Drag left right to select nodes Drag to lasso select D Insert a node Add new node E Time sel...

Page 463: ...ols on page 492 Hotspot Default action Double click ALT CTRL A Drag transient marker line to stretch selected transients non proportional stretch Select all adjacent transient markers in other tracks...

Page 464: ...nts To select the Select tool Do one of the following Click the Select tool button in the Control Bar Press T to display the Tools HUD then select the Select tool Press F6 Using the Select tool on aud...

Page 465: ...gure 134 Select tool hotspots on MIDI clip Hotspot Default action Right click A Select by time Drag to lasso select B Click to select clip B Drag to select multiple clips C Select by time Drag to lass...

Page 466: ...tool Using the Select tool on PRV notes Figure 135 Select tool hotspots on PRV notes Hotspot Default action A Click to select note A Drag to lasso select B Lasso select Table 77 Using the Select tool...

Page 467: ...ick CTRL SHIFT Right click A Select node Extend toggle selection Extend selection Drag to lasso select B Time select nodes Extend toggle selection Extend selection Drag to lasso select nodes across tr...

Page 468: ...ool on page 482 Freehand tool on page 486 Line tool on page 490 Pattern tools on page 492 Erase tool on page 495 Mute tool on page 499 Scrub tool on page 503 Zoom tool on page 504 Hotspot Default acti...

Page 469: ...kers To select the Move tool Do one of the following Click the Move tool button in the Control Bar Press T to display the Tools HUD then select the Move tool Press F7 Using the Move tool on audio clip...

Page 470: ...RV notes Figure 140 Move tool hotspots on PRV notes Hotspot Default action ALT A Drag clip to move clip A Drag selection to move selection Table 81 Using the Move tool on MIDI clips Hotspot Default ac...

Page 471: ...pots on automation Hotspot Default action Double click CTRL SHIFT A Move node Reset node Extend toggle selection Extend selection B Move selected segments nodes C Move segment Add new node Extend togg...

Page 472: ...it tool on page 482 Freehand tool on page 486 Line tool on page 490 Pattern tools on page 492 Erase tool on page 495 Mute tool on page 499 Scrub tool on page 503 Zoom tool on page 504 Hotspot Default...

Page 473: ...n envelopes To select the Edit tool Do one of the following Click the Edit tool button in the Control Bar Press T to display the Tools HUD then select the Edit tool Press F8 Note The Edit tool does no...

Page 474: ...move the fade in or drag the bottom 25 to only crop the clip without moving the fade in Stretch clip Crop clip start and also move clip data D Crop clip end Note If the clip contains a fade out drag...

Page 475: ...d move the fade in or drag the bottom 25 to only crop the clip without moving the fade in Crop clip start and also move clip data B Crop clip end Note If the clip contains a fade out drag the top 75 t...

Page 476: ...Edit tool hotspots on PRV notes Using the Edit tool on automation Figure 146 Edit tool hotspots on automation Hotspot Default action A Drag up down to adjust note velocity B Adjust note start C Adjust...

Page 477: ...tool on page 482 Mute tool on page 499 Scrub tool on page 503 Zoom tool on page 504 Hotspot Default action Double click CTRL SHIFT A Drag to move node Click to select node Reset node Extend selection...

Page 478: ...y the Tools HUD then select the Timing tool Press F8 Using the Timing tool on audio clips Figure 147 Timing tool hotspots on audio clip Note The Timing tool does not work on MIDI clips or automation N...

Page 479: ...p transients Hotspot Default action A Drag up down to drag quantize selected notes Table 90 Using the Timing tool on PRV notes Hotspot Default action Double click CTRL A Drag left right to stretch aud...

Page 480: ...n page 503 Zoom tool on page 504 Comping tool The Comping tool lets you isolate clips in Take lanes To select the Comping tool Do one of the following Click the Comping tool button in the Control Bar...

Page 481: ...thout moving the fade in B Crop clip end Note If the clip contains a fade out drag the top half to crop clip end and move the fade out or drag the bottom half to only crop the clip without moving the...

Page 482: ...m tool on page 504 Split tool The Split tool lets you split clips cut clips split MIDI notes and split clips at transients By splitting clips you can copy move and delete individual sections To select...

Page 483: ...e 152 Split tool hotspots on MIDI clip Hotspot Default action A Click to split clip A Drag to split selection B Lasso to split at lasso edges Table 93 Using the Split tool on audio clips Hotspot Defau...

Page 484: ...lit tool hotspots on AudioSnap transients Hotspot Default action A Split note Table 95 Using the Split tool on PRV notes Hotspot Default action A Split audio at transient marker B Drag over transient...

Page 485: ...age 456 Select tool on page 464 Move tool on page 469 Edit tool on page 473 Timing tool on page 478 Freehand tool on page 486 Line tool on page 490 Pattern tools on page 492 Erase tool on page 495 Mut...

Page 486: ...ge 507 Figure 155 Use the Value control to specify the duration of new note events A Draw resolution note value To select the Freehand tool Do one of the following Click the Freehand tool button in th...

Page 487: ...hown in the Controller pane B Draw a new note Insert a new note Table 97 Using the Freehand tool on PRV notes Note 1 To glue notes together click one note drag to another note of the same pitch then r...

Page 488: ...ehand tool on AudioSnap transients Figure 158 Freehand tool hotspots on AudioSnap transients Hotspot Default action A Draw nodes segments Table 98 Using the Freehand tool on automation Hotspot Default...

Page 489: ...n page 456 Select tool on page 464 Move tool on page 469 Edit tool on page 473 Timing tool on page 478 Split tool on page 482 Line tool on page 490 Pattern tools on page 492 Erase tool on page 495 Mut...

Page 490: ...ne tool on PRV notes Figure 159 Line tool hotspots on PRV notes Note The Line tool does not work on audio clips MIDI clips or AudioSnap transients Note The F9 shortcut key cycles through all Draw tool...

Page 491: ...the Value control to specify the duration of each note and use the Snap resolution to specify the interval between each note Hotspot Default action SHIFT A Drag to add nodes at mousedown and mouseup p...

Page 492: ...HUD then select the desired pattern tool Press F9 Sine tool The Sine Pattern tool lets you edit automation envelopes by drawing sine shapes Triangle tool The Triangle Pattern tool lets you edit automa...

Page 493: ...oSnap transients Hotspot Default action SHIFT A Draw automation shapes Insert nodes at the Snap to Grid value without changing the value of the envelope segments limited to the track the gesture is st...

Page 494: ...n page 456 Select tool on page 464 Move tool on page 469 Edit tool on page 473 Timing tool on page 478 Split tool on page 482 Freehand tool on page 486 Line tool on page 490 Erase tool on page 495 Mut...

Page 495: ...the Erase tool Press F10 Using the Erase tool on audio clips Figure 162 Erase tool hotspots on audio clip Note The F10 shortcut key cycles through all Erase tools Erase Mute If another Erase tool is...

Page 496: ...e 163 Erase tool hotspots on MIDI clip Hotspot Default action ALT A Drag to delete a time selection B Click clip to delete clip B Click a selection to delete the selection C Lasso to delete clips Dele...

Page 497: ...pots on automation Hotspot Default action A Click to delete note A Drag to delete multiple notes B Lasso delete notes Table 105 Using the Erase tool on PRV notes Hotspot Default action A Delete node B...

Page 498: ...on page 478 Split tool on page 482 Freehand tool on page 486 Line tool on page 490 Pattern tools on page 492 Mute tool on page 499 Scrub tool on page 503 Zoom tool on page 504 Hotspot Default action...

Page 499: ...he Mute tool on audio clips Figure 167 Mute tool hotspots on audio clip Note The Mute tool does not work on automation Note The F10 shortcut key cycles through all Erase tools Erase Mute If another Er...

Page 500: ...n MIDI clip Hotspot Default action ALT CTRL A Click to unmute clip Click to isolate Take lane A Drag to unmute by time Drag to isolate by time B Click to mute clip Click to isolate Take lane B Drag to...

Page 501: ...e tool functions as a toggle Click once to mute and click again to unmute Figure 169 Mute tool hotspots on PRV notes Hotspot Default action A Click to mute unmute A Drag to mute unmute multiple notes...

Page 502: ...469 Edit tool on page 473 Timing tool on page 478 Split tool on page 482 Freehand tool on page 486 Line tool on page 490 Pattern tools on page 492 Erase tool on page 495 Scrub tool on page 503 Zoom to...

Page 503: ...layed tracks Hold down the J key to temporarily enable Scrub mode and drag in the Time Ruler See also Scrubbing on page 836 Tools on page 441 Smart tool on page 456 Select tool on page 464 Move tool o...

Page 504: ...oom controls on page 85 To undo redo zoom with mouse buttons on page 86 Configuring the display of tracks in the Track view on page 334 Tools on page 441 Smart tool on page 456 Select tool on page 464...

Page 505: ...time or absolute time E Triplet F Dotted The Snap module contains the following settings Snap enable disable Enable disable snapping When enabled vertical grid lines that correspond to the snap resolu...

Page 506: ...magnetic strength when snapping which determines how quickly moved events are pulled towards the snap grid Magnetic Test Drag the event to test the current Snap Intensity setting Snap to Nearest Audi...

Page 507: ...can choose to always apply the note duration from the last touched Note event To do so select Last Touched in the Value control drop down menu Before inserting a new Note event select an existing Not...

Page 508: ...ions depend on the selected tool the Edit Filter setting and where the pointer is positioned The following table describes each cursor Cursor Description Select clip Lasso select Select by time Move F...

Page 509: ...fade out position Mute event Mute by time Unmute by time Isolate Take lane mute all other overlapping Take lanes in same track Erase clip Lasso erase Erase by time Split Scrub Move a single envelope n...

Page 510: ...ttern Draw automation line Draw automation sine pattern Draw automation triangle pattern Draw automation square pattern Draw automation sawtooth pattern Draw automation random pattern Move selected au...

Page 511: ...nsient marker Move transient marker Erase transient marker Disable transient marker Split audio at transient marker Glue MIDI note events together Move MIDI note events Adjust MIDI note velocity Trim...

Page 512: ...Mouse cursors See Tools on page 441 Move data within clip ALT SHIFT Isolate a clip or region when comping in Take lanes Crossfade abutting clips in Take lanes Cursor Description Table 113 Tool cursors...

Page 513: ...ge 517 To mute unmute a clip on page 517 To move a clip on page 518 To stretch an audio clip on page 518 To erase a clip on page 518 To split a clip on page 519 To raise lower an audio Clip Gain envel...

Page 514: ...note on page 528 Working with automation envelopes To select automation on page 529 To move automation on page 529 To draw automation freehand on page 530 To draw a straight line on page 530 To draw...

Page 515: ...sition With the Edit tool position the pointer over the clip s start or end point then drag to adjust the start end position To move data and the clip edge 1 Set the track s Edit Filter control to Cli...

Page 516: ...o make a time selection With the Smart tool position the pointer outside any clips then drag to make a time selection With the Smart tool drag with the right mouse button to lasso the clips you want t...

Page 517: ...to mute a time region and drag across the top half to unmute a time region With the Mute tool click the bottom half of the clip to mute the entire clip and click the top half of the clip to unmute th...

Page 518: ...alf and drag to stretch the beginning or position the pointer over the clip s second half and drag to stretch the end With the Edit tool hold down the CTRL key and position the pointer over the clip s...

Page 519: ...up points To raise lower an audio Clip Gain envelope 1 Set the track s Edit Filter control to Clips 2 Select the Smart tool 3 Position the mouse pointer over the top half of the clip until the pointer...

Page 520: ...o one of the following With the Smart tool position the pointer over the clip s start or end point then hold ALT SHIFT and drag to adjust the start end position With the Edit tool position the pointer...

Page 521: ...no need to fully enclose the clips With the Select tool position the pointer over the bottom half of the clip then click to select the clip With the Select tool position the pointer over the top half...

Page 522: ...clips and drag over the clips you want to mute unmute To isolate a Take lane 1 Set the track s Edit Filter control to Clips 2 Do one of the following With the Mute tool hold down the CTRL key and dra...

Page 523: ...ool position the pointer over the top half of the clip then drag to erase a time selection With the Erase tool position the pointer over the bottom half of the clip then click to erase the entire clip...

Page 524: ...ints To raise lower a MIDI Clip Velocity envelope 1 Set the track s Edit Filter control to Clips 2 Select the Smart tool 3 Position the mouse pointer over the top half of the clip until the pointer lo...

Page 525: ...note s start or end point then drag left right to adjust the start end position With the Edit tool position the pointer over the note s start or end point then drag left right to adjust the start end...

Page 526: ...half center of the note then drag the note to the desired location With the Move tool drag the note or selection to the desired location To draw a MIDI note 1 Set the track s Edit Filter control to No...

Page 527: ...All touched note events of the same pitch are merged into a single note event To paint MIDI notes 1 Set the track s Edit Filter control to Notes 2 Do one of the following With the Smart tool hold dow...

Page 528: ...asso to split a region With the Split tool position the pointer where you want to split the note then click or lasso to split a region To open the Note Properties dialog 1 Set the track s Edit Filter...

Page 529: ...red automation parameter Track Automation or Clip Automation 2 Do one of the following With the Move tool position the pointer over the envelope segment you want to move then drag the segment to the d...

Page 530: ...o one of the following With the Smart tool position the pointer near the top center of the track clip then drag up down With the Edit tool position the pointer near the top center of the track clip th...

Page 531: ...hape 5 Drag up or down to set the vertical range of the envelope then drag to the right or left to set the length of your edit As you drag the cursor s vertical distance from the midpoint the point wh...

Page 532: ...e following With the Smart tool position the pointer over the envelope where you want to insert a new node then click With the Smart tool hold down the CTRL key and drag to insert two nodes at the sel...

Page 533: ...control point to Track Automation and choose MIDI to open the MIDI Envelope dialog box 2 Specify the desired MIDI envelope parameter settings Type Value and Channel 3 With the Freehand tool drag to in...

Page 534: ...ght to select multiple transient markers With the Select tool double click a transient marker to select all adjacent transient markers in other tracks To move transient markers without stretching audi...

Page 535: ...sients 2 With the Erase tool click the transient marker to erase a single transient marker or drag over transient markers to erase multiple transient markers To reset transients 1 Set the track s Edit...

Page 536: ...Working with audio clips on page 515 Working with MIDI clips on page 520 Working with MIDI notes on page 525 Working with automation envelopes on page 529 Working with AudioSnap transients on page 53...

Page 537: ...will need to record edit and play back your project The Control Bar consists of several modules that each contain various related controls You can re arrange and show hide each individual module whic...

Page 538: ...ts you configure loop settings For details see Loop module on page 550 Mix module The Mix module lets you configure Mute Solo Arm for recording effects bypass and automation playback recording setting...

Page 539: ...name module To hide a module Right click the module and select Hide Module To show all modules Right click the Control Bar and select Show All To re arrange modules Drag a module s gripper to the desi...

Page 540: ...Select this option to undock the Control Bar See Tools module on page 541 Snap module on page 544 Transport module on page 547 Loop module on page 550 Mix module on page 552 ACT module on page 554 Sc...

Page 541: ...d from the Tools module in the Control Bar A Smart tool B Select tool C Move tool D Edit tools Edit Timing Split E Draw tools Freehand Line Sine Triangle Square Saw Random F Erase tools Erase Mute G D...

Page 542: ...s For details see Line tool on page 490 Sine tool The Sine Pattern tool lets you edit automation envelopes by drawing sine shapes For details see Sine tool on page 492 Triangle tool The Triangle Patte...

Page 543: ...n page 379 Slip editing non destructive editing on page 426 Fades and crossfades on page 430 Clip muting and isolating clip soloing on page 388 Scrubbing on page 836 See also Snap module on page 544 T...

Page 544: ...time or absolute time E Triplet F Dotted The Snap module contains the following settings Snap enable disable Enable disable snapping When enabled vertical grid lines that correspond to the snap resolu...

Page 545: ...o to Edit Preferences Customization Snap to Grid or right click the Snap to Grid button The Snap section contains the following settings Snap Intensity Specify the magnetic strength when snapping whic...

Page 546: ...p module on page 550 Mix module on page 552 ACT module on page 554 Screenset module on page 556 Performance module on page 558 Punch module on page 560 Select module on page 561 Markers module on page...

Page 547: ...rd R Metronome during playback S Click to open metronome settings The Transport module contains the following controls Rewind Gradually rewind the project Stop Stop playback Play Start stop playback P...

Page 548: ...e Now time shows your current location in the project For details see The Now time and how to use it on page 182 Click the time display to toggle between the following time formats MBT Display time as...

Page 549: ...on off Enable disable the metronome during recording Right click to access Metronome settings Metronome Playback on off Enable disable the metronome during playback Right click to access Metronome set...

Page 550: ...on page 568 Loop module The Loop module lets you control loop settings To show hide the Loop module Right click the Control Bar and select Loop Module Figure 181 The Loop module A Loop On Off B Set Lo...

Page 551: ...sport module on page 547 Mix module on page 552 ACT module on page 554 Screenset module on page 556 Performance module on page 558 Punch module on page 560 Select module on page 561 Markers module on...

Page 552: ...n is lit if at least one track is muted Solo Unsolo All Tracks Click to solo unsolo all tracks The button is lit if at least one track is soloed Dim Solo enable disable Enable disable Dim Solo mode Di...

Page 553: ...lope mode and Offset mode on page 1131 See Silencing tracks on page 203 To mute or solo a bus on page 893 Muting and soloing soft synth tracks on page 863 Soloing tracks on page 204 Dim Solo mode on p...

Page 554: ...module Right click the Control Bar and select ACT Module Figure 183 The ACT module A Controller surface name B Status display C Open property page D ACT Learn E ACT Lock The ACT module contains the f...

Page 555: ...4 Transport module on page 547 Loop module on page 550 Mix module on page 552 Screenset module on page 556 Performance module on page 558 Punch module on page 560 Select module on page 561 Markers mod...

Page 556: ...creenset Revert the current screenset to its last saved state before the project was saved See To revert the current screenset to its last saved state on page 1158 Lock Unlock Current Screenset Lock t...

Page 557: ...page 544 Transport module on page 547 Loop module on page 550 Mix module on page 552 ACT module on page 554 Performance module on page 558 Punch module on page 560 Select module on page 561 Markers mo...

Page 558: ...ossible that it will exceed 100 at times more so during recording than playback Disk Activity indicator Measures how much of the available time SONAR is using to perform input output functions on your...

Page 559: ...9 See also Tools module on page 541 Snap module on page 544 Transport module on page 547 Loop module on page 550 Mix module on page 552 ACT module on page 554 Screenset module on page 556 Punch module...

Page 560: ...cording on off Set Punch Time to Selection Set the Punch In time to the start From time of the selection and the Punch Out time to the end Thru time of the selection Punch In Time The current Punch In...

Page 561: ...A Set Select From Now B Set Select Thru Now C Select From Time D Select Thru Time The Select module contains the following controls Set Selection From Now Specify the Now time as the time from which a...

Page 562: ...568 Markers module The Markers module lets you navigate by markers and insert new markers To show hide the Markers module Right click the Control Bar and select Markers Module Figure 188 The Markers...

Page 563: ...le on page 544 Transport module on page 547 Loop module on page 550 Mix module on page 552 ACT module on page 554 Screenset module on page 556 Performance module on page 558 Punch module on page 560 S...

Page 564: ...Beat 3 Tick 720 would be written as 2 3 720 Duration Duration of the selected event s specified as a PPQ value You can also specify a percentage of the current duration value For example to double the...

Page 565: ...ansport module on page 547 Loop module on page 550 Mix module on page 552 ACT module on page 554 Screenset module on page 556 Performance module on page 558 Punch module on page 560 Select module on p...

Page 566: ...ideo perfectly with SONAR but the sequencer position displayed in the Now Time and Big Time displays will gradually drift and become incorrect over long periods of time The audio and MIDI synchronizat...

Page 567: ...s see MIDI synchronization on page 1270 Transmit MTC Sync Transmit MIDI Time Code MTC to external devices that can receive MTC SMPTE MTC is a position and timing reference that indicates the current l...

Page 568: ...Auto Backup is enabled Gobbler will continuously back up your project as you work However Gobbler is smart so it won t run any CPU related tasks while you are working in SONAR The color of the button...

Page 569: ...on page 544 Transport module on page 547 Loop module on page 550 Mix module on page 552 ACT module on page 554 Screenset module on page 556 Performance module on page 558 Punch module on page 560 Sel...

Page 570: ...570 Control Bar overview...

Page 571: ...to the left of the Track view but can also be moved to the right side There are three separate inspectors Track Inspector The Track Inspector shows mix settings for the current track bus or main and i...

Page 572: ...erties on page 603 ProChannel Producer only ProChannel combines compression equalization and tube saturation modeling in one convenient processor ProChannel is available on each audio track Instrument...

Page 573: ...ck undock Inspector B Show hide Clip Properties Inspector C Show hide Track Properties Inspector D Show hide ProChannel E Display area for Properties Inspector F Display area for Track Inspectors G Sh...

Page 574: ...in the top right corner of the Inspector pane and select Collapse To expand collapse the Inspector pane When the Inspector is docked do one of the following Click the Expand Collapse button at the to...

Page 575: ...s to change the position of the Inspector A Dock Undock B Docking Options To enter values in inspectors Do one of the following Type a value in the text box and press ENTER Drag the slider or use the...

Page 576: ...The Track Inspector provides mixing controls for the currently selected audio track MIDI track Instrument track bus or main The Track Inspector is essentially identical to a channel strip in the Cons...

Page 577: ...Instrument track D Advanced MIDI settings for current MIDI track or Instrument track MIDI tab E Current Instrument track F Output of current Instrument track Audio tab G Selected bus H Output of sele...

Page 578: ...nt 1 Click the track or bus you want to show in the Track Inspector 2 Click the Track Name control in the Track Inspector and select Lock the current track or bus from the drop down menu To unlock the...

Page 579: ...an of the audio data sent to the bus x ProChannel Producer only ProChannel is an extended channel strip that provides high quality Compressor Equalizer and Tube saturation processing for each channel...

Page 580: ...play the waveform of the audio that s flowing through the bus x Pan The stereo distribution of the output ranging from 100 left hard left to 100 right hard right a value of C indicates sound that is c...

Page 581: ...rack x x Reverb Adds MIDI reverb effect to the track x x Bank Select Method The Bank Select Method used by your sound module to switch back and forth between banks of sounds See Assigning the Bank Sel...

Page 582: ...s enabled any notes that you draw or move in the Piano Roll view stay within the selected scale See Snap to Scale section on page 587 x x Display The Display menu lets you show hide modules in the Tra...

Page 583: ...Input gain B ProChannel Producer only C Effects bin D Sends E Mute Solo Arm Input Echo Phase Invert Stereo Interleave Read Automation Write Automation F Pan G Volume H Meter I Track icon J Input and...

Page 584: ...ols for buses A Input gain and pan B ProChannel Producer only C Effects bin D Sends E Mute Solo Waveform preview Read Automation Write Automation F Pan G Volume H Meter I Bus Icon J Output K Bus name...

Page 585: ...is selected Figure 199 Track Inspector controls for MIDI tracks and Instrument tracks A Velocity trim B Effects bin C Channel Bank Patch Quantize D Mute Solo Arm Input Echo Read Automation Write Autom...

Page 586: ...alf steps by which the notes in the track are transposed on playback e g 12 to transpose up one octave Time The number of Ticks on page 2059 that the track s playback timing is offset from the other t...

Page 587: ...le categories The pre installed scales are organized into categories such as Diatonic Pentatonic Exotic etc Point to the desired category and select a scale from the submenu Custom User Scales This su...

Page 588: ...the Resolution value Only Quantize Notes If selected SONAR will not modify other events such as controllers Strength This value determines how closely SONAR moves the selected notes to the resolution...

Page 589: ...eys This control can be assigned to MIDI remote control and modified in real time during project playback Swing Sets the amount of swing applied to the selected pattern You can make a pattern of 8th 1...

Page 590: ...e 2 Inward Outward Inward Circle Outward Circle As Played As Played Circle Random For more information about the Arpeggiator see Arpeggiator on page 286 Main controls Figure 201 Track Inspector contro...

Page 591: ...Input Echo Phase Invert Mono Stereo Read Automation Write Automation and Waveform Preview controls Pan Control Show hide Pan controls Volume Show hide Volume controls and meters and Link controls for...

Page 592: ...de and time base specify an audio track s AudioSnap render modes specify the default clip colors and enter a text description for the selected track s For details see Properties Inspector Track Proper...

Page 593: ...le the Properties Inspector is shown in the top half when visible A Dock undock and expand collapse Inspector B Show hide Clip Properties Inspector C Show hide Track Bus Properties Inspector D Show hi...

Page 594: ...95 Groove Clip section on page 597 AudioSnap section on page 598 Clip Effects section on page 599 Figure 204 The Clip Properties Inspector displays settings for the currently selected clip s A Clip Pr...

Page 595: ...a name to the selected clip The name of a clip is used in the Track view and Event List view You can assign any name to help you remember the contents of the clip Time Format Use the list to specify...

Page 596: ...n shifts Absolute If the clip is set to the Absolute time base its absolute position stays constant and its M B T position shifts Mute Mutes the clip Lock Locks the clip s data and or position The Loc...

Page 597: ...ve clips with Follow Pitch enabled Reference Note Represents the key in which the loop was originally recorded The Follow Pitch feature uses this information when checked to transpose the loop to matc...

Page 598: ...to make editing easier Higher values create a bigger volume threshold which disables markers that are fall below that threshold Filter Resolution The selected Filter Resolution value lets you disable...

Page 599: ...tructs SONAR to stretch or shrink the clip to fit the project s tempo SONAR uses the Original BPM parameters to make the change Stretch Amount Specify by what percentage to stretch the clip New Durati...

Page 600: ...Track Properties Inspector lets you type a name enter a text description specify the AudioSnap track render mode for audio tracks and specify the default clip colors for the selected track s Figure 2...

Page 601: ...roove Clip render mode on percussive material especially if the stretching is by more than a few beats per minute Offline Render This drop down menu lets you choose the algorithm that is used when you...

Page 602: ...g even if you don t touch the parameter Latch Latch Mode is similar to Touch mode new automation data overwrites existing automation data when you move a control However when you release the parameter...

Page 603: ...Properties Inspector C Bus name D Automation Time Base and write mode E Text description To show hide the Bus Properties Inspector Click a bus in the Track view then click the Bus button at the top of...

Page 604: ...r is moved with the mouse or a MIDI controller Automation writing stops when the parameter is released and the parameter returns to any previously automated position Overwrite Overwrite mode overwrite...

Page 605: ...k icons that you want to import into a project For more information see Using the Media Browser on page 610 Plug in Browser Organize plug ins and drag effects to tracks and clips You can access audio...

Page 606: ...th Rack Browser D Header bar To show audio MIDI content Click the Browse Media button To show plug ins Click the Browse Plug ins button To show the Synth Rack Click the Browse Synth Rack button See Ad...

Page 607: ...a project on page 622 To insert an effect in a track or bus on page 622 To insert an effect into a clip s effects bin on page 624 To insert an instrument on page 624 To insert a ReWire device on page...

Page 608: ...resize the width of the Browser More detailed information is shown in the Media Browser and Synth Rack Browser when the SONAR Browser is floating or docked at the bottom of the screen Figure 212 Brow...

Page 609: ...screen Click the Dock Undock button in the Browser More detailed information is shown in the Media Browser and Synth Rack Browser when the SONAR Browser is floating or docked at the bottom of the scre...

Page 610: ...ing Audio files wav mp3 wma aif etc MIDI files mid Project5 patterns ptn Step sequencer patterns ssp REX loops rex Video files avi mpg wmv asf mov Track icons bmp Track templates cwx Project templates...

Page 611: ...older pane Show Media Browser Show the Media Browser Browser menu The Browser menu lets you choose how content files are displayed and specify options for previewing audio and MIDI files The menu cont...

Page 612: ...filter allows you to only show content that includes a specific text string in the file name Content Location menu The Content Location menu allows you to quickly jump to favorite content locations on...

Page 613: ...g track as a new clip Double click the file to add it to the selected track at the current Now time or drag the file to the desired location To insert into a new track Drag the file to en empty space...

Page 614: ...ptions when exporting audio you can use the File Export Audio command instead To import a track template 1 In the Browser click the Browse Media button 2 Navigate to the folder that contains the track...

Page 615: ...ects bin MIDI Console strip MIDI Console effects bin Empty Track view Empty Console view Instrument track Instrument track inspector Instrument Console strip To import a project template 1 In the Brow...

Page 616: ...Track view Double click the video file To assign a track bus icon 1 In the Browser click the Browse Media button 2 Navigate to the folder that contains the icon you want to import 3 Drag the icon to t...

Page 617: ...Right click the file you want to rename and choose Rename on the pop up menu To delete media files in the Media Browser 1 In the Browser click the Browse Media button 2 Do one of the following Right c...

Page 618: ...Browser the Content Location box automatically displays the current folder name or the first preset that matches the selected folder location To save a Content Location preset 1 In the Browser click...

Page 619: ...605 Keyboard navigation on page 619 Keyboard navigation Standard key commands for navigating Windows Explorer also work in the SONAR Browser The following table lists keys for navigating the SONAR Bro...

Page 620: ...ser The Plug in Browser lets you insert effects instruments and ReWire devices into your projects The following plug in types are supported DirectX and VST audio effects MFX MIDI effects DXi and VSTi...

Page 621: ...you specify how plug ins are organized The menu contains the following commands Manage Layouts Opens Cakewalk Plug in Manager which lets you create delete and edit plug in layouts For more informatio...

Page 622: ...24 To insert an instrument on page 624 To insert a ReWire device on page 625 Using the Media Browser on page 610 Using the Synth Rack Browser on page 628 Keyboard navigation on page 619 Browser on pag...

Page 623: ...stinations for audio effects You can drag audio effects to the following locations Audio track Audio clip Audio track inspector Audio clip inspector Audio track effects bin Audio Clip effects bin Audi...

Page 624: ...instrument as a new Instrument track Drag the desired instrument to an empty space in the Track view or Clips pane or double click the instrument To insert an instrument as a track effect Drag the in...

Page 625: ...added to the Synth Rack and a new Instrument track is created To rename a plug in 1 In the Browser click the PlugIn button to show the Plug in Browser 2 Select the plug in then click the plug in name...

Page 626: ...wse Plug ins button in the Browser then drag the FX Chain container from the Track view to the Audio FX section in the Browser The FX Chain is added to the FX Chain folder To load an FX Chain preset D...

Page 627: ...Under Audio expand the FX Chain branch 3 Select the FX Chain then click the FX Chain name again and type a name See Effects chains on page 932 FX Chain module on page 1031 Using the Media Browser on p...

Page 628: ...ted You can insert as many copies of the same soft synth as you like each new copy appears in a new row and has the same name but has a higher number after the name ReWire soft synths can only have on...

Page 629: ...out to change the plug in list Insert Synths This submenu lists all available soft synths Click the desired soft synth to insert it in the current project and add an Instrument track You can also prev...

Page 630: ...memory especially with synths that use samples Of course if you remove the synth from your computer s memory reconnecting or unfreezing the synth will take the same amount of time that it did when you...

Page 631: ...Synth Rack This control is only available when the Synth Rack is undocked or docked at the bottom Mute Mute unmute the synth and all tracks associated with this instance of the synth Solo Solo unsolo...

Page 632: ...e Browse Synth Rack button 2 Click the Synth Settings button menu point to Insert Synths and select the desired soft synth To remove an instrument 1 In the Browser click the Browse Synth Rack button 2...

Page 633: ...on 3 Click the desired synth s Show Hide Assigned Controls button To replace an instrument 1 In the Browser click the Browse Synth Rack button 2 Do one of the following Select the synth you want to re...

Page 634: ...ing the Plug in Browser on page 620 Using the Synth Rack Browser on page 628 To import an audio or MIDI file on page 613 To import a video file on page 616 To import a track template on page 614 To in...

Page 635: ...ps are mutually exclusive Groove clip markers are typically placed at a zero crossing point before a transient AudioSnap transient markers are placed where musical changes occur but may not be exactly...

Page 636: ...lette and you can override the default algorithm s on a clip by clip basis The transients also make it possible for SONAR to calculate a clip s tempo map see Editing a clip s tempo map on page 659 Fig...

Page 637: ...pping edits to audio beats on page 681 Fixing timing errors in multi track recordings while maintaining phase relationships see Adjusting the timing of a multi track performance while maintaining phas...

Page 638: ...tool on AudioSnap transients on page 479 Using the Split tool on AudioSnap transients on page 484 Using the Freehand tool on AudioSnap transients on page 488 Using the Erase tool on AudioSnap transien...

Page 639: ...the marker Drag the line to stretch a marker and drag the head to move a marker Lasso selects transient markers Hold down the CTRL key and drag Proportionally stretches selected transients Lasso sele...

Page 640: ...the audio clip Clips follow project tempo This command forces the clip to follow the project s global tempo map Edit clip tempo map Each audio clip has an internal tempo map This command exposes cont...

Page 641: ...nd opens the Groove Quantize dialog box which has an option to quantize AudioSnap Beats and controls to set automatic crossfade options Pool Add MBT to pool The Track view Time Ruler can be added to t...

Page 642: ...see Properties Inspector Clip Properties on page 594 Figure 223 The AudioSnap section in the Clip Inspector See Editing transient markers on page 643 Using the AudioSnap palette on page 652 Fixing ti...

Page 643: ...n page 644 To select multiple adjacent transient markers on page 644 To select multiple discontiguous transient markers on page 644 To select the same transient in multiple clips on page 644 To extend...

Page 644: ...in the Control Bar 2 Assign the track s Edit Filter control to Audio Transients 3 Do one of the following Draw a lasso around the desired transient markers Click the first marker in the range hold do...

Page 645: ...e click another transient marker in any selected clip A range or transient markers are selected across all selected clips To select all similar transient markers in a clip 1 Select the Smart tool in t...

Page 646: ...moves to the place where you drop it and the audio that is located between the dragged marker and the following marker stretches You can find additional marker editing commands on the transient marker...

Page 647: ...Bar 2 Assign the track s Edit Filter control to Audio Transients 3 Hold down the ALT key and click where you would like to insert a new transient marker A new transient marker is inserted or 1 Disabl...

Page 648: ...head of a disabled marker remains visible There are several ways to disable enable the transient markers in a selected clip The Resolution drop down list in the AudioSnap palette The selected Resoluti...

Page 649: ...xt previous transient amongst all selected clips If there is no selection tabbing operates on the current track Marker appearance Description Soft yellow hollow diamond shape Standard active marker or...

Page 650: ...RL ALT P Delete marker Only available for manually added markers the command is greyed out if you right click an automatically generated marker Shortcut for selected markers is CTRL ALT BACKSPACE Snap...

Page 651: ...abling AudioSnap can also temporarily free up CPU processing power To enable or disable AudioSnap 1 Select the audio clips you want to enable disable AudioSnap on 2 Do one of the following Click the B...

Page 652: ...controls Figure 227 AudioSnap palette controls A Bypass B Copy as MIDI C Split into clips by transient markers D Toggle sample musical based clip start time E Average Tempo F AudioSnap properties G S...

Page 653: ...roject s measure boundaries to align with the audio clip AudioSnap Options This button opens the AudioSnap Options dialog box This dialog box has its own Help topic which appears when you click its He...

Page 654: ...kers are showing The selected Resolution value lets you disable markers based on their time location This clears out unwanted markers to make editing easier Larger values create a bigger time window b...

Page 655: ...This is better for clips containing monophonic solo instruments Percussion This is the best choice for percussion sounds AudioSnap palette auto load AutoLoadAudioSnapPalette 0 or 1 default 1 By defau...

Page 656: ...MIDI instruments that play in time with the original song you need to create a tempo map from the original song For details see To sync the project tempo to an audio clip on page 657 Applying the proj...

Page 657: ...empo as desired either specify the tempo manually or extract the tempo from another audio clip by using the Set Project Tempo from Clip button on the AudioSnap palette 2 Select the audio clip s that y...

Page 658: ...689 Algorithms and rendering on page 692 Note AudioSnap will always attempt to find the tempo of any clip recorded or imported into SONAR While several possible tempos are normally generated in some c...

Page 659: ...h detected beat has a corresponding beat marker You can remap a beat marker by dragging the marker to any active transient marker When a beat marker has been moved it turns red and becomes anchored to...

Page 660: ...chored to a new transient An anchored beat marker is a marker that has been edited as opposed to a beat that SONAR detected To un anchor a beat marker double click the marker Note 1 Beat markers can o...

Page 661: ...orrect transients 1 Right click the clip tempo map above the clip where you want to audition the clip and keep the right mouse button pressed SONAR creates a one measure selection starting from one me...

Page 662: ...lows Project Tempo button in the AudioSnap palette All the clips display the Auto Stretch icon and will now conform to any new or future tempo changes 6 In the Control Bar s Transport module click the...

Page 663: ...ontrol over every aspect of your audio and allows you to manually drag audio beats around to perfect the timing If you need to fix a multi track performance such as a multi mic drum kit or a full band...

Page 664: ...usting beats you have complete control over the timing of your audio To manually adjust the timing of a solo performance 1 Select the Smart tool in the Control Bar 2 Assign the track s Edit Filter con...

Page 665: ...learn how to use AudioSnap to edit a multi track drum kit alongside a piano track The drum kit was recorded with three microphones kick snare and overhead each routed to its own track To adjust the t...

Page 666: ...ts 8 Select all three drum tracks 9 Right click any selected clip and select Merge and Lock Markers on the pop up menu All three drum tracks now share the exact same transient markers and each clip s...

Page 667: ...an entire section later or earlier In this example the drummer was speeding up through the drum fill and then hits next downbeat too early To fix this you need to proportionally drag the drum transie...

Page 668: ...e need to fix this single beat 12 Hold down the CTRL key and double click any drum transient marker on the second hit All drum transient markers for the second hit are selected 13 Drag any selected tr...

Page 669: ...ti tracked drums without stretching audio on page 674 See Adjusting the timing of a solo performance on page 664 Synchronizing the rhythms of out of sync tracks on page 670 Making multiple clips track...

Page 670: ...ove Quantize an audio clip on page 672 To quantize an audio clip to another audio clip Quantize to Pool on page 673 Making multiple clips tracks groove together You can extract the groove from one aud...

Page 671: ...ool on page 689 Method 3 Use the Extract Timing button on the AudioSnap palette to extract the timing from selected clips then use the Apply Groove button to apply the extracted groove to the selected...

Page 672: ...eats check box is selected 8 Click OK To extract the groove from one clip and apply it to another clip 1 Select the audio clip you want to extract the groove from 2 Press A to open the AudioSnap palet...

Page 673: ...marker on page 647 5 Right click the selected clip and select Pool Add clip to pool on the pop up menu The selected clip is added to the Pool and its transient markers turn purple 6 Select the audio...

Page 674: ...e clips without stretching any audio This method of aligning clips does not change the phase relationships between the clips as long as you move all the clips identically Let s take a look at some mul...

Page 675: ...Project Tempo From Clip button to align measure lines with drum track and establish a tempo map The project s measure boundaries line up with the transients in the drum tracks 11 Select all the drum...

Page 676: ...quantize this example to eighth notes 13 Select all the clips that you want to quantize 14 Use the Process Quantize command to open the Quantize dialog box 15 In the Duration field choose Eighth for...

Page 677: ...art times move to the eighth note boundaries Some clips now overlap and some clips have small gaps between them Because the Auto XFade Audio Clips check box was enabled and the XFade and Max Gap value...

Page 678: ...ance while maintaining phase relationships on page 665 See Quantizing on page 767 To split a clip quantize it and fill in the gaps on page 684 Using global tools on AudioSnap transient markers on page...

Page 679: ...necessary quantizing and disable any transient markers that you don t want to extract see Quantizing audio on page 671 and To disable a transient marker on page 647 6 With the clip still selected cli...

Page 680: ...ers on page 638 Editing transient markers on page 643 Using the AudioSnap palette on page 652 Synchronizing audio and the project tempo on page 656 Fixing timing problems in audio clips on page 663 Ex...

Page 681: ...nt markers in selected audio clips When snapping audio transients the following rules apply If a Pool exists audio transients snap to the Pool If a Pool does not exists audio transients snap to transi...

Page 682: ...abled in the Control Bar s Snap module A These notes don t line up with the audio beats 5 Drag the misaligned MIDI notes so they line up with the audio beats As you re dragging notes they will automat...

Page 683: ...he first clip s right edge and the second clip s left edge to create a crossfade This option will often be used when quantizing drum parts which results in smooth sounding audio without introducing ph...

Page 684: ...o will stretch and we may or may not like the resulting sound Let s try splitting it and quantizing the clips instead of the transients click the Split Beats Into Clips button on the AudioSnap palette...

Page 685: ...to XFade Audio Clips option unchecked for now and click OK Let s zoom in and look at the quantized clips 6 The start of each clip now lines up where we want it to but there are gaps between some of th...

Page 686: ...box has the Fill Gaps XFade between Audio Clips radio button the XFade number goes here ms field and the Max Gap field Figure 235 The Fade Selected Clips dialog To fill in gaps with the Fade Selected...

Page 687: ...cursor changes into the slip stretch icon then drag the end of the clip to the desired position The clip is stretched and displays the stretch amount in the clip header percentage of original duratio...

Page 688: ...rkers you want to use as a guide 2 Right click an automation envelope on the clip and choose Add Nodes at Transient Markers from the pop up menu Now you can easily edit your envelope at transient loca...

Page 689: ...rt tool in the Control Bar 2 Assign the desired track s Edit Filter control to Audio Transients 3 Right click a clip and choose Pool Show pool lines on the pop up menu Figure 236 Pool lines A Tooltip...

Page 690: ...up menu Markers appear on the selected clips at Pool lines When aligning clips on multiple tracks it is necessary to split and or quantize all clips at the exact same position in order to avoid phase...

Page 691: ...clip to another audio clip Quantize to Pool on page 673 See Using global tools on AudioSnap transient markers on page 638 Editing transient markers on page 643 Using the AudioSnap palette on page 652...

Page 692: ...lips use the offline rendering algorithm you have chosen for them Typical algorithm choices for an AudioSnap session work like this Do your AudioSnap time stretching error correction etc with a quick...

Page 693: ...speech saxophone or vocals The default value for this control is 50 Higher values of pitch coherence will increase phase accuracy but may sound more modulated Phase coherence When processing stereo o...

Page 694: ...nherit the selected render modes To freeze an AudioSnap enabled clip 1 Do one of the following to open the Freeze Options dialog In the Track view right click any track s Freeze button Right click an...

Page 695: ...clips on page 835 Using global tools on AudioSnap transient markers on page 638 Editing transient markers on page 643 Using the AudioSnap palette on page 652 Synchronizing audio and the project tempo...

Page 696: ...696 AudioSnap Producer and Studio only Algorithms and rendering...

Page 697: ...sted using pitch markers In SONAR you can import ACID loops or digital audio clips and convert them to Groove clips You can also record your own audio and create Groove clips To download more Groove c...

Page 698: ...reate and edit Groove clips Figure 237 The Loop Construction view The Loop Construction view toolbar has tools for editing slicing markers and controls for previewing loops See Loop Construction contr...

Page 699: ...oop Properties Opens the Loop Properties dialog box Slice menu The Slice menu contains the following commands Reset Markers Restores all automatically generated markers to the original position and en...

Page 700: ...one it finds As you increase the number in this field smaller transients are detected and the number of markers increases Beats The number of beats quarter notes in the clip BPM The tempo at which the...

Page 701: ...dredth of a semitone The Pitch fine option can fine tune a slightly out of tune clip so that it is in pitch with the remaining clips in a project Slicing markers There are two types of slicing markers...

Page 702: ...ick display options in the Audio Scale Ruler Percentage Shows audio scaling by percentage For example if the highest percentage in the Audio Scale Ruler reads 2 0 then only the parts of the waveform w...

Page 703: ...cking options F Expand collapse G Move up one level to the parent directory H Search filter I File list J Play Stop To import an audio or MIDI file 1 In the Browser click the Browse Media button 2 Nav...

Page 704: ...older that contains the MIDI content you want to preview then click the file you want to preview The Play button changes to a Stop button during preview For more information about the Browser see Brow...

Page 705: ...e boundaries 2 Move the cursor over the end of the loop enabled clip until the cursor looks like this 3 When the cursor changes click the end or beginning of the clip and drag it to the right if you a...

Page 706: ...pitch when they read pitch markers You can add pitch markers in the Track view s Time Ruler to transpose the Groove clip As your project passes over a pitch marker SONAR transposes your Groove clips b...

Page 707: ...and click the Media button 2 Navigate to a directory that contains Groove clips 3 Drag and drop a clip into the Track view or double click it to insert it at the Now Time 4 The clip appears on the tr...

Page 708: ...original tempo of the recording SONAR uses the original tempo to adjust to your project s tempo The original tempo must be specified for stretching clips Reference note The original key of the record...

Page 709: ...ow this procedure to force the Groove clip to follow the project s default pitch 1 Double click the clip you want to transpose to the project s pitch The clip appears in the Loop Construction view 2 C...

Page 710: ...o transpose to the project s pitch The clip appears in the Loop Construction view 2 If the Pitch button is enabled click it to disable it 3 In the Pitch fine field enter the number of cents you want t...

Page 711: ...To adjust a Groove Clip slice pan 1 In the Loop Construction view select the slice on which you want to adjust the pan 2 Click the Slice menu and select Show Hide Pan Envelope The Pan envelope is disp...

Page 712: ...drop clips from SONAR to another application or to a directory in Windows When you drag a file from SONAR the source file is copied and the copy is placed in the new directory or application See Usin...

Page 713: ...oject Set Default Groove Clip Pitch and specify the default pitch SONAR transposes each groove clip that has the Follow Project Pitch option enabled by the difference between the clip s Reference Note...

Page 714: ...EX file you want to import If you want to preview the selected file click Play The file will play at the current project tempo 4 Click Open The REX file is imported into SONAR as a Groove Clip You can...

Page 715: ...when your project reaches a pitch marker You can change any MIDI clip into a MIDI Groove clip or back into a regular MIDI clip by right clicking the clip and choosing Groove Clip Looping on the pop up...

Page 716: ...this When the cursor changes click the end or beginning of the clip and drag it to the right if you are dragging out from the end or left if you are dragging from the beginning The clip repeats itself...

Page 717: ...Explorer There are three methods for importing MIDI Groove clips Using the File Import MIDI command Using the Media Browser view Dragging a MIDI Groove clip from the Windows Explorer to a MIDI track i...

Page 718: ...owser 1 Make sure that the Snap to Grid setting is appropriate for what you want to do 2 If the Browser view is not open use the Views Browser command to display it or press B 3 Navigate to a folder w...

Page 719: ...mport the pattern 2 Highlight the track you want to import the pattern into 3 Use the File Import MIDI command The Import MIDI dialog box appears 4 Change the Files of Type field to P5 Pattern 5 Navig...

Page 720: ...720 Working with loops and Groove Clips Importing Project5 patterns...

Page 721: ...u double click a MIDI clip To do so click the Track view Options menu point to Click Behavior Double Click MIDI Clips and select the desired default editing view The options are as follows Nothing Pre...

Page 722: ...ers RPNs NRPNs and automation data on page 786 The Event List view on page 788 MIDI effects MIDI plug ins on page 796 To sync the project tempo to freely played MIDI on page 776 See also To convert au...

Page 723: ...does not display anything To change a note s properties using the Event Inspector 1 Select a note 2 In the appropriate Event Inspector field change the value See the following table for a description...

Page 724: ...s The Piano Roll view makes it easy to add edit and delete notes from a track A single track version of the Piano Roll view is available in each track in the Track view This view is called the Inline...

Page 725: ...isplaying notes and controllers Piano Roll view only on page 731 Adding and editing notes in the Piano Roll on page 732 Piano Roll view snap resolution on page 740 Adding and editing controllers in th...

Page 726: ...rid pane on page 819 and Adding and editing controllers in the Piano Roll on page 743 See also Drum maps and the Drum Grid pane on page 807 Notes pane In this pane you can add edit and delete notes in...

Page 727: ...pening the view There are several ways to open the Piano Roll view In the Track view select the track you want to see then choose Views Piano Roll View or press ALT 3 In the Track view right click on...

Page 728: ...rack editing H Output I Current track To make a track the current track in the Track List pane click on the track The current track is highlighted The following is a list of ways to optimize the multi...

Page 729: ...sets whether or not you can edit the notes of a track in the Piano Roll view When the button appears white editing is enabled and the track appears in color When the button appears gray editing is dis...

Page 730: ...ns on page 1229 To change the active track s instrument definition 1 Right click the left side of the Notes pane where the piano keys or note names are displayed to display the Note Names dialog box F...

Page 731: ...for all displayed tracks click the Piano Roll view Notes menu and choose Show Notes To hide or show the outline s of the clip s you re looking at click the Piano Roll view View menu and choose Show Cl...

Page 732: ...variety of methods Select notes and then use editing commands from the Edit menu the Process menu or the Event Inspector Move single or groups of selected notes with the Select tool Edit the pitch loc...

Page 733: ...he drum map rows in the Note Map pane as shown in the table To do this Do this Select a single note Click on the note Select several notes at once Drag a rectangle around the notes you want to select...

Page 734: ...commands in the Process menu Length Slide Transpose If you want to edit multiple notes at the same time first select them with the Select tool MIDI notes display their velocity value as a wide or narr...

Page 735: ...g left right to adjust the start end position With the Edit tool position the pointer over the note s start or end point then drag left right to adjust the start end position To select MIDI notes 1 Se...

Page 736: ...A Event Muted hollow the note outline uses the Clip Mute color B Unmuted events track color C Muted using the Mute tool on the clip Clip Mute color To move a MIDI note 1 Set the track s Edit Filter c...

Page 737: ...release the mouse button With the Freehand tool drag across two or more notes of the same pitch click on the first note drag to the second note and release the mouse button All touched note events of...

Page 738: ...split the note then click or lasso to split a region To open the Note Properties dialog 1 Set the track s Edit Filter control to Notes 2 With the Smart tool double click the note MIDI note velocity co...

Page 739: ...c Software SONAR Producer X3 4 Add a new DWORD value called AllowLassoVelInNotesPane click Edit New DWORD Value 5 Double click the new AllowLassoVelInNotesPane DWORD event to open the Edit DWORD Value...

Page 740: ...ther Snap to Grid is on or off To enable disable independent Piano Roll view Snap resolution 1 In the Piano Roll view click the Snap to Grid button which is located to the right of the menu bar The Sn...

Page 741: ...ts This option makes it easier to see and edit velocities when many Note events are present It also makes it easier to change the velocity for individual Note events that are stacked such as chords If...

Page 742: ...1 Painting velocity when some Note events are selected Only those Note events are changed Example 2 Painting velocity when no Note events are selected All Note events are changed See Editing notes wi...

Page 743: ...appear in different colors so you can differentiate them when you re displaying multiple controller events possibly in multiple tracks A A single controller event B Edit handle also called Controller...

Page 744: ...odulation pitch bend and CCs Continuous Controllers and events can be moved and copied between lanes To show the Controller pane click the Piano Roll view View menu and choose Show Hide Controller Pan...

Page 745: ...e a new lane 1 Make sure the Controllers pane is shown at the bottom If it is not displayed click the Piano Roll view View menu and choose Show Hide Controller Pane 2 Click the Plus button in the bott...

Page 746: ...match the edit type in the target lane 1 Select the event types you want to copy to another lane See Selecting controllers on page 749 for more information 2 In the Scale pane right click the lane you...

Page 747: ...ler lane s Event Filter and choose New Value Type to open the MIDI Event Type dialog box 2 Choose options from the following fields Type Choose the type of controller you want to add for example choos...

Page 748: ...insert a larger number of controller events with relatively small changes in value move the mouse slowly To insert a smaller number of controller events with relatively large changes in value drag th...

Page 749: ...necessary to align the timing of Controller events with that of Note events For example Sustain Pedal CC64 events need to move along with the notes they are supposed to sustain and Pitch Wheel events...

Page 750: ...eding to change zoom settings This is especially useful in the inline Piano Roll where track heights are typically sized such that MIDI notes become very small When Microscope mode is enabled a transp...

Page 751: ...x How Microscope mode works Position The Microscope is always centered on the mouse position Size The size of the Microscope is configurable The default diameter is 100 pixels See Configuring Microsco...

Page 752: ...xels are equal or less than this number The valid range is 2 20 and the default value is 6 Magnifying Time Use this check box to enable disable horizontal magnification when the Piano Roll view zoom i...

Page 753: ...the Inline Piano Roll view with the global tools in the Control Bar s Tools module See also Displaying the Inline Piano Roll view on page 753 The MIDI scale on page 754 Displaying notes and controller...

Page 754: ...trol If a track uses a Drum Map the MIDI Scale for that track displays the Drum Map s note names on the track s MIDI Scale in Notes mode Figure 246 MIDI Scale in Notes mode A MIDI Scale To zoom vertic...

Page 755: ...oll view You can show or hide notes and controller events in the Inline Piano Roll independently for each track and also independently from the Piano Roll view To hide or show data in individual track...

Page 756: ...e choose Control if you want to edit volume Value This field is grayed out if you choose Wheel or ChanAft in the Type field If you choose Control RPN or NRPN in the Type field choose which Control RPN...

Page 757: ...ial commands you can use to modify or clean up a performance or to search for or select events that meet certain criteria See Transposing on page 758 Shifting events in time on page 759 Stretching and...

Page 758: ...itch shifting a plug in for changing audio pitch to perform the transposition You can transpose audio only a single octave in either direction 12 to 12 and you cannot transpose audio when you are usin...

Page 759: ...nd markers either forward or backward in time This has an effect that is similar to the Time parameter in the Track view However the Process Slide command modifies the time stored with each event whil...

Page 760: ...make sure that no track or time range is selected 2 Set the Now time to the place where you want to insert the measure 3 Choose Project Insert Time Measures to display the Insert Time Measures dialog...

Page 761: ...following method If there is no data in the area you want to delete you can simply drag any clips that come after the empty area to their proper destinations You can also use this method if there is d...

Page 762: ...the selection so that it ends at a specific time expressed in either Measure Beat Tick MBT or Hours Minutes Seconds Frames SMPTE format This command gives you a choice of modifying the events or modif...

Page 763: ...e of audio data you re stretching Choose options based on the source material single voice or instrument versus a group of instruments ensemble or polyphonic and how long you want to wait for processi...

Page 764: ...ged while note durations and event start times change 5 If you want to stretch selected audio clips check the Stretch Audio box The following options become available Type disabled unless Stretch Audi...

Page 765: ...equence of notes or other events 1 Select the notes you want to reverse 2 Choose Process Retrograde SONAR reverses the order of the selected events Adding crescendos and decrescendos The Process Scale...

Page 766: ...out using a metronome and strayed from the tempo in one direction or another SONAR has two types of commands that you can use to modify the timing of a clip The Quantize command alters the timing of t...

Page 767: ...izing If you are quantizing a run of sixteenth notes use a sixteenth note as the resolution If you are quantizing a mix of sixteenth and eighth notes you should still use a sixteenth note At the defau...

Page 768: ...f 50 percent means that all notes are moved half way towards the desired position This lets you tighten up the timing as much as you want without going too far The Groove Quantize command also lets yo...

Page 769: ...djacent quantization points When you use Groove Quantize you can also perform adjustments on out of window events There are four options Option How it works Do Not Change Notes outside the window are...

Page 770: ...Quantize dialog box Figure 252 The Quantize dialog 3 Choose one of your own presets from the list or enter the settings you want according to the table 4 Click Audition if you want to hear how the qua...

Page 771: ...e pattern from the Groove Pattern field 5 Use the following fields to configure your pattern Setting What to do Resolution Choose a note size or enter the number of clock ticks Window Sensitivity Ente...

Page 772: ...groove pattern With a carefully defined groove pattern you can give an old project an entirely new feel If you like the groove pattern you have created you can save it to a groove file Groove files ca...

Page 773: ...roove verify that you want to delete the existing version 10 Click Close when you are done to return to the Groove Quantize dialog box SONAR stores the groove in the file and chooses the new groove as...

Page 774: ...ing You ve recorded a bass line that has exactly the off beat rhythmic dynamic you want for the dry piece You d like to force your other tracks to share that feel Copy the bass track to the Clipboard...

Page 775: ...want you can use other types of events as markers on the reference track such as a sustain pedal Remember however that MIDI sustain pedals generate one event when the pedal is pressed and another whe...

Page 776: ...to identify where you want to put the downbeats of each measure and possibly where you want to place some other beats of the measure if the tempo varies a lot 1 Display the MIDI clip that you want the...

Page 777: ...roject Set Measure Beat at Now to open the Measure Beat Meter dialog box enter the desired values and click OK 8 Repeat steps 6 and 7 until the Time Ruler is correctly aligned After you align the Time...

Page 778: ...scale notes To enable or disable Snap to Scale for a single track Open the Track Inspector Figure 255 Snap to Scale settings in the Track Inspector A Root Note menu B Scale Snap button C Scale menu Or...

Page 779: ...cale to appear under when your scale appears in the Scale menu 3 Click the Create New Scale button The Scale Manager displays a default name New Scale n for the new scale and automatically selects C a...

Page 780: ...e scale degree buttons under the Scale Degrees field Included notes appear as blue dots in the keyboard display as depressed scale degree buttons and as scale degrees in the Scale Degrees field A Keyb...

Page 781: ...ters For example all MIDI notes have a channel starting time pitch velocity and duration Controllers have a controller number and value SONAR makes it simple to find select and modify events that have...

Page 782: ...example you might want to Select the notes that are played in a certain octave so you can copy them to another track Select and boost the velocity of notes that have a velocity below a certain thresh...

Page 783: ...s of the types you choose The All and None buttons help you set up the event filter the way you want In any place in the event filter where you would normally enter a pitch string you can also enter t...

Page 784: ...to display the Event Filter dialog box 3 Set up the event filter to find the events you want 4 Click OK SONAR searches the currently selected events and weeds out those that do not meet the requiremen...

Page 785: ...nal note with a different note in the original octave Using octave wild cards for both the search and replacement event filters lets you for instance change all E flats to E naturals preserving the oc...

Page 786: ...al form and edit them even while recording or playback is in progress This means you can loop over a portion of your project and hear any change you make on the next loop For more information about au...

Page 787: ...oose the controller you want to see and edit The contents of these lists depend on the output and channel settings and on the instrument assigned to that output and channel Different instruments use c...

Page 788: ...tely separate event You cannot add or remove velocity events in the Notes pane but you can use the draw tool to adjust the velocity values for existing notes You can also edit velocities with the Proc...

Page 789: ...time you change the Now time the event list is updated and the highlight is moved to the event that will be played next When the Event List view includes more than one track events are mixed together...

Page 790: ...mply ticks MIDI channel 1 16 KeyAft MIDI key aftertouch Pitch MIDI key number pressure amount 0 127 MIDI channel 1 16 Control MIDI controller change Controller number 0 127 controller value 0 127 MIDI...

Page 791: ...1251 for more information about System Exclusive banks See Editing audio on page 821 for more information about audio clips Shape Events Automation graph segments made up of a solid line between two n...

Page 792: ...keys while pressing the up or down arrows Select multiple non contiguous events Select an event hold the CTRL key while selecting additional events Table 140 To do this Do this Hide events of a certai...

Page 793: ...e its position in the event list The Event List view follows that event to its new location If you try to change the event type kind of event SONAR lets you choose the kind of event you want from a di...

Page 794: ...4 To edit the last event you heard release the ALT key then release the CTRL key The highlight moves back to the last event you heard so you can make changes You can also audition a single event using...

Page 795: ...I commands can be used to play Wave files these files are played at their normal speed and are not necessarily synchronized with MIDI or other audio data By contrast Wave audio clips are played in loc...

Page 796: ...partial clips For example you can apply an echo to just one note MIDI effects can also be applied to MIDI tracks in real time during playback in the Track view Track Inspector and Console views Unlik...

Page 797: ...he spacing of the grid used for quantization Tuplet Specify the resolution as a tuplet note for example 5 notes in the time of 4 Strength The strength of the adjustments 100 indicates perfect quantiza...

Page 798: ...ervals The parameters used to specify the echo delay effect are as follows Offset Ticks The offset of the quantization grid from the start of measure boundaries A value of 0 indicates perfect alignmen...

Page 799: ...ay between successive echo notes Delay Units The units used to specify the delay You may specify delay in ticks in milliseconds or as a note duration Tap The delay you specify by tapping the control w...

Page 800: ...most identically to the event filter used by the Edit Select By Filter command For more information see Event filters on page 782 To apply an event filter to MIDI data 1 Select the data to be affected...

Page 801: ...pecify delay in ticks in milliseconds or as a note duration Legato The smoothness of the notes of the arpeggio 1 percent plays each notes and releases it instantly 99 percent plays each note up to the...

Page 802: ...specified arpeggio effect to the selected data Use chord control The chord you specify Checked specifies that the arpeggiator infers the chord from the notes played in the range It identifies the cho...

Page 803: ...single parameter To analyze a chord 1 Select the notes to be analyzed 2 Right click the selected clip s and choose Process Effect MIDI Effects Cakewalk FX Chord Analyzer on the pop up menu 3 Click the...

Page 804: ...changes note velocities according to the specified options Parameter Option Meaning Set all velocities to X Sets all velocities to the specified value Change velocities by X Adds a specified incremen...

Page 805: ...osition the number of steps for the transposition For Diatonic Transposition the number of scale degrees for the transposition For Key Scale transposition a number of octaves added to each note after...

Page 806: ...ata 1 Select the data to be affected 2 Right click the selected clip s and choose Process Effect MIDI Effects Cakewalk FX Transpose on the pop up menu 3 Set the transposition options as described in t...

Page 807: ...s the original pitch values and the mapped values for each note and the Drum Grid pane which displays your drum tracks any track assigned to a drum map and where you can edit your drum tracks See The...

Page 808: ...rum sounds you want to see Sort drum sounds to suit your needs Mute and solo individual drum sounds See Assigning a MIDI track to a drum map on page 813 Opening a drum map on page 814 To preview a map...

Page 809: ...m Map button B Delete Drum Map button C Current Drum Map D Click to create a new row E Preset list F Rows G Port Channel pairs Drum maps used in current project This field displays all the currently a...

Page 810: ...The user defined name for the row Chn The channel on which the note is transmitted Out Port The hardware output port or software virtual output port to which you are sending the note Vel Apply a velo...

Page 811: ...individual mapped note in your drum map The settings in the Map Properties dialog box are the same as a single row in the Drum Map Manager If you want to edit more than one drum note pitch mapping cl...

Page 812: ...enu that appears See The Drum Map Manager on page 808 Working in the Drum Map Manager on page 811 Creating and editing a drum map on page 808 Saving a drum map Use the following procedure to save a ne...

Page 813: ...To change the order of mapped notes in the Drum Map pane on page 818 Assigning a MIDI track to a drum map Use the following procedure to assign a MIDI track to a drum map To assign a MIDI track to a...

Page 814: ...815 To change the order of mapped notes in the Drum Map pane on page 818 Displaying tracks in the Drum Grid pane Use the following procedure to display a drum track or tracks in the Drum Grid pane To...

Page 815: ...playing tracks in the Drum Grid pane on page 814 Editing note velocities on page 815 To change the order of mapped notes in the Drum Map pane on page 818 Editing note velocities In the Drum Map Editor...

Page 816: ...lter control to Notes 3 Select the notes you want to change the velocity of 4 Move your cursor over one of the selected notes 5 Click and drag the velocity tail Drag it up to increase the velocity Dra...

Page 817: ...pped note See Changing mapped note settings on page 817 Changing mapped note settings You can change the following settings in the Note Map pane Mapped note name Note Out Mute Solo To change the Name...

Page 818: ...SHIFT keys while selecting a new Output in the Output column To mute or solo a mapped note The Mute and Solo controls in the Note Map pane allow you to mute or solo an individual mapped note To mute o...

Page 819: ...grid lines in the Drum Grid pane and choose whether or not to show note velocity tails See Event Inspector on page 723 Adding and editing controllers in the Piano Roll on page 743 Velocity tails on p...

Page 820: ...820 Drum maps and the Drum Grid pane The Drum Grid pane...

Page 821: ...he Event List view as well by selecting one or more audio clips then choosing the desired command from the Process Apply Effect menu Plug in effects can also be applied to audio data non destructively...

Page 822: ...nd is produced when molecules in the air are disturbed by some type of motion produced by a vibrating object This object which might be a guitar string human vocal cord or a garbage can is set into mo...

Page 823: ...ck by the pick B shows it moving back towards its resting point C represents the string moving through the resting point and onward to its outer limit then D has it moving back towards the point of re...

Page 824: ...perceives as a single tone This composite waveform still doesn t account for the uniqueness of the sound of different instruments For example stringed instruments usually have a resonator In the case...

Page 825: ...ula as a series of numbers or graphically as a waveform A waveform displays the size or amplitude of the vibration as a function of time For example the waveform of the sound of the plucked guitar str...

Page 826: ...e at zero Back and forth motions of the vibrating object translate to upward positive and downward negative excursions of waveform amplitude For example a close up of a portion of the guitar waveform...

Page 827: ...e capable of sampling at much higher rates than that Typical sampling rates used by modern musicians and audio engineers are 22 kHz 44 1 kHz and 48 kHz The 44 1 kHz rate is called CD quality since it...

Page 828: ...a good idea of what is contained in a SONAR audio clip An audio clip contains a long series of numbers or samples representing the fluctuating amplitude of a waveform Audio clips are typically quite l...

Page 829: ...drop split and bounce You can drag fade ins and fade outs onto a clip using your mouse or you can set complex envelopes on both clips and tracks You can use envelopes to change settings for gain volu...

Page 830: ...e audio clip 2 In the Clip Inspector enter a new starting time in the Start field The Track view displays the clip at the new starting time Select clips between two markers Click between the markers R...

Page 831: ...eform You can change the audio scale using keyboard shortcuts or the Audio Scale Ruler The Audio Scale Ruler is located in the vertical splitter bar between the Clips pane and the Track pane A Track p...

Page 832: ...e a certain height If you cannot see the Audio Scale Ruler increase the size of your track or bus To do this Do this Increase the scale for all tracks Press ALT UP ARROW Or Hold down the CTRL key and...

Page 833: ...ton When you hold down the SHIFT and CTRL keys and position your cursor over the Vertical Zoom Out button your cursor looks like this To do this Do this Increase decrease the scale of individual stere...

Page 834: ...be made on a note or measure boundary a marker specify the desired snap settings in the Control Bar s Snap module 3 Select the Split tool in the Control Bar 4 Click once to make a single split or to m...

Page 835: ...Bounce to Clip s command There are two common reasons why you may want to bounce AudioSnap and stretched clips To free up CPU resources during playback In order to save a bundle cwb file which does no...

Page 836: ...ilence in the new clip Scrubbing You can use the Scrub tool to locate or audition a particular sound or passage as you drag the mouse You can scrub a single audio track by dragging over that track or...

Page 837: ...dit Undo to restore your audio data to its previous state Many of the dialog boxes associated with SONAR s audio processing and effects commands have two important features Audition and Presets The Au...

Page 838: ...other means too Due to the nature and limitations of digital audio the sum of all audio signals played together cannot exceed the waveform amplitude limit Even though no individual clip is clipped th...

Page 839: ...to INF 7 Press the Audition button if you want to audition your edits 8 Click OK to process the selected audio Listen to the edited data in your mix You can use the Edit Undo command if you don t lik...

Page 840: ...ove Silence is great for cleaning up your final audio mix because it can mute all audio tracks in which the live performers were laying out Using Remove Silence to split long audio clips into smaller...

Page 841: ...a fade in effect instead of an instant on off sound Hold Time ms The minimum time for the gate to stay open Hold Time is useful when you ve set high open and close levels for example when your source...

Page 842: ...m first 5 seconds only To speed processing select the Compute DC offset from first 5 seconds only check box Only the first five seconds of a sound file will be analyzed when measuring the DC offset Th...

Page 843: ...ar curves are a single segment the exponential curves consist of nine segments each Although the endpoints of the curve are fixed you can move the intermediate points and create new intermediate point...

Page 844: ...270 The Fade Envelope dialog 4 If desired manipulate the curve as described in the table above 5 Click OK SONAR applies the fade to the selected audio data To crossfade two overlapping clips 1 Select...

Page 845: ...ove You can manipulate only the curve pertaining to the first of the two overlapping clips the second curve is automatically adjusted so that the two curves constantly add up to 100 5 Click OK SONAR a...

Page 846: ...ws Unlike some of the audio processing discussed so far using effects in real time is non destructive This means that the audio clip data itself is not modified and no new audio files are created For...

Page 847: ...Destructive audio effects processing on page 847 Destructive audio effects processing You can also directly apply an audio effect to an audio clip Right click the clip and select an effect from the Pr...

Page 848: ...848 Editing audio Audio effects audio plug ins...

Page 849: ...ks and effects for each patch or group of patches in a multi timbral multi port synth SONAR seamlessly integrates VST synths The VST Configuration Wizard runs automatically on startup registering all...

Page 850: ...a higher number after the name ReWire soft synths can only have one copy open The new higher numbered name also appears on the menus of synth track inputs and MIDI track outputs Figure 272 Synth Rack...

Page 851: ...860 Recording a soft synth s MIDI output on page 869 Using the Assignable Controls feature on page 866 Automating controls from the Synth Rack on page 867 To remove a soft synth from a track or bus on...

Page 852: ...n that track A synth track can display a waveform preview of its output When you enable this display function by clicking the button on the track strip the amplitude of a synth track s audio signal is...

Page 853: ...ck s Output field to the name of the soft synth you inserted Then you can record MIDI data in the MIDI track to play the soft synth with The procedure for inserting multi output and single output soft...

Page 854: ...MIDI data enable the Enable MIDI Output check box Any automation data you create for this synth is displayed by default on the Synth track for this synth If you want to display this data on a differen...

Page 855: ...is multi timbral choose a MIDI channel for the MIDI track 7 Also in the MIDI track select a bank and patch Now you can record some MIDI data into the MIDI track to play the soft synth with See To pla...

Page 856: ...an instrument track In order to create an instrument track you must first insert a new soft synth 1 Do one of the following to insert a new soft synth On the Insert menu point to Soft Synths and selec...

Page 857: ...ls Internally the MIDI output is assigned to the soft synth s MIDI input and the audio input is assigned to the soft synth s main output The following table shows all controls that are available on an...

Page 858: ...frozen Converting an audio and MIDI track to a single instrument track If an existing audio track and MIDI track are assigned to the same soft synth you can convert the two tracks to a single instrum...

Page 859: ...There are several different methods to open a soft synth s property page interface When you insert the soft synth from the Insert menu or Browser select the Open These Windows Synth Property Page chec...

Page 860: ...ng procedures to manage your synth icons To do this Do this To hide Synth Rack icons Right click an icon in the Synth Rack and choose Show Synth Icons from the pop up menu Or Use the Views Icons Synth...

Page 861: ...he MIDI track that sends its output to the soft synth choose a MIDI channel 3 Open the soft synth s interface see Opening a soft synth s property page on page 859 4 Set the soft synth s parameters cho...

Page 862: ...attached to your MIDI interface and that none of the relevant tracks are muted To remove a soft synth from a track or bus If your soft synth is patched into the effects bin of an audio track or bus ri...

Page 863: ...th track that the MIDI tracks are patched into SONAR automatically mutes or solos all the correct MIDI tracks Or Click the M or S buttons mute and solo respectively next to the soft synth s name in th...

Page 864: ...ert Soft Synth Options dialog box gives you the option of automatically creating a separate synth track for each audio output that the soft synth has or creating just one synth track for Output 1 of t...

Page 865: ...other type files 1 Mute all tracks that you don t want to export make sure you don t mute the synth track or the audio track that the soft synth is patched into or the MIDI track s that you are using...

Page 866: ...Undock the Browser or dock it in the MultiDock Assignable controls can not be shown when the Browser is docked at the left or right side 2 In the synth s strip of controls in the Synth Rack click the...

Page 867: ...u can also draw and edit synth automation in the Clips pane See Drawing soft synth automation in the Clips pane on page 868 for more information See also Recording a soft synth s MIDI output on page 8...

Page 868: ...ular synth s control strip displays the track that this synth s automation appears in Click this track s Edit Filter control and choose the desired synth parameter on the pop up menu SONAR draws an en...

Page 869: ...ut to the synth whose MIDI output you want to hear 3 Set the Output of that track to another synth or MIDI output used in your project and enable Input Echo 4 Play some MIDI data through the synth who...

Page 870: ...any MIDI channels and devices in each ReWire application as that application makes available You can insert ReWire devices into SONAR projects from the Synth Rack or Insert menu and you can tell SONAR...

Page 871: ...ear in SONAR s Insert menu under ReWire Devices and also in the Synth Rack s Insert button pop up menu To insert a ReWire instrument 1 Open a SONAR project Do not launch your ReWire application 2 In t...

Page 872: ...e Insert button in the Synth Rack and choose a ReWire instrument from the pop up menu check the Ask This Every Time option If you always insert ReWire Instruments in the same way you can uncheck this...

Page 873: ...ose Input field lists the output channel you patched your device into the playback meter lights up as you play the MIDI track that plays your device Now you can use separate effects for each of your R...

Page 874: ...h Won t Play After I Open Its Property Page Make sure that the Loop switch in Rebirth is enabled My ReWire Project Plays at a Different Tempo when Opened from SONAR When you open a ReWire project from...

Page 875: ...clip at the end of the SONAR project or if Stop at Project End is not checked ReWire tracks silent when using metronome record count in When using a metronome count in and recording any ReWire tracks...

Page 876: ...sure the name of your stand alone synth s MIDI driver is highlighted and click OK 3 Click the Output field of an unused MIDI track to display the Output menu 4 Select the name of the stand alone synt...

Page 877: ...you don t want to record to the destination track 4 If SONAR s metronome is set to use any software synth to produce a click disable the recording metronome To do so click the Record Metronome button...

Page 878: ...878 Software instruments Stand alone synths...

Page 879: ...net You can choose to include all real time effects and control movements in the mixed down tracks that you export see Preparing audio for distribution on page 963 for more information See Preparing t...

Page 880: ...880 Mixing Preparing audio for distribution on page 963 Burning audio CDs on page 974 Freeze tracks and synths on page 909 See also ProChannel Producer and Studio only on page 999...

Page 881: ...annel strips E Bus channel strips F Main channel strips The Console view contains the following main elements Menu Use the menu to configure channel strips You can filter the display of specific chann...

Page 882: ...ds SONAR supports both stereo buses and surround buses For details see Bus controls on page 1984 Main Use to control the physical audio outputs of your audio interface A main channel strip contains bo...

Page 883: ...audio tracks and real time effects you can play back at one time In the Track view there are several ways to configure which tracks are displayed To hide selected tracks 1 Select the tracks you want...

Page 884: ...er an existing bus to add a bus before it 2 Select Insert Stereo Bus or Insert Surround Bus from the menu that appears A bus appears in the Bus pane To delete a bus 1 Right click in the Bus pane over...

Page 885: ...ole view click on the module name In the Track view double click on the Track name 2 Type a new name 3 Press ENTER If you rename a track the new name is copied to the Track view If no name has been as...

Page 886: ...e list for more information see Using real time effects on page 913 Remove an effect Select the effect and press DELETE or right click and select Delete Select the output Click the Output control and...

Page 887: ...of your sound card 2 Arm the destination track 3 Mute or archive any tracks that you don t want to record to the destination track 4 If SONAR s metronome is set to use any software synth to produce a...

Page 888: ...er post fader Output Pan Playback meter post fader Surround bus Pre fader sends are affected by M S buttons unless you change the LinkPFSendMute Aud ini option Post fader send Effects bin Send level S...

Page 889: ...ntrols by right clicking in the track controls and selecting Insert Send name of bus you want the data to go to Click the FX tab at the bottom of the Track pane and then click the track s Bus Enable b...

Page 890: ...gnal flow See also Sidechaining on page 923 Signal flow on page 888 External Insert signal flow on page 928 Track 1 Output Track 1 effects bin Track 2 Output Send Bus Output Send FX Sidechainable FX H...

Page 891: ...r track s volume fader controls output level to Bus 2 The audio in each bus is processed by the input gain and pan controls main output buses don t have these controls then processed by any real time...

Page 892: ...bus In an audio track set the Bus Send Level corresponding to the bus or volume fader if the output is to the bus Set the pan of the audio data sent to the bus Adjust the Bus Send Pan knob Set the inp...

Page 893: ...h the bus then do the following Drag the Bus Send Level control for the bus to the approximate level you want Drag the Bus Send Pan to the approximate setting you want Click the Bus Enable button for...

Page 894: ...h the bus To do this Do this Select a bus Click the bus letter in the Track view or Console view The bus is selected and all other buses except the current bus are deselected When a bus is selected bo...

Page 895: ...ur audio in SONAR Main outs accept input from both tracks and buses Main outs contain both a left channel and a right channel Volume fader which allows you to adjust the level of each channel independ...

Page 896: ...dialog The Insert Send Assistant dialog box has the following options Send to Existing Bus This option lets you assign a new send to an existing bus in the current project Select the desired bus from...

Page 897: ...can be configured Stereo This option lets you assign a new send to a new stereo bus Surround This option lets you assign a new send to a new surround bus Bus Output Specify the desired output for the...

Page 898: ...ny other desired options see New bus options on page 897 3 Click OK to close the Insert Send Assistant dialog box A new send is inserted and assigned to the new surround bus To insert a send to a new...

Page 899: ...view if you want The responsiveness of your record meters which also measure input monitoring is dependent upon the latency setting in Edit Preferences Audio Driver Settings and the settings Edit Pre...

Page 900: ...ers belong to the same Inspector module To show hide meters in the Console view Click the Console view Modules menu and choose Volume Meters and Volume faders belong to the same Console view module Ki...

Page 901: ...the desired settings on the submenu To configure Track Inspector meters Click the Display button at the bottom of the Track Inspector point to Module Options Meters and select the desired settings on...

Page 902: ...playback and bus meters only Choose Pre Fader or Post Fader to measure the playback level either before or after the track s or bus volume fader Pre Fader Post FX This option is for the buses only Cho...

Page 903: ...page 900 Segmented and non segmented meters on page 904 To show vertical or horizontal meters in the Track view Click the Track view Options menu point to Meter Options and select Horizontal Meters or...

Page 904: ...e information see Customization Colors on page 1838 Changing the meters performance There are two major factors that determine the performance of meters in SONAR One is audio latency which you can adj...

Page 905: ...Do this Increase or decrease meter refresh rates Adjust the Refresh rate field Valid values are from 25 to 250 milliseconds Change the decay rate the amount of time the meter display stays at its peak...

Page 906: ...can be either vertical or horizontal in the Track view For more information see Changing the meters display on page 901 Peak markers Buses and audio tracks have a feature called Peak Markers A Peak M...

Page 907: ...m the pop up menu To jump to a peak marker Right click the numeric peak display in the track bus header strip and choose Go To Peak from the context menu see the following figure Doing so will center...

Page 908: ...on page 906 for more information If you change the volume of the audio signal and replay the project the waveform changes to reflect the new bus or synth track volume Each bus or synth track has a Wa...

Page 909: ...wing are the available commands for synth freezing Freeze Synth Audio from a soft synth is bounced and placed on the synth s track Output from the synth is disabled as is the effects bin on the synth...

Page 910: ...track s Freeze button Right click on a frozen track and select Freeze Quick Unfreeze Track from the menu that appears SONAR hides and mutes the bounced audio restores the original audio and enables th...

Page 911: ...ynth Do one of the following Hold down the SHIFT key and click any associated track s Freeze button Right click a frozen synth MIDI or audio track and choose Freeze Quick Unfreeze Synth from the menu...

Page 912: ...e synth track To set Freeze options Do one of the following to open the Freeze Options dialog In the Track view right click any track s Freeze button Right click an audio or synth track and choose Fre...

Page 913: ...s processing puts a heavy load on your computer s CPU If you use too many effects the CPU will not be able to keep up and playback will sound choppy and disconnected You can also apply real time audio...

Page 914: ...hile playback is in progress so there is no need for an Audition button For audio effects because mixing is handled through the Track view or Console view there is no Mixing tab You do not need to cli...

Page 915: ...effects are used Drag an effect up or down in the effects bin Edit an effect s parameters Double click on the effect to open the effect s dialog box Move an effect to a different bin Drag the effect t...

Page 916: ...d or two and a tooltip will pop up to display the full name of the effect Effects in effects bins display ticks that tell you whether the effect is outputting a mono stereo or surround signal A Mono i...

Page 917: ...ets are a way to store property page settings so that you can recall the exact same group of settings again in the future Effects and soft synths use presets and so do some other functions you ll find...

Page 918: ...ff View To do this Do this Load a preset Do either of the following Click the drop down arrow on the right side of the Presets menu and click the name of the preset in the drop down menu Click the lef...

Page 919: ...le to only hear the audio that is passing through the effect A Solo button is available on all plug in property pages which allows you to quickly solo the track or bus that the effect is inserted on w...

Page 920: ...pass as well as at an effects bin level bin bypass Any existing effects and bin bypass states are preserved when you globally bypass and unbypass effects You can selectively unbypass individual effect...

Page 921: ...re Splitting a clip copies the effect s onto both clips You can copy or move clip based effects from one clip to another and to or from the effects bin on a track A clip s effects bin also appears in...

Page 922: ...dit the ends of the clips to leave some empty space 3 Click the Track view Clips menu and choose Bounce to Clip s After the progress bar disappears the bounced clips appear with new waveforms to refle...

Page 923: ...ucer and Studio only on page 999 Limiting the number of plug in sidechain inputs By default a multi channel VST plug in always exposes the maximum number of input channels it supports You can limit th...

Page 924: ...ins in clip effects bins and surround bus effects bins Sidechain inputs are not exposed by plug ins that are inserted in clip effects bins and surround bus effects bins You can insert any multi input...

Page 925: ...g ins on page 925 Bouncing tracks on page 958 Bouncing to clips on page 835 Freeze and sidechain inputs Freeze does not consider sidechain inputs because Freeze only works on a single audio track at a...

Page 926: ...external send This parameter is automatable Send VU Meter This meter shows the signal level being delivered to the external send Since this is feeding a sound card output it is important to avoid clip...

Page 927: ...bled during playback Figure 283 External Insert A Send Stereo Mode Left Right Mono B Send Level C Send VU Meter D Send Port E Return Phase F Return Level G Return VU Meter H Return Port I Delay Measur...

Page 928: ...output ports and the external gear s audio output must be connected to one of your audio interface s input ports 2 Right click an effects bin and select External Insert from the pop up menu The Exter...

Page 929: ...gn the Send and Return to any available input and output on your audio hardware 5 Patch an audio cable directly between the assigned input and output on your audio hardware 6 Press Play in SONAR You s...

Page 930: ...anged in your system and it s time to measure the delay again Loading a project that uses the External Insert plug in When you load a project with the External Insert plug in or select a preset in the...

Page 931: ...ses the External Insert plug in the bounce operation must be performed in real time When bouncing audio data SONAR will automatically detect the presence of any External Insert plug ins see External I...

Page 932: ...saved to disk as FX Chain presets Figure 285 An FX Chain is a container that can include multiple audio plug ins Figure 286 FX Chain A FX Chain container in effects bin B FX Chain property page See Us...

Page 933: ...effects bin but you can not nest an FX Chain container inside other FX Chain containers Figure 287 To create a new FX Chain drag an FX Chain preset from the Browser s Audio tab to an audio track or a...

Page 934: ...ble click the FX Chain container in an effects bin to open the FX Chain property page 2 Do one of the following To add a new plug in right click the FX Chain property page and select a plug in from th...

Page 935: ...ut level meter Measures the pre FX Chain level Assignable rotaries Up to 6 assignable rotaries allow you to control automatable plug in parameters without having to open a plug in s property page For...

Page 936: ...ser The FX Chain is added to the FX Chain folder To load an FX Chain preset Do one of the following Right click an effects bin and choose Load FX Chain Preset on the pop up menu Select the desired FX...

Page 937: ...bin and the FX Chain is deleted To replace effects bin contents with an FX Chain preset Hold down the ALT key while you drag an FX Chain preset to an effects bin The effects bin is cleared and replace...

Page 938: ...an FX Chain preset 1 In the Browser click the PlugIn button to show the Plug in Browser 2 Under Audio expand the FX Chain branch 3 Select the FX Chain then click the FX Chain name again and type a na...

Page 939: ...6 buttons or knobs is reached or when the limit of 4 parameters for a knob or button is reached To customize an assignable control Right click a knob or button in the FX Chain property page and choos...

Page 940: ...Start Set the Start value of all parameters assigned to the FX Chain knob or button The values are determined by the current position of each plug in s property page settings All Parameters Set End Se...

Page 941: ...button Figure 293 Specify up to four automatable plug in parameters for each assignable control See Effects chains on page 932 Using FX Chain presets on page 933 Customizing the FX Chain UI on page 9...

Page 942: ...ck the FX Chain property page and click Customize UI on the pop up menu to open the Settings dialog box Figure 294 Use the Settings dialog box to customize the appearance of the FX Chain property page...

Page 943: ...er cap image E Rotary image F Button image G Label text color For details about the options in the Settings dialog see Settings dialog on page 1914 See Effects chains on page 932 Using FX Chain preset...

Page 944: ...VST plug ins so that they become available in SONAR s plug in menus You can turn off automatic scanning in Edit Preferences File VST Settings by clearing the Scan For VST Plug ins On Startup check bo...

Page 945: ...ment allowing it to manage its own automation Max used inputs This option controls the number of sidechain inputs that are exposed by SONAR for the plug in The default value is the maximum number of i...

Page 946: ...nstruments that have problems with stuck notes when stopping the transport The Always suspend on Play property is also useful for effects that generate a tail such as delays and reverbs The effect is...

Page 947: ...in Manager to open the Cakewalk Plug in Manager 2 In the Plug in Categories list select VST Audio Effects or VST Instruments 3 In the Registered Plug ins list select the desired plug in 4 Under VST Co...

Page 948: ...The EQ Plot module lets you adjust the per track equalization curve To access additional equalizer controls double click the EQ plot Figure 296 EQ Plot module A EQ on off B EQ plot Figure 297 Double c...

Page 949: ...Q settings from one track bus source to another track bus target when using the integrated per channel EQ in the Console View or Track Inspector To do so hold down the CTRL click the source EQ plot an...

Page 950: ...ffects The number of real time audio effects that your computer can handle depends on the number of audio tracks in your project the number and type of effects you want to use and the type and speed o...

Page 951: ...her at all times Buttons that are in opposite positions when grouped will always remain in opposite positions When you group buttons with knobs or faders the button turns on off when the knob or fader...

Page 952: ...on the control 2 Choose Remove From Group from the menu SONAR removes the control from the group and displays the control with the neutral color indicator To remove all controls from a group Right cli...

Page 953: ...g or ending value for a control click on the control in the list and enter new values in the Start and End box 4 To swap the starting and ending value click the Swap button 5 Click Close when you are...

Page 954: ...ups Quick Groups only affect tracks of the same type Audio or MIDI For instrument tracks the relevant controls is treated as belonging to an Audio or MIDI track Quick Groups do not work between tracks...

Page 955: ...Volume FX insert Send insert Send controls Send destination Clear peak meter Input pan Channel Bank Patch Expand collapse Take lanes Expand collapse Automation lanes Meter scale Track color ProChanne...

Page 956: ...he type of MIDI message used to work a control is selected in the Remote Control dialog box The options are as follows Message option Message effect on buttons Message effect on sliders and knobs None...

Page 957: ...and choose Disable Remote Control from the pop up menu To prevent SONAR from sending controller data to your MIDI device Right click each knob or fader in SONAR that is sending unwanted controller da...

Page 958: ...ay in real time Here are some reasons to use Bounce to Track s Your mix is so complex that real time playback is impossible Bounce to Track s produces the correct mix and store the result in a new tra...

Page 959: ...o to eight new mono tracks the Split Mono option depending on whether the bus is a stereo or surround bus and depending on what you choose in the Channel Format field Main Outputs Choosing this option...

Page 960: ...d and the bounce is performed silently There are a few limitations to the Fast Bounce operation You cannot perform a fast bounce if the audio contains any External Insert plug ins Since the External I...

Page 961: ...Bounce is enabled you can hear the output of the mixdown To allow live input during bounce 1 Click the Track view Tracks menu and choose Bounce to Track s to open the Bounce to Track s dialog box 2 Un...

Page 962: ...your CD you are ready to burn a CD Use the Utilities Burn Audio CD command to burn your tracks to an audio CD For step by step procedures To export audio to Wave file format on page 964 Converting MI...

Page 963: ...nternet with the file extension mp3 The MP3 encoder that comes with SONAR is a trial version which will time out The full version is available for download at www cakewalk com Apple AIFF Audio Interch...

Page 964: ...us extra time for the reverb or effects tail 4 Choose File Export Audio to open the Export Audio dialog box 5 Select a destination folder using the Look In field 6 Enter a file name 7 Choose one of th...

Page 965: ...file to be 12 Select the bit depth that you want the exported file to use If your source file is 16 and you export to 24 you get more precision for any audio effects in the mix and a larger file If y...

Page 966: ...se Windows Media Advanced Streaming Format from the Files of type drop down list 8 In the Source Category field select one of the following options Tracks Choosing this option creates a separate file...

Page 967: ...cks select those clips now 3 If you are using effects on the tracks and want to mix the effects down at this time select the whole length of the longest track or clip plus an extra measure for the rev...

Page 968: ...ng on page 973 for more information 13 In the Mix Enables field choose the elements you want to include in the mixdown If you want to exclude muted tracks and or include only soloed tracks make sure T...

Page 969: ...ll appear showing Extra Encoding Options These options typically determine the bit depth endian ness the byte ordering in memory used to represent the data and an encoding type within the major file f...

Page 970: ...it float U Law A Law IMA ADPCM GSM 6 10 12 bit DWVW 16 bit DWVW 24 bit DWVW AU Sun NeXT extension au Signed 8 bit PCM Signed 16 bit PCM Signed 24 bit PCM Signed 32 bit PCM 32 bit float 64 bit float U...

Page 971: ...Signed 8 bit PCM Signed 16 bit PCM Signed 24 bit PCM Signed 32 bit PCM Unsigned 8 bit PCM 32 bit float 64 bit float U Law A Law SD2 Sound Designer II extension sd2 Signed 8 bit PCM Signed 16 bit PCM...

Page 972: ...oject as an OMF file 1 Select File Export OMF The Export OMF dialog box appears 2 Enter a File Name maximum 64 characters SONAR limits name length for ISO CDR compatibility and in the Save As Type fie...

Page 973: ...method has advantages and disadvantages depending on the particular operation SONAR features the Pow r dithering process short for Psycho acoustically Optimized Wordlength Reduction which can produce...

Page 974: ...erations where dither will be applied successively e g bounce and freeze Pow r 3 Same as Pow r 2 except most CPU intensive and transparent of all choices To choose dithering options 1 Go to Edit Prefe...

Page 975: ...ith the Surround basics on page 976 See Surround basics on page 976 Configuring SONAR for surround mixing on page 976 Panning in surround on page 983 Surround metering on page 990 Bass management on p...

Page 976: ...E channel the 1 in 5 1 is the LFE or sub channel The five full range channels are reproduced by left right and center speakers positioned in front of the listener L R and C for short and left and righ...

Page 977: ...rranged and the speaker angles For example The speaker positions moving clockwise from center are identified as To mix in surround sound in SONAR you must insert at least one surround bus Surround For...

Page 978: ...owing Surround Format templates 2 0 2 1 LCR LRC LFE LRS LFS LFE Matrix UHJ QUAD 4 1 SMPTE ITU Quad LFE PanAmbio 4 1 LCRS Surround SMPTE ITU Surround Media LCRS LFE 5 1 Standard 3 2 5 1 Film Alternativ...

Page 979: ...converting a surround mix into a stereo mix The group of sound card outputs that you choose in Edit Preferences Project Surround make up the Surround Main The Surround Main becomes a choice on the Out...

Page 980: ...nels For example if a project is set to 7 1 then the bus has 8 channels 7 directional channels and one LFE channel To insert a surround bus 1 In the Bus Pane of the Track view or the Console view righ...

Page 981: ...eo bus No change Mono track to surround bus Mono signal is routed to both Left and Right channels of surround format You can change the routing to other surround channels by using the surround panner...

Page 982: ...d downmix level and click OK 3 In each of the surround buses assign the output to a stereo bus 4 Listen to your project through the stereo bus and make any final adjustments to the stereo mix by chang...

Page 983: ...round panner The surround panner comes in four sizes Micro This is found in the Track view Small This is found on sends Medium This is the surround panner which is displayed in the Track Inspector and...

Page 984: ...d panning Here are pictures of the large surround panner and medium surround panner Figure 302 Large Surround Panner A Angle and focus marker B Width markers C Right speaker icon Note 1 Surround panni...

Page 985: ...Each surround channel is represented by a speaker icon in the large panner and a white square in the small panner The large panner also has a corresponding volume level in dB directly in front of eac...

Page 986: ...away from the center Or In the large surround panner drag the Focus slider To mute a surround speaker In the large surround panner click a speaker icon to mute its output The speaker icon turns grey w...

Page 987: ...sired Numeric Keypad key that represents the speaker position 7 L 8 C 9 R see Keyboard shortcuts on page 988 To group panner controls In the large surround panner right click each slider that you want...

Page 988: ...rag Constrains to angle ALT SHIFT drag Constrains to angle at 100 focus CTRL SHIFT drag Constrains to focus only SHIFT click Sets panner point to the point that you click large and medium panners only...

Page 989: ...A force feedback joystick such as the Microsoft SideWinder Force Feedback 2 joystick can add a tactile element to mixing sessions and add button control to some SONAR transport and or menu commands w...

Page 990: ...the current track and horizontally to change to a different send control The Control Bar s ACT module displays the names of the current track and send Use any other buttons you configured to control o...

Page 991: ...at this 10 dB of low bass can be added to any low bass that came out of the other 5 channels from redirection so you realistically can deliver a sound from the subwoofer that is more than 20dB above t...

Page 992: ...round channels to instance 2 the Center channel to instance 3 and the LFE channel to instance 4 If you patch a mono effect into a surround bus the SurroundBridge assigns each channel to a single insta...

Page 993: ...change an automatable parameter on one tab of the property page that change is duplicated on all the tabs of the property page However you can unlink individual parameters from the other tabs by clic...

Page 994: ...nd bus and choose a mono or stereo effect from the pop up menu The SurroundBridge patches multiple instances of the effect you chose into the bus s effects bin however only one effect appears in the b...

Page 995: ...field If you unlinked some but not all of an instance s parameters the instance s check box in the Controls Linked to Group column appears gray with a check To view a list of the automatable parameter...

Page 996: ...y using the Enable check box lightens the CPU load by taking the instance out of the processing path The Bypass button on the instance s property tab does not change color when you click the Enable ch...

Page 997: ...ble to decode these files in SONAR Windows Media Pro To import a surround multi channel file 1 Use the File Import Audio command to open the Import Audio dialog box 2 Select a file of a supported file...

Page 998: ...ose Buses Main Outputs or Entire Mix 5 Choose the bus or buses in the Source Buses Tracks field that you want to export your mix from 6 Choose Multichannel in the Channel Format field 7 Choose any oth...

Page 999: ...ered per audio track Instrument track and bus in the Inspector and Console view Combining compression equalization and tube saturation modeling in one convenient processor ProChannel is designed to ma...

Page 1000: ...o signal Equalization may also be applied creatively to add presence or enhance certain frequencies to remove noise hum or low end rumble for special effects or numerous other purposes The QuadCurve E...

Page 1001: ...of analog magnetic tape saturation to your digital mixes For details see Tape Emulator module Producer only on page 1039 Additional modules will be available in the future from Cakewalk and third par...

Page 1002: ...6 U Type Channel Compressor module Producer only on page 1014 PC4K S Type Bus Compressor module Producer only on page 1016 QuadCurve Equalizer module on page 1019 Tube Saturation module Producer only...

Page 1003: ...Module button to insert a new module To remove a module Right click the module header and select Remove Module on the pop up menu To replace a module Right click a module header or blank space in ProC...

Page 1004: ...on the pop up menu To specify the default configuration for tracks Right click any empty space in a bus ProChannel and select Set Modules as Default for Buses on the pop up menu To route ProChannel p...

Page 1005: ...on the pop up menu The resolutions are as follows Auto graph scales dynamically 6 dB 12 dB 18 dB Figure 309 QuadCurve Equalizer graph A Low band B Low Mid band C Mid High band D High band To sidechain...

Page 1006: ...dless of which track is current 1 Click the track or bus you want to show in the Track Inspector 2 Click the ProCh button at the top of the Inspector ProChannel is displayed in the Inspector pane 3 Cl...

Page 1007: ...if you want to switch from the Sonitus fx EQ to the ProChannel QuadCurve Equalizer Loading X3 projects in SONAR X1c or earlier SONAR X1c and earlier only support a single compressor module per channel...

Page 1008: ...ed only a subset of all available controls are visible Figure 312 ProChannel can be displayed collapsed or expanded in the Inspector and Console view Note When expanding ProChannel in the Inspector Pr...

Page 1009: ...s collapses the ProChannel module Preset Shows selected preset name Hover the mouse over the Preset control to access Load Preset and Save Preset controls For details see Presets on page 1012 Pre Post...

Page 1010: ...nnel Producer and Studio only ProChannel controls expanded Figure 314 ProChannel expanded A Selected track B Selected track s expanded ProChannel C Presets D Compressor E Equalizer F Tube saturation A...

Page 1011: ...r details see Module categories on page 1013 Name Module name Clipping LED Shows if the input signal to the module is clipping If there is any distortion in the ProChannel signal chain the clipping LE...

Page 1012: ...lected preset name Choose any existing preset from the list Preset Shows selected preset name Load Preset Opens the Open dialog box to the default preset directory Choose a preset and click Load to lo...

Page 1013: ...6 Console Emulator module Producer only on page 1027 FX Chain module on page 1031 Tape Emulator module Producer only on page 1039 Category Module icon Type of processor Frequency EQ pitch shift etc Dy...

Page 1014: ...itar tracks The PC76 U Type Channel Compressor module contains the following controls Clipping LED Shows if the input signal to the Compressor module is clipping If there is any distortion in the ProC...

Page 1015: ...Controls the amount of compression gain reduction that will be applied to the signal after the input audio level exceeds the threshold level Ratio denotes the difference in dB between input level and...

Page 1016: ...le C VU meter D Release E Make up gain F Attack G Threshold H Sidechain High Pass filter I Sidechain enable disable J Ratio K Dry Wet level This is the default compressor module when using ProChannel...

Page 1017: ...is 0 5 seconds If Auto is selected the release time is dependent on the duration of the signal peak Make Up Compensates or makes up for automatic gain reduction Make up gain refers to the process of...

Page 1018: ...to the sidechain input The valid range is OFF to 2 kHz Dry Wet Adjusts the balance between the unprocessed dry and processed wet audio signal The range is 0 to 100 and the default value is 100 See als...

Page 1019: ...of the Inspector point to Module Options ProChannel and choose Compact EQ Module To show hide compact mode in the Console view Click the Console view Options menu point to ProChannel and choose Compa...

Page 1020: ...The QuadCurve Equalizer module contains the following controls Clipping LED Shows if the input signal to the QuadCurve Equalizer module is clipping If there is any distortion in the ProChannel signal...

Page 1021: ...ection of frequencies Pure Provides a clean transparent mastering style equalizer with a soft and gentle curve Overall EQ Buses Mastering Whenever you need to apply subtle changes over a wide spectrum...

Page 1022: ...ding frequencies that will be affected when adjusting the band A low Q value gives a high bandwidth for the filter band resulting in a smooth shaping of the sound and little audible coloration Filteri...

Page 1023: ...ng other frequencies to pass unfiltered Slope Low Pass Specifies the ratio of how the Low Pass filter attenuates frequencies above the Low Pass frequency Slope is expressed in decibels per octave The...

Page 1024: ...Q plot D FFT spectrum analyzer E Output meter F Pin fly out panel G Close fly out panel The FFT spectrum analyzer displays the instantaneous level of all frequencies The vertical axis represents ampli...

Page 1025: ...adCurve Equalizer graph on page 1004 QuadCurve Equalizer fly out panel touch gestures on page 1177 See ProChannel Producer and Studio only on page 999 Using ProChannel on page 1003 ProChannel modules...

Page 1026: ...the Tube Saturation module is clipping If there is any distortion in the ProChannel signal chain the clipping LEDs let you identify where the clipping occurs Tube Saturation enable disable Enables dis...

Page 1027: ...us elements that define the sound of each console Digital audio is often accused of lacking character Although mixing entirely inside a computer often referred to as mixing in the box has many benefit...

Page 1028: ...modules The Console Emulator module contains the following controls Mode Selects the desired console emulation mode For each mode the Console Emulator module closely resembles the hardware it is model...

Page 1029: ...not in the Console Emulator Bus module Drive Adjusts how much of the pre processed input signal enters into saturation For example in an analog hardware mixer if you put all the channel faders at 3dB...

Page 1030: ...t the Console Emulator module as the first module and make sure ProChannel has Post FX Bin disabled However you can also experiment with placing the Console Emulator module at the end and enable Post...

Page 1031: ...sign J Click button to bypass un bypass plug in K List of effects in chain double click to open plug in drag to reorder L Scroll bar The FX Chain module contains the following controls FX Chain preset...

Page 1032: ...mpty FX Chain module appears with the Effects page visible and the audio effect s property page appears Drag an FX Chain preset from the Browser to ProChannel To load an FX Chain preset Do one of the...

Page 1033: ...k the effect name on the Effects page and choose Delete on the pop up menu To re order plug ins On the Effects page drag the effects up down to the desired position To bypass an individual plug in On...

Page 1034: ...Chain can be automated just like other effects in an effects bin Parameter names for plug ins that reside within an FX Chain container are listed in submenu s prefixed by the associated FX Chain name...

Page 1035: ...ly 1 Right click a knob or button in the FX Chain module and choose Edit control on the pop up menu to open the Control Properties dialog box 2 Specify the Start and End values To set parameter value...

Page 1036: ...menu to open the Control Properties dialog box 2 Specify an automatable plug in parameter in the Destination list You can specify up to four parameters for each knob and button Figure 328 Specify up...

Page 1037: ...igure 329 Use the Settings dialog box to customize the appearance of the FX Chain module A Background image B Preset background image C Preset text color D Label text color The Settings dialog box con...

Page 1038: ...Producer only on page 1014 PC4K S Type Bus Compressor module Producer only on page 1016 QuadCurve Equalizer module on page 1019 Tube Saturation module Producer only on page 1026 Console Emulator modu...

Page 1039: ...0dB before undesirable clipping occurs This is known as overload Analog tape recordings also have an upper limit but unlike digital clipping the signal compresses and distorts slightly as you approach...

Page 1040: ...able disable Enables disables the Tape Emulator module Noise Adjusts the level of simulated tape hiss Rec Level Applies a gain adjustment to the pre processed audio signal input level Higher values ca...

Page 1041: ...nel on page 1003 ProChannel modules and controls on page 1008 PC76 U Type Channel Compressor module Producer only on page 1014 PC4K S Type Bus Compressor module Producer only on page 1016 QuadCurve Eq...

Page 1042: ...1042 ProChannel Producer and Studio only...

Page 1043: ...an apply special processing to specific audio regions These effects are called Region FX Any ARA compatible VST3 audio plug in will be available as a Region FX in SONAR and will be listed in the Track...

Page 1044: ...lick the clip For details see Selecting clips on page 350 2 In the Track view click the Region FX menu click the name of the desired ARA plug in for example Melodyne then select Create Region FX The s...

Page 1045: ...pass all Region FX in a project Do one of the following In the Track view click the Region FX menu and select Bypass All Region FX Right click a Region FX clip and choose Region FX Bypass All Region F...

Page 1046: ...t program in real time during playback and knows nothing about the musical context of the audio data This may be sufficient for some types of plug ins like reverb and EQ but not for plug ins that need...

Page 1047: ...y click the clip For details see Selecting clips on page 350 2 In the Track view click the Region FX menu click the name of the desired ARA plug in for example Melodyne then select Create Region FX Th...

Page 1048: ...and convert to MIDI For details see To convert audio to MIDI on page 1060 Melodyne is integrated in SONAR via the ARA protocol see ARA Audio Random Access on page 1046 The Melodyne interface appears d...

Page 1049: ...Region FX on page 1043 V Vocal Region FX clips on page 1063 V Vocal Editor on page 1065 Using Melodyne This section describes how to use Melodyne in SONAR For tutorials and detailed information about...

Page 1050: ...ne on page 1061 To adjust loop points in Melodyne on page 1061 To toggle looping on off on page 1062 To create a Melodyne Region FX clip 1 Select an audio region or clip you wish to process with Melod...

Page 1051: ...the audio clip or region you want to edit in Melodyne Figure 334 The Melodyne editor opens in the MultiDock view Note Although you can insert an ARA compatible plug in in a clip effect bin doing so w...

Page 1052: ...You can change the algorithm at any time from Melodyne s Algorithm menu In some cases you may want to change the algorithm if the audio material was not interpreted in a way that suits your editing ne...

Page 1053: ...correct most pitch or timing problems then fine tune individual notes with the Main tool A Main tool B Correct Pitch macro C Quantize Time macro Note Polyphonic editing is only available in Melodyne e...

Page 1054: ...er hotspot The mouse pointer indicates the function of each hotspot Figure 335 Main tool hotspots on Melodyne blobs Hotspot Default action ALT A Click to select blob Double click to create a note sepa...

Page 1055: ...hed compressed by the same amount E Drag to lasso select Double click to start stop playback Command Shortcut Raise lower pitch by a semitone or scale degree CTRL UP DOWN ARROW Raise lower pitch by a...

Page 1056: ...ote s 6 Adjust the Correct Pitch Drift slider to progressively reduce the amount of pitch drift exhibited by the selected note s 7 Click OK when you are satisfied with the results After using the Corr...

Page 1057: ...ill be edited 5 Click the Quantize Time button to open the macro controls 6 Under Select Groove Reference select the note duration that will govern the time correction 7 Adjust the Intensity slider to...

Page 1058: ...e pop up menu To snap to a specific scale 1 Click the small arrow button above the pitch ruler and select Scale Editor Selection and Master Tuning on the pop up menu Two new columns appear in the pitc...

Page 1059: ...empo on the pop up menu The Melodyne Region FX clip will now obey any tempo changes in the project To create harmonies 1 Copy an audio clip to a new track or Take Lane 2 Convert the copied clip to a M...

Page 1060: ...usical structure of audio data You can even view the data as musical notation in the Staff view Extract the groove of an audio track and create a Groove Quantize template that can be applied to MIDI t...

Page 1061: ...ty area in Melodyne Double click in the upper half of the time ruler in Melodyne To adjust loop points in Melodyne Do one of the following To create a loop region drag in the lower part of the Melodyn...

Page 1062: ...ust C Loop region drag to move double click in Melodyne to enable disable looping D Loop end drag to adjust E SONAR time ruler F Melodyne time ruler click to change Now time double click in the upper...

Page 1063: ...d The following procedures explain how to manage V Vocal Region FX clips For information about using V Vocal see V Vocal Editor on page 1065 To create a V Vocal Region FX clip 1 Select the audio data...

Page 1064: ...Vocal Bypass Region FX from the Clips pane pop up menu When you bypass a V Vocal Region FX clip you hear the original audio data that makes up the V Vocal Region FX clip without hearing any V Vocal pr...

Page 1065: ...e 338 V Vocal A Bypass B Mute C Solo D Rewind E Play Stop F AutoScroll G LoopMode H Undo Redo I Cent indicator J Timeline K Scroll L Formant control M Information view N Zoom O Edit mode P Pitch corre...

Page 1066: ...of pitch correction This function can adjust the pitch to the selected notes grids by increasing or decreasing the pitch of the selected region Vibrato Set the depth of the vibrato If you choose 100...

Page 1067: ...playback time To play a V Vocal Region FX clip To play a V Vocal Region FX clip click the Play button in the V Vocal interface or press the SPACEBAR To stop playback press the SPACEBAR or click the S...

Page 1068: ...te horizontal line is called Center Pitch Center Pitch is used as a baseline for increasing or decreasing vibrato or for pitch correction To change the pitch of a selected region 1 Use the Arrow tool...

Page 1069: ...lue of 100 you will get a robot voice type sound Current default values are Note 100 Vibrato 50 Sense 100 This setup is a bit too artificial If you want to make the sound more natural we suggest the f...

Page 1070: ...od starting point If the selection has vibrato try 0 to 30 5 Click the Correct button The pitch in the selected region moves to the target pitches the light blue notes on the keyboard To conform pitch...

Page 1071: ...ode section must be enabled To edit time 1 Make sure the Time button is enabled 2 Move the Arrow tool near the vertical center of the graph until the cursor changes to the double arrow and click at ea...

Page 1072: ...drag the nodes to create different shapes Tips Double clicking the red line in a selected region adds nodes to the place where you click and also to the start and end of the selected region You can d...

Page 1073: ...or show the phrase s waveform Wave option on submenu the pitch display Pitch the formant line Formant and the dynamics line Dynamics Group Node Deletes nodes in the selected region Pitch Detect Mode M...

Page 1074: ...ect Pitch to MIDI Settings from the pop up menu There are two parameters that affect the generated MIDI data Pitch Bend Range This setting is used to specify the pitch bend range to use when convertin...

Page 1075: ...Erase tool E Hand tool H Zoom tool Z Undo zoom U Redo zoom SHIFT U Zoom vertically CTRL UP DOWN ARROW keys Zoom horizontally CTRL LEFT RIGHT ARROW keys Fit entire region into display SHIFT F Fit conte...

Page 1076: ...ge 1043 Redo CTRL SHIFT Z Cancel drag gesture ESC Select All CTRL A Select None CTRL SHIFT A Return selection to default settings DELETE Solo track Show hide waveform in Pitch edit mode SHIFT W Go to...

Page 1077: ...loud users This is a great way to collaborate with others Allow anyone or only specific people to access and comment on your sounds An active Internet connection and free SoundCloud account are requir...

Page 1078: ...nds artwork and metadata to the SoundCloud service directly from SONAR Before you can upload your music to SoundCloud you must grant SONAR access to your SoundCloud account This is referred to as auth...

Page 1079: ...a new account then return to Cakewalk SoundCloud and specify the e mail address and password used for your SoundCloud account 3 Click Allow to grant SONAR permission to upload sounds to your SoundClo...

Page 1080: ...n your default web browser Disconnect Disconnect from the SoundCloud service which will de authorize your SoundCloud account from SONAR Connection Status Shows the SoundCloud account name when connect...

Page 1081: ...e Specify the track type of the audio file The following options are available Original Remix Live Recording Spoken Podcast Demo Work in progress Stem Loop Sound effect One Shot Sample Other Artwork A...

Page 1082: ...to share your sounds on your Facebook profile The name of the primary connected Facebook account is shown next to the Setup link If selected the Make track private option will be disabled when you sh...

Page 1083: ...kHz wav file Share with SoundCloud MP3 Creates a 256kBit s mp3 file Share with SoundCloud FLAC Creates a 16 bit 44 1kHz flac file FLAC is a royalty free high quality lossless audio compression codec F...

Page 1084: ...l wav file and unlike MP3 there is no loss of audio quality 4 Under Bounce Settings select the desired settings such as channel format sample rate and bit depth 5 Enter a name in the File name box 6 C...

Page 1085: ...have failed For troubleshooting help click the Help button or see Troubleshooting on page 1087 To share your music on Facebook and Twitter When you upload a song to SoundCloud you can choose to also...

Page 1086: ...Twitter click Setup to configure See Sharing your songs on SoundCloud on page 1077 The Cakewalk SoundCloud interface on page 1078 Troubleshooting on page 1087 Note If you have multiple Facebook and o...

Page 1087: ...use AVG go to Settings and disable the Linkscanner Resident shield Surf Shield and Webshield For Kaspersky Avast and all other software try disabling the program entirely for the duration of the uplo...

Page 1088: ...1088 Sharing your songs on SoundCloud Troubleshooting...

Page 1089: ...ltiple projects spread across multiple hard drives Gobbler helps to keep your files secure and provide access to them from anywhere with an Internet connection An active Internet connection and free G...

Page 1090: ...ctly from SONAR To show hide the Gobbler module Right click the Control Bar and select Gobbler Module Figure 342 The Gobbler module A Connect to Gobbler The first time you click the Connect to Gobbler...

Page 1091: ...un any CPU related tasks while you are working in SONAR The color of the button indicates its state Blue The project is presently on auto backup Yellow The project is already backed up but paused not...

Page 1092: ...e 1095 To export and share a video file on Gobbler on page 1097 Receiving files from another Gobbler user on page 1099 To back up the current project to Gobbler 1 Open the project you want to back up...

Page 1093: ...you want to store the file then click OK The file will download to your local computer To share the current project and related files on Gobbler 1 Open the project you want to share on Gobbler 2 Make...

Page 1094: ...option is disabled by default Video This option only appears if the project references a video file If disabled Gobbler will not send any video files This option is enabled by default Audio This setti...

Page 1095: ...u want to share on Gobbler You can also drag in the time ruler to select a specific time region 2 Go to File Export Audio to open the Export Audio dialog box 3 In the Files of type list select the des...

Page 1096: ...launches the Gobbler Send Files dialog box 8 Enter the recipient s e mail address and add an optional description then click Send To cancel the upload click the Cancel button See also Preparing audio...

Page 1097: ...to File Export Video to open the Export Video dialog box 3 In the File Name field type a name for the new video file 4 In the Save as Type field select the desired file format 5 Click Encoding Options...

Page 1098: ...d an optional description then click Send To cancel the upload click the Cancel button See also Exporting your video on page 168 Exporting video on page 256 Tip If you want to share multiple video fil...

Page 1099: ...Control Bar s Gobbler module or open the Gobbler desktop program and click Received Files 2 Select the desired notification message then click the hyperlink for the file you want to download 3 In the...

Page 1100: ...and disable the Linkscanner Resident shield Surf Shield and Webshield For Kaspersky Avast and all other software try disabling the program entirely for the duration of the upload Finally disable Flash...

Page 1101: ...movements You can draw freehand and geometric automation curves with the Freehand tool and Pattern tools All automatable controls are in the Console view and the Track view including the Clips pane ho...

Page 1102: ...1108 Recording individual fader or knob movements on page 1109 Automation lanes on page 1111 Creating and editing automation envelopes on page 1119 Automating track and bus mute on page 1130 Envelope...

Page 1103: ...tomate How you can automate them Individual tracks Gain pan mute bus send gain bus send balance MIDI controllers MIDI chorus and reverb pitch wheel channel aftertouch RPN and NRPN Draw envelopes in th...

Page 1104: ...aw automation envelopes with the global tools An envelope is a graph of the change in level of a particular parameter over time For details see Creating and editing automation envelopes on page 1119 R...

Page 1105: ...e parameter returns to any previously automated position This mode is useful if you want to update a previous write pass appending new automation data only where desired When using a touch sensitive M...

Page 1106: ...on Write buttons on page 1108 Recording individual fader or knob movements on page 1109 Automation lanes on page 1111 Creating and editing automation envelopes on page 1119 Automating track and bus mu...

Page 1107: ...want to show in the Track Inspector 2 Click the Track button at the top of the Inspector pane or press CTRL SHIFT I 3 In the Track Properties Inspector s Automation section click the Time Base item a...

Page 1108: ...ameters on a specific audio track bus or plug in to be recorded The Automation Read and the Automation Write buttons are located by default next to the Mute Solo Arm buttons on track and bus strips in...

Page 1109: ...recording operations To record individual fader or knob movements 1 Do one of the following To write enable an individual track or bus control right click the fader or control you want to automate an...

Page 1110: ...ols so that automating one control automates all the controls in the group See also Automation on page 1101 Quick automation guide on page 1103 Automation methods on page 1104 Automation write modes o...

Page 1111: ...s are indented below the parent track bus Automation lanes can be created hidden and removed Each track bus can have an unlimited number of lanes Automation lanes provide many benefits including Bette...

Page 1112: ...ion guide on page 1103 Automation methods on page 1104 Automation write modes on page 1105 Automation time base on page 1107 Automation Read and Automation Write buttons on page 1108 Recording individ...

Page 1113: ...rite Automation enable disable G Edit Filter H Parameter slider The following controls are shown in each Automation lane Remove lane Remove lane but keep any existing automation envelopes Insert new l...

Page 1114: ...ble track parameter to show in the Automation lane Parameters that are already displayed in other Automation lanes are shown in the menu but disabled Note Clip envelopes are accessed in the parent tra...

Page 1115: ...button is a toggle and only shows automation parameters that have previously been assigned to lanes Any other existing automation parameters are displayed in the parent track If no Automation lanes ha...

Page 1116: ...ne button Press SHIFT PLUS A new Automation lane is created and assigned to a parameter based on the following priority list Audio and Instrument tracks 1 Existing automation priorities are same as 2...

Page 1117: ...on in an Automation lane All existing automation envelopes are displayed in separate Automation lanes To remove a lane Click the lane s Remove lane button The lane is removed and any existing automati...

Page 1118: ...the menu 3 Use the global tools to edit automation envelopes For details see Tools on page 441 To edit clip automation in a lane 1 Click a track s Expand collapse Take lanes button 2 Click the Take l...

Page 1119: ...se the global tools in the Control Bar s Tools module see Tools on page 441 to edit the envelope If a time selection spans multiple tracks the global envelope editing tools affect all selected tracks...

Page 1120: ...segment s shape on page 1125 To draw automation patterns on page 1126 To draw MIDI continuous controller envelopes on page 1126 To erase automation on page 1127 To delete a single envelope on page 11...

Page 1121: ...he desired automation parameter Track Automation or Clip Automation 2 Do one of the following With the Smart tool or Select tool drag left right to make a time selection With the Smart tool or Select...

Page 1122: ...lope where you want to insert a new node then click With the Smart tool hold down the CTRL key and drag to insert two nodes at the selection boundaries With the Select tool position the pointer over t...

Page 1123: ...the previous node or two previous flat line segments As the dragged node is snapped the vertical snap target is highlighted The global Snap to Grid settings are also active while the CTRL key is pres...

Page 1124: ...r the top center of the track clip then drag up down To raise lower an envelope across a time range 1 Set the track s Edit Filter control to the desired automation parameter Track Automation or Clip A...

Page 1125: ...appears then right click the envelope and choose one of the following shapes on the pop up menu Jump This choice causes the envelope to make a ninety degree jump where the envelope reaches the second...

Page 1126: ...To create a series of identical shapes hold the SHIFT key down while you drag To gradually increase or decrease the amplitude gradually move the pointer farther from or closer to the midpoint 6 Releas...

Page 1127: ...lete Envelope from the menu SONAR deletes the envelope To delete several or all envelopes 1 Select the data that contains the envelopes you want to delete you can select parts of tracks one or more wh...

Page 1128: ...hose in the box into the track and location you selected You can reassign an envelope to control a different parameter from the one it originally controlled For example you can reassign a volume envel...

Page 1129: ...ds on page 1104 Automation write modes on page 1105 Automation time base on page 1107 Automation Read and Automation Write buttons on page 1108 Recording individual fader or knob movements on page 110...

Page 1130: ...To draw a Mute envelope 1 Click the track s Edit Filter control point to Track Automation and choose Automated Mute on the submenu An envelope appears at the bottom of the track 2 Add nodes to the env...

Page 1131: ...two modes are Envelope mode and Offset mode Envelope mode In envelope mode volume and pan faders follow the project s automation and do not respond to changes you make in real time Offset mode In Offs...

Page 1132: ...00 R default is C Bus Send Level Infinity to 6dB default is 0 dB Infinity to 6dB default is 0dB Bus Send Pan 100 L to 100 R default is C 100 L to 100 R default is C Bus Return Level Infinity to 6dB de...

Page 1133: ...ct the Display Envelopes on Percentage Scale check box See Automation on page 1101 Quick automation guide on page 1103 Automation methods on page 1104 Automation write modes on page 1105 Automation ti...

Page 1134: ...t 4 In the Value field select the controller number of the controller you want to convert For example if you re converting a volume envelope to a shape select 7 5 In the Channel field select the chann...

Page 1135: ...n the track 4 Make sure the appropriate Automation Read button is enabled play your project and listen to the results You can undo the snapshot by using the Undo command or by taking another snapshot...

Page 1136: ...log box when it appears 2 Right click in the Clips pane in the track or bus where you patched the effect The Clips pane or Bus pane pop up menu appears 3 If you opened the Clips pane pop up menu choos...

Page 1137: ...modes on page 1105 Automation time base on page 1107 Automation Read and Automation Write buttons on page 1108 Recording individual fader or knob movements on page 1109 Automation lanes on page 1111 C...

Page 1138: ...3 If your controller works by sending Sysx information instead choose options in the Sysx fields see Remote Control dialog on page 1875 for more information and click OK 4 In either the Track or Conso...

Page 1139: ...time base on page 1107 Automation Read and Automation Write buttons on page 1108 Recording individual fader or knob movements on page 1109 Automation lanes on page 1111 Creating and editing automation...

Page 1140: ...1140 Automation Recording automation data from an external controller...

Page 1141: ...see Floating views and using dual video monitors on page 1150 Open multiple instances of the same view type For details see Locking views on page 1152 Save window layouts as screenset presets and fre...

Page 1142: ...default the MultiDock appears below the Track view For details see MultiDock on page 1146 The SONAR interface consists of five primary UI elements each with its own default location The following lis...

Page 1143: ...ight of SONAR s interface A Control Bar B Track and Clip Inspectors C MultiDock Piano Roll view shown D Track view E Browser When dragging the Control Bar Inspector Browser MultiDock and other views t...

Page 1144: ...t Left Click any blank space at the top of the Inspector pane and drag the Inspector to the desired position To undock do one of the following Click the Docking Options button and select Undock Click...

Page 1145: ...Browser to the desired position Figure 355 Use the docking controls to change the position of the Browser A Click here to drag the Browser B Dock Undock C Docking Options D Expand Collapse More detail...

Page 1146: ...on tabbed panes in the MultiDock Figure 356 You can dock multiple windows in the MultiDock Figure 357 The MultiDock A Each docked window has its own tab B Click to the right of the tabs and drag the M...

Page 1147: ...and choose Dock in MultiDock Click the upper left corner of a window and choose Dock in MultiDock from the pop up menu Figure 359 To dock a window in the MultiDock click the window s icon menu in the...

Page 1148: ...s X button To navigate between docked windows Do one of the following Click the desired tab Hold down the SHIFT and CTRL keys and press the LEFT ARROW or RIGHT ARROW key To resize the MultiDock Drag...

Page 1149: ...e MultiDock to the top or bottom of the screen The MultiDock can be docked in four different positions depending on where you release the mouse button By default the Inspector and Browser extend the f...

Page 1150: ...rease the number of views that you can have open at one time You can float views in SONAR without having a second monitor Floating a view allows you to move it out of SONAR over the Control Bar and me...

Page 1151: ...of the view and choose Enable Floating A Piano Roll view icon 3 Move the view wherever you want See also Window management on page 1141 Docking windows on page 1142 MultiDock on page 1146 Floating vi...

Page 1152: ...locked To lock unlock a view Do one of the following Click the upper left corner of a window and choose Lock Contents from the pop up menu If the view is docked in the MultiDock right click the view...

Page 1153: ...floating for any windows you want to tile click the icon located in the upper left corner of the window and select Disable Floating 3 Do one of the following Choose Window Cascade Choose Window Tile...

Page 1154: ...project or switch to another screenset This allows screensets to seamlessly integrate into any workflow You can also lock screensets in order to prevent any further changes When you open a project SON...

Page 1155: ...last saved state on page 1158 Using Screensets Screenset controls You use the Screenset module in the Control Bar to manage screensets The Screenset module contains a menu and 10 buttons to select sc...

Page 1156: ...n the computer keyboard to select screensets 1 through 10 The active screenset button is highlighted To show hide the Screenset module Right click the Control Bar and select Screenset module To select...

Page 1157: ...sets from another project 1 Make sure the Screenset module is visible in the Control Bar 2 Open the target project that you want to import screensets into 3 While the target project is open also open...

Page 1158: ...SONAR automatically saves any changes to the current screenset unless the screenset is locked If you have made changes to the current screenset that you don t want to save you can easily revert to th...

Page 1159: ...or key combinations scroll through the options in the Key window until the Assigned to field that is just under the window reads Unassigned It s a good idea to find two unassigned options that are ne...

Page 1160: ...ck Customization Display 2 On the General tab you can adjust these options Enable X Ray Enable or disable this check box to turn the X Ray Windows feature on or off Opacity Adjust this value by typing...

Page 1161: ...owing Waves SSL EQ Stereo XRayExclude11 1397510483 XRayExclude12 E451379E F7E1 4E82 98D9 BEB87AC45E90 8 Exclude your plug in by creating a blank line below the last entry in the EffectProps View secti...

Page 1162: ...w management on page 1141 Docking windows on page 1142 MultiDock on page 1146 Floating views and using dual video monitors on page 1150 Locking views on page 1152 Tiling windows on page 1153 Screenset...

Page 1163: ...ar studio configuration MIDI instruments audio outputs and so on Templates make it fast and easy to create and configure new projects A key binding lets you associate SONAR commands with keys on your...

Page 1164: ...s default project by creating and saving a special template file called Normal cwt If you create or update the Normal cwt file SONAR will display this template automatically when the program is starte...

Page 1165: ...all existing templates 2 Choose a template from the list 3 Click OK SONAR creates the new project and displays it in the Track view See also Template example three MIDI instruments on page 1165 Screen...

Page 1166: ...zer can respond to 16 MIDI channels but the only channels left are 9 and 11 through 16 Enter these numbers in the corresponding tracks You will need to mute the unused channels on the third synthesize...

Page 1167: ...key and then assign different notes to specific commands for example C4 to Process Quantize C5 to Process Groove Quantize and so on If you press the C4 key by itself the note plays normally If you pr...

Page 1168: ...xt to them Any commands that have keys assigned to them list the keys in the Computer column and or the MIDI column 8 Repeat steps 3 through 7 for all the keys you want to bind 9 If you want to save t...

Page 1169: ...tcuts see Help Keyboard Shortcuts on page 1575 See also Importing key bindings on page 1169 Exporting key bindings on page 1170 Importing key bindings SONAR can use key bindings from other sequencer a...

Page 1170: ...to switch key bindings To export key bindings 1 Go to Edit Preferences Keyboard Shortcuts 2 Click the Export button to open the Export Key Bindings dialog box 3 Navigate to the folder where you want t...

Page 1171: ...e Console view Scroll in the Inspector Drag content from the Browser with visual feedback Adjust MultiDock divider splitter Control Bar Transport module touch support Arrange windows on the screen Tri...

Page 1172: ...sly or trigger multiple cells in the Matrix view SONAR supports many touch gestures as described in the following table Gesture Description Tap Briefly touch the surface of the touchscreen with your f...

Page 1173: ...fingertip over surface without losing contact Scroll Move one finger up or down or left and right across the touchscreen Note Scrolling supports inertia so if you scroll quickly and let go it will co...

Page 1174: ...w s Solo button Stop all cells Tap the Panic button Toggle record Tap the Record button Reorder cells Press a cell and drag to the desired location Scroll left or right Swipe left or right Scroll up o...

Page 1175: ...eft right Move loop start end positions Tap and drag loop start end markers Toggle mute Tap Mute button Toggle solo Tap Solo button Table 192 Track view multi touch gestures Function Gesture Resize th...

Page 1176: ...e Browser on page 605 Function Gesture Toggle Play Tap Play button Toggle Stop Tap Stop button Toggle Record Tap Record button Return to zero Tap RTZ button Move Now Time Tap the time ruler Table 194...

Page 1177: ...only on page 1024 Using touch gestures with a trackpad Windows 8 supports indirect multi touch which is gesture support that occurs through a PC s trackpad In addition to touching a touchscreen direct...

Page 1178: ...1178 Multi touch...

Page 1179: ...And you can print professional quality notation of a complete arrangement or individual parts with up to 24 staves per page The Meter Key view lets you view insert and edit meter and key changes at a...

Page 1180: ...layers who are new to musical notation the Fretboard represents the notes in the Staff pane as they would appear on a six string guitar neck in standard tuning The number of strings and the tuning are...

Page 1181: ...List pane Click the Staff view Track menu and choose Show Hide Track Pane To set track focus In the Track List pane click the track name To mute solo or arm a track In the Track List pane click a trac...

Page 1182: ...box See Quantizing on page 797 for more information Transpose Opens the Transpose dialog box See Transposing on page 758 for more information Slide Opens the Slide dialog box Find Change Opens the Eve...

Page 1183: ...ng the new staff settings The Fretboard The Fretboard shows you the notes located at the Now time in the Staff pane laid out on a virtual guitar fretboard For example if the Staff pane shows you this...

Page 1184: ...ck the Fretboard in the Staff view the Fretboard pop up menu appears giving you choices for note editing Staff view layout and Fretboard appearance Menu command Result Layout Opens the Staff View Layo...

Page 1185: ...t in the list click the Tracks menu and choose Pick Tracks then select the desired track The Clef option shows the track s clef 3 Select a new clef from the list 4 If you select Treble Bass select a S...

Page 1186: ...it notes chord symbols guitar fretboards pedal marks expression marks hairpins and lyrics When drawing events in the Staff view the staff is shaded to indicate where the current event type can be draw...

Page 1187: ...pecify a note duration for new notes use the Duration control in the Control Bar s Tools module The CTRL RIGHT ARROW CTRL LEFT ARROW commands pages you through the track sounding each note as the curs...

Page 1188: ...he Note Properties dialog box in the Pitch field use the or buttons to raise or lower the pitch and click OK You can type enharmonic spellings into the Pitch field such as C 5 E 4 and Fx6 The double q...

Page 1189: ...ctangle around them Add symbols to the selection Press SHIFT and either click on the symbols or drag a rectangle around the events Add or remove symbols from the selection Press CTRL and either click...

Page 1190: ...se command For more information see Transposing on page 758 To move a single note in the Staff view 1 Select the Select tool or Draw tool in the Control Bar 2 Click the note to be moved 3 Drag the not...

Page 1191: ...hange 2 Select the Select tool or Draw tool in the Control Bar 3 Drag the note along the string to a new fret SONAR moves the note to the new pitch To change the pitch of a chord in the Fretboard 1 Cl...

Page 1192: ...key to activate the Scrub tool 2 Drag the mouse horizontally through the Staff pane to play the notes SONAR plays any notes the scrub line passes over To play notes with Step Play 1 Set the Now time b...

Page 1193: ...e to open the Note Properties dialog box Figure 368 The Note Properties dialog 2 Edit the note s properties as described in the table 3 Click OK SONAR changes the note s parameters and redraws the not...

Page 1194: ...set a minimum velocity allowed in the track If a MIDI event has a lower velocity than the one you set it is removed Duration With the Duration filter you can set a minimum note duration for the track...

Page 1195: ...Snap to Grid in the Control Bar s Snap module 2 Select the Draw tool in the Control Bar 3 Select a triplet note duration in the Tools module 4 Enter the first note at the desired location in the staf...

Page 1196: ...ee all these imperfections notated with excruciating precision The Staff view has two options you can select to affect the way MIDI notes are displayed on the staff Here s what the Staff view looks li...

Page 1197: ...ft In fact there may not even be a scale in a diatonic sense chromatic scales for instance are supposed to sharp on the way up and flat on the way down Because no set of rules will suffice for all sit...

Page 1198: ...mmand to change enharmonic spellings for example to change multiple occurrences of Eb5 to D 5 or even all Ebs to D s See Process Find Change on page 785 for more information MIDI Channels and the Fret...

Page 1199: ...e Files of type field Then choose the Roland GT 30 Guitar Synthesizer template 4 Open the Staff view 5 Click the Staff view Edit menu and choose Layout to open the Staff View Layout dialog box 6 Click...

Page 1200: ...as a large number of predefined chords from which you can choose You can also define and save your own chords If a track is split into treble bass staves chords are allowed only above the upper treble...

Page 1201: ...chord symbol to a new location To edit a chord symbol 1 Right click the symbol to open the Chord Properties dialog box 2 Edit information about the chord according to the table 3 If desired select a...

Page 1202: ...s Do this Display a blank chord grid Click New Grid Place a dot on the grid Select the finger number 1 4 or T for Thumb then click the grid at the appropriate string and fret location Assign an open s...

Page 1203: ...ld be interpreted In such cases the language used can leave much to the imagination as in with majesty or abrasively Expression marks do not change the underlying MIDI data They only provide informati...

Page 1204: ...e expression mark text Press ESC to abort the operation 6 Press ENTER or press TAB or SHIFT TAB to move to the next or previous mark respectively SONAR inserts the new expression mark below the staff...

Page 1205: ...ol in the Control Bar 2 Click the Hairpin button in the Staff view 3 Position the pointer below the staff the pointer changes to a pencil when you are in a legal position 4 Click to place a hairpin sy...

Page 1206: ...ss staves pedal marks are allowed only below the bass staff You can suppress the display of all pedal marks by deselecting the Show Pedal Events option in the Staff view s Layout dialog box To add a p...

Page 1207: ...mbol pedal down or pedal up to open the Pedal Event Parameters dialog box Figure 373 The Pedal Properties dialog box 2 Edit the pedal event parameters as described in the table above 3 Click OK SONAR...

Page 1208: ...ablature by choosing from the Preset pop up menu or you can define your own style by clicking the Define button in the Staff View Layout dialog box to open the Tablature Settings dialog box To define...

Page 1209: ...on the String Number fields 7 Save your settings by typing a name into the Preset field at the top of the dialog box and clicking the disk icon next to it You can remove presets from the list by clic...

Page 1210: ...works on selected regions in a track to modify the fingering according to the method you choose The TAB display by default uses the Floating algorithm which allows the notes to spread over the entire...

Page 1211: ...umber release the mouse With the Freehand tool selected move a note to a different string by holding down the ALT key while you drag the fret number to a different line If the note you are moving won...

Page 1212: ...y the chord you want to transpose 2 Hold down the SHIFT key and select all the notes in the chord 3 Hold down the SHIFT key and drag the chord to a new position then release the mouse Entering notes f...

Page 1213: ...s it Working with percussion The Staff view can display percussion tracks on a five line percussion staff or on a single percussion line The staff usually displays notes for a drum set or multiple per...

Page 1214: ...on about instrument definitions see Instrument definitions on page 1229 Setting up a percussion staff or line The first time you display a percussion track in the Staff view SONAR picks a default perc...

Page 1215: ...e note bindings and noteheads you assigned To do this Do this Map bind a percussion sound to a line or space on the staff Select the sound or corresponding MIDI note in the MIDI Note list select the i...

Page 1216: ...ff sizes The Staff view prints general project information from the File Info dialog box see Labeling your projects on page 327 at the beginning of the score including the song s title or file name su...

Page 1217: ...d print the score Alternatively you can choose File Print and skip the print preview window Can t print if Staff view is floating It is not possible to print the Staff view if the Staff view is float...

Page 1218: ...to MusicXML the notation is exported exactly the way it is displayed in the Staff View after visual quantization is applied which could differ from what is stored as MIDI data To export to a MusicXML...

Page 1219: ...rom 1 through 99 The bottom number of a meter is the value of each beat you can pick from a list of values ranging from a whole note to a thirty second note The meter affects several things in SONAR M...

Page 1220: ...ing the key signature does not affect the MIDI key number pitch stored with each note To actually transpose pitches use the Transpose command or edit notes individually by using the Piano Roll Event L...

Page 1221: ...Meter Key to open the Meter Key Signature dialog box Figure 374 The Meter Key Signature dialog 3 Enter information about the new meter key change 4 Click OK SONAR inserts the meter key change into the...

Page 1222: ...the properties of the meter key change Music notation for non concert key instruments For historical reasons certain musical instruments are traditionally notated in a transposed key rather than the...

Page 1223: ...the Staff view appears in the key of D SONAR automatically adds two sharps to the trumpet track s key signature but the track sounds in the key of C because you entered 2 in the Key field you may nee...

Page 1224: ...ed location for entering lyrics since you can see the notes with which the lyrics are associated The Lyrics view can also be used for entering or editing lyrics but its main strength is that it can di...

Page 1225: ...utton in the Staff view 3 Position the pointer below the staff under the first note to be assigned lyrics The pointer changes to a pencil when you are in a legal position 4 Click to open an insertion...

Page 1226: ...a stream of syllables each one associated with a note in the track In this context a syllable is any continuous string of characters without a hyphen For example love desire and infatuation are all s...

Page 1227: ...nt selection cut CTRL X copy CTRL C paste CTRL V and delete DELETE When you pause SONAR will update all Lyric events in the track To hyphenate the lyrics 1 If you want select a portion of the lyric te...

Page 1228: ...1228 Notation and lyrics Working with lyrics...

Page 1229: ...truments are GM compatible The names of patches and controllers that you initially see displayed throughout SONAR are drawn from the GM specification At the same time many MIDI instruments provide add...

Page 1230: ...ts instrument definition to channel 10 That way any SONAR tracks you assign to channel 10 on that output use the names of drum sets for patch names and drum notation in the Piano Roll view If you have...

Page 1231: ...16 items in the Output Channel list to select them 3 Choose the instrument definition to which the selected outputs and channels should be assigned from the Uses Instrument list A black line connects...

Page 1232: ...the default General MIDI instrument definition After you reassign the output channel combinations the default GM bank patch controller and note names are used throughout SONAR on any track that uses...

Page 1233: ...as described in To import instrument definitions on page 1233 When you import an instrument definition it is added to the master instrument definition file Master ins The contents of this file determi...

Page 1234: ...lect method does the instrument use To collect this information you need the MIDI documentation for your instrument Here s a general outline of the steps you must follow to create an instrument defini...

Page 1235: ...ght click on an item and choose Expand or Collapse from the menu or double click on an item to expand or collapse it To define an instrument you drag resources from the Names tree to the name of an in...

Page 1236: ...Names dialog box right click the word Instruments at the top of the Instrument tree and choose Add Instrument from the pop up menu 2 Type a name for the new instrument and press ENTER The new instrume...

Page 1237: ...efinitions Users of MIDI librarian programs need the ability to update SONAR s instrument definitions in real time without having to close and restart SONAR When the Reset Panic button is pressed SONA...

Page 1238: ...hat contains the name list highlight the name list and press the Ins Insert key highlight the folder and press SHIFT INSERT or right click any folder or name list and choose Add Names List from the me...

Page 1239: ...e General MIDI list in the Names tree You will be asked if you want to base NewList on the General MIDI list Click OK NewList will now be listed under the General MIDI branch Any patch names that exis...

Page 1240: ...strument definition as follows 81 x 128 0 10 368 Method Used for Normal Instruments that respond to Controller 0 or Controller 32 bank select messages Controller 0 only Instruments that only respond t...

Page 1241: ...s start with a patch number of 0 You can assign a patch name list to each bank You can also assign a default patch name list to the instrument which is used for all banks for which you haven t assigne...

Page 1242: ...definition To remove a bank or patch name list 1 In the Instrument tree in the Patch Names for Banks folder of the instrument you re editing highlight the bank and patch names list 2 Press the DELETE...

Page 1243: ...ich indicates that this patch contains drum sounds If you set this flag the Piano Roll view will display drum notes as diamonds and the Staff view will use percussion notation There are several standa...

Page 1244: ...ew patch to the instrument definition To remove a note name list 1 In the Instrument tree in the Note Names for Patches folder of the instrument you re editing highlight the name of the note names lis...

Page 1245: ...e B Controller name list C RPN name list D NRPN name list To change the controller RPN or NRPN name list 1 In the Names tree expand the branch containing the Controller name lists RPN name lists or NR...

Page 1246: ...ent definition For example Mackie OTTO 1604 UsesNotesAsControllers 1 Control Mackie OTTO 1604 Patch Mackie OTTO 1604 Key Mackie OTTO 1604 NoControllerReset n Any port channel using an instrument defin...

Page 1247: ...R s Track view Also if you have an effects processor or module that s hard to get to in your studio you may find it convenient to control it from SONAR Next topic What can they do and not do on page 1...

Page 1248: ...og box The instrument definition you imported should now appear in the Uses Instrument list in the Assign Instruments dialog box When you import an instrument definition it is added to the master inst...

Page 1249: ...they are the same 5 Let s substitute the Var 08 list for the Var 01 list that SONAR currently lists as the XP 10 s second bank which has a bank change number of 128 1 In the Instruments tree in the le...

Page 1250: ...10 includes a list called Roland XP 10 User Tone 1 let s just edit that one in the Names Tree window on the right right click the Roland XP 10 User Tone 1 list and choose Add Patch Name from the pop u...

Page 1251: ...is limited only by available memory The banks are saved in the SONAR project file Each bank can also be saved as a syx file Figure 377 The Sysx view See What is System Exclusive on page 1252 Using the...

Page 1252: ...Exclusive data and no notes See Sysx events on page 1252 Using the System Exclusive view on page 1253 Sending Sysx banks at startup on page 1254 Transmitting banks during playback on page 1260 Real t...

Page 1253: ...only visible in the Event List view as SysxData events A Sysx data message can have up to 255 bytes in it You can send Sysx data to an instrument without interrupting playback depending on the speed o...

Page 1254: ...and choose Output to open the Sysx Bank Output dialog box 4 Enter the number of the output you want to send this bank out through and click OK The output number you entered appears next to the select...

Page 1255: ...in the Sysx view If you want SONAR to send this bank every time you open this project make sure the bank is selected highlighted then click the Sysx view Settings menu and choose Auto Send on off A ch...

Page 1256: ...rd are not in the list select You start dump on instrument click OK and press whatever button on your synthesizer that starts a Sysx bank dump The You start dump on instrument option is not really a D...

Page 1257: ...DRM must start with F0 and end with F7 Sometimes you will find that the byte size is different when you use a DRM as opposed to initiating the dump from the instrument It is possible the instrument is...

Page 1258: ...message If nothing seems to happen make sure you have correctly set the output This command is disabled if the current bank is empty Send All Transmit all non empty Sysx banks Receive Dump data from a...

Page 1259: ...wp and cwb files Settings menu Auto Send on off Automatically transmit the selected bank every time SONAR loads the project file You might use this option for banks that contain System Exclusive messa...

Page 1260: ...sending System Exclusive information at the beginning of your project Instead use the Auto option for System Exclusive banks Banks that are marked Auto are transmitted automatically by SONAR when it...

Page 1261: ...Sysx echo on page 1261 Troubleshooting on page 1263 Sysx echo You can configure SONAR to echo received System Exclusive messages to output devices To echo Sysx messages 1 Go to Edit Preferences MIDI...

Page 1262: ...ecs n sets the size of the delay n 60 Default value in milliseconds SysxDelayAfterF7 n This setting causes SONAR to delay Sysx transmission for a certain amount of time if it encounters an F7 in a Sys...

Page 1263: ...ion to them This usually happens when SONAR sends data at a rate too fast for the synthesizer to keep up You can use the SysxSendPacketSize number setting in TTSseq ini to make SONAR transmit Sysx dat...

Page 1264: ...eiving Sysx packets in fast succession You must use the setting SysxDelayAfterF7 1 with these devices Ensoniq instruments Successfully sending Sysx messages to most Ensoniq instruments requires that y...

Page 1265: ...r it s important that they operate in synchronization For this to happen all the equipment must rely on the same source of clock or timing information SONAR lets you use many different types of synchr...

Page 1266: ...nal MIDI device that is capable of generating MIDI Time Code like the Roland VS880 A MIDI interface that is converting other time code signals like SMPTE EBU or film time code into MIDI Time Code When...

Page 1267: ...st music projects and some film in North America This is the best choice for any music project and should be used unless the situation dictates otherwise Incoming timecode Shows the current time of in...

Page 1268: ...re prepared you are the more we can help Choosing clock sources SONAR as master When SONAR is used alone or with an external device that does not have its own clock or timing signal you use one of two...

Page 1269: ...he Control Bar s Sync module click the Sync Type button and choose Internal Sync on the pop up menu Figure 379 The Sync module A SMPTE MTC format B Incoming timecode C Sync type To use the Audio clock...

Page 1270: ...evices are set up correctly they receive the message and start playing back with the master device When SONAR is set up as the master device you can enable or disable these messages See SONAR as the s...

Page 1271: ...it MIDI Start Continue Stop and Clock messages Digital audio will play back but not necessarily in sync To use MIDI Sync with SONAR as the slave 1 Configure the external MIDI device you want to use as...

Page 1272: ...to stop and what timing data to go by SONAR s Use Start Never Continue greyed out unless above option is checked If you are using an external drum machine to repeat a drum pattern or loop you might a...

Page 1273: ...e SONAR to send MIDI Stop Start Continue SPP messages 4 Record the drum part from SONAR The drum machine starts automatically when recording begins and stops automatically when you press Stop 5 Switch...

Page 1274: ...fter the start of the time code Sometimes the tape stripe starts at a time like 00 59 50 00 and the material starts 10 seconds later at 01 00 00 00 When you create a new SONAR project by default the p...

Page 1275: ...nal device will not be affected by this discrepancy 29 97 frames per second drop frame 29 97 FPS DF NTSC broadcast and long format video in North America and Japan This setting synchronizes the video...

Page 1276: ...he same numbers but those numbers will now refer to different outputs Also if you reduce the number of highlighted outputs in Edit Preferences MIDI Devices and the MTC ports you chose have higher numb...

Page 1277: ...ode is earlier than the start of the project based on the time code offset another message Chasing is displayed in the status bar When the time code reaches the start of the project SONAR starts to pl...

Page 1278: ...Edit Preferences Audio Sync and Caching 2 Under Synchronization select either Trigger Freewheel or Full Chase Lock 3 Click OK Audio playback under time code sync is handled according to the setting y...

Page 1279: ...pitch of the audio These fluctuations continue until SONAR matches its playback speed to the external clock which usually takes no more than 30 seconds The stable playback speed by the way may be slig...

Page 1280: ...u must enable a Time Code Sync option Check the MIDI interface settings to make sure that MIDI Time Code is being generated The frame rate is set incorrectly The frame rate on the stripe must match th...

Page 1281: ...all connected devices If you press Record while playback is underway all connected MMC devices e g tape decks begin recording on any armed tracks If you stop recording without stopping playback SONAR...

Page 1282: ...1282 Synchronizing your gear MIDI Machine Control MMC...

Page 1283: ...io contained in the project so care must be taken when backing up your digital audio projects This section covers file management including backing up your projects See Project files and bundle Files...

Page 1284: ...ct by copying the audio folder and the cwp file or if you need to do a Save As to round up files not in your project s audio folder The filenames for each audio file your project is referencing The co...

Page 1285: ...a file with a cwb extension 3 Click Open If you have the Use Per project Audio Folders option enabled in Edit Preferences File Audio Data the Unpack Bundle dialog box appears If this option is not en...

Page 1286: ...ge 1286 Per project audio folders on page 1287 Imported audio files on page 1288 Global audio folders You can change the location of the Global Audio Folder This may be necessary if for example your h...

Page 1287: ...roject File allows you to choose the directory where you want to store the new project and a subdirectory where you want to store the project s audio data To create a new project using per project aud...

Page 1288: ...cified in the Project Path field and stores all the project s audio in the directory specified in the Audio Path field Imported audio files By default SONAR will make a copy of any audio data imported...

Page 1289: ...pies of all imported audio clips as a default Or Uncheck the Always Copy Imported Audio Files option to reference imported audio from its current location 3 Click OK when you are done Imported files w...

Page 1290: ...ect s audio folder 5 Close the project Backup Method Advantages Per project Audio Folders If you are using per project audio folders you can create a copy of the project folder and its audio subfolder...

Page 1291: ...procedure to backup a project that has multiple audio folders 1 Open the project you want to backup 2 Select Utilities Consolidate Project Audio 3 A message box appears listing the destination folder...

Page 1292: ...e sure all project files that contain audio are immediately accessible on a hard disk 2 Choose Utilities Clean Audio Folder to display the Clean Audio Folder dialog box 3 Click the Browse button to th...

Page 1293: ...ates and bit depths and it is CPU intensive Added to this mix is the wide variety of audio hardware available today This section covers some common problems with recording and playback and how to conf...

Page 1294: ...revious Cakewalk products The DMA settings in versions of Cakewalk prior to SONAR 1 0 were displayed in bytes rather than samples Using your previous DMA settings in SONAR will not work Try the settin...

Page 1295: ...ble a device in the Windows Control Panel SONAR also allows you to choose the sound card whose clock should be used to control recording and playback timing if you only have one sound card SONAR autom...

Page 1296: ...hange the sampling rate of a project 1 Select an audio track and use the File Export Audio command to open the Export Audio dialog box 2 Select the options you want and click Export to export the trac...

Page 1297: ...time 64 bit files are streamed at full 64 bit resolution when the Double Precision engine is turned on At playback time 64 bit files are converted to 32 bit when the Double Precision engine is turned...

Page 1298: ...bit depth you want to use in the Audio Driver Bit Depth field 2 Click OK To rewrite audio files at different bit depths 1 Use the Utilities Change Audio Format command to open the Change Audio Format...

Page 1299: ...bit depths as high as 64 Because SONAR can play projects that contain files of different bit depths you don t have to convert 16 bit files to 24 bits to play them with other 24 bit files saving signi...

Page 1300: ...ender Bit Depth field to the desired number 3 Click OK Preparing higher quality audio for CD burning If your project uses a different sampling rate from 44 100 or contains files that are not 16 bit us...

Page 1301: ...e to CD using Pyro Audio Creator or other software SONAR project file compatibility notes Cakewalk Bundle cwb files containing double precision 64 bit floating point files will not open in SONAR 5 or...

Page 1302: ...computer The maximum number of audio tracks you can expect to play on your computer depends on the audio sample rate the speed of your hard disk and the speed of your computer s CPU The effect of your...

Page 1303: ...28 32 or 16 If those values don t help try 256 512 or move on to another remedy Defragment your hard disk If your hard disk is fragmented playback of audio will be slower Use the Disk Defragmenter to...

Page 1304: ...ue buffers on page 1306 CPU meter Disk meter Dropout indicator on page 1307 Sampling rate 16 bit 24 bit 11 kHz Mono 1 3 MB per minute 1 9 MB per minute 11 kHz Stereo 2 5 MB per minute 3 8 MB per minut...

Page 1305: ...called the Wave Profiler that can usually automatically detect the type of sound card that you have installed and configure its settings for best performance If your sound card is a well known model...

Page 1306: ...Aud ini file opens in the default Windows text editor 3 In Aud ini locate the entry called MinimizeDriverStateChanges and set it to the desired value For example MinimizeDriverStateChanges 1 Valid va...

Page 1307: ...lays the time it takes to process a buffer full of audio data as a percentage of the maximum time available to process that data and maintain uninterrupted playback There is one CPU meter for each in...

Page 1308: ...essor load balancing SONAR s audio engine has enhanced multicore performance and load balancing The CPU meter in the Control Bar s Performance module shows the time it takes to process a buffer full o...

Page 1309: ...rd s highest bit depth is only 18 or 20 bits you should try selecting an Audio Driver Bit Depth of 24 first If you receive an error message when doing so try selecting 20 If this also produces an erro...

Page 1310: ...e a 24 bit 96khz project requires substantially more computing resources than a corresponding 16 bit 44 1khz project Depending on the size of your project and the configuration of your computer CPU RA...

Page 1311: ...s it to the sound card for audible output If these activities can t be completed fast enough or if the communication between SONAR and the sound card driver is broken in some way recording and or play...

Page 1312: ...processing To disable it open the System applet in the Control panel click on the Device Manager tab expand the CD ROM list entry double click on the listed CD ROM device click on the Settings tab an...

Page 1313: ...to send and receive audio data to from your sound card with very a minimal delay so that any real time adjustments you make to a track s volume pan or other settings will take effect rapidly If the la...

Page 1314: ...n you are ready to save the file again you may want to save it as a normal cwp file Saving and opening cwp files takes less time than saving and opening bundle files Your sound card s driver may be ob...

Page 1315: ...true color display settings can severely hamper real time audio performance on some computers using fewer colors allows your computer to spend more of its processing time on audio and MIDI You can ad...

Page 1316: ...than one sound card installed in your system try using only a single sound card and deselecting the other s If you can get audio to record playback properly on a single sound card but you encounter p...

Page 1317: ...umber of SysEx messages in your tracks If you can t reduce your project s complexity or if problems persist even after the complexity has been reduced proceed to the next step Upgrade your computer ha...

Page 1318: ...se the Win Tune test application available at www winmag com this diagnostic tool measures your hard drive s uncached transfer rate Optimized picture cache redrawing There are several options in the i...

Page 1319: ...ips that you want to redraw 2 Right click a selected clip and choose Associated Audio Files on the pop up menu to open the Associated Audio Files dialog box 3 Click the Recompute Picture s button A di...

Page 1320: ...tibility with consumer audio devices Supports a wide variety of audio devices including newer WaveRT devices and legacy Windows audio devices Lets you use consumer audio devices that don t have ASIO d...

Page 1321: ...stom MMCSS task profile in SONAR 1 Determine the name of the MMCSS task profile that you want to use MMCSS task profiles are listed in the Windows registry under HKEY_LOCAL_MACHINE SOFTWARE Microsoft...

Page 1322: ...ways WDM driver mode WaveRT event mode access is available in SONAR when you are using WDM as a driver mode and a WaveRT capable audio device is detected A WaveRT suffix is added to the driver name in...

Page 1323: ...particular instance of a plug in To keep track of your mappings SONAR displays different colored markers on each track and or bus to show you which controller surface is currently controlling that par...

Page 1324: ...ses plug ins and other parameters from your A PRO MIDI keyboard controller A A PRO MIDI keyboard controller B Control surface plug in C SONAR Using your Roland A PRO to control SONAR is as easy as 1 E...

Page 1325: ...to close the Controller Surface Settings dialog box 7 In the Preferences dialog box MIDI Control Surfaces page make sure that the WAI Display check boxes and the ACT Indicators check boxes are enable...

Page 1326: ...surface one that both sends and receives data in order to control a software application also make sure that the MIDI Output driver or drivers that the controller surface uses are enabled in the Outp...

Page 1327: ...face from the Presets window in the property page Note 1 You may need to read the documentation for your controller surface to find out which MIDI input driver your controller surface uses to control...

Page 1328: ...Control Strips Visible in click one of the following Track View The controller surface matches the channel strips that are visible in the Track view Console View The controller surface matches the cha...

Page 1329: ...message every 75 milliseconds CtrlSurfaceRefreshMS 50 5000 default 75 You may want to increase the value of this Cakewalk ini variable if you are experiencing sluggish UI responsiveness when using a c...

Page 1330: ...the drop down menu If you can t find it in the drop down menu you need to add it in Edit Preferences MIDI Control Surfaces see Setting up control surfaces on page 1326 if necessary 2 Click the Open Co...

Page 1331: ...me and current level of each Send 2 in the controlled tracks You can restore the default parameter assignments by clicking the Defaults button If you want to choose a different knob or other control t...

Page 1332: ...e ACT MIDI Controller property page that you want to control with a specific knob or control on your controller surface You can assign knobs to cells that do not currently list any SONAR or plug in pa...

Page 1333: ...s surfaces Before creating a set of mappings from scratch load one of the preset mappings for your controller surface and see if you like it Even if the preset doesn t meet all of your needs it is usu...

Page 1334: ...ks are in a single bank enter a new number in the Number of Track Strips field 4 Click the radio button of the Parameter that you want to configure choose from Parameters 1 16 5 Use the drop down menu...

Page 1335: ...the ACT Enable check box is enabled or that the Both check box is enabled If the Both check box is enabled your controller surface is controlling both track parameters and plug in parameters 4 In SON...

Page 1336: ...gle type parameters such as Solo and Arm For example if a knob sends out NRPN 5000 with a data value of 1 when you turn it to the right and a data value of 16383 when you turn it to the left you could...

Page 1337: ...by clicking the BaseTrack buttons that are at the top of the Cakewalk Generic Surface property page To control the next track or bank of tracks 1 In the Cakewalk Generic Surface property page under Gl...

Page 1338: ...Track Strips field The number can be from 1 to 32 inclusive The property page is designed so that you can minimize it by dragging the border to show only the BaseTrack buttons and Preset window so yo...

Page 1339: ...your controller surface to enable or disable the Lock Context check box Lock Context check box When this check box is enabled your controller surface controls only the particular instance of the parti...

Page 1340: ...e Number field SONAR moves the selected parameter whenever it receives this specific RPN message from your controller surface on the specified channel Note You can use a Note On message to trigger a p...

Page 1341: ...ed literally to make timely changes in a continuous parameter such as Volume The other common interpretation of a MIDI message is that it is meant to toggle a control such as a Mute button on and off...

Page 1342: ...parameter changes the currently controlled bank of tracks to the next lower numbered bank of tracks Move 1 Right This parameter changes the currently controlled track to the next higher numbered trac...

Page 1343: ...troller Surface button which opens the Controller Surface Settings dialog box 4 In the Controller Surface field of the Controller Surface Settings dialog box select EuCon Controller 5 Click OK to clos...

Page 1344: ...roller surface 1 blue markers is controlling tracks 2 5 and controller surface 2 red markers is controlling tracks 7 14 You can drag the markers to different groups of tracks to change which tracks ea...

Page 1345: ...lick the WAI markers for that controller surface Show or hide the WAI markers in the Track view and or Console view Go to Edit Preferences MIDI Control Surfaces and select or clear the Track view and...

Page 1346: ...the controller surface itself 3 Put the focus on the plug in that you want to control The name of the plug in appears in the Active Controller Technology field of your controller surface s property p...

Page 1347: ...bal so they are the same for every project 8 In the property page of the plug in that you want to control click the parameters that you want to control 9 Move the sliders knobs on your controller surf...

Page 1348: ...ug in Technology If you have a Yamaha sound module that uses OPT panels you can open the panels directly from SONAR edit your sounds and save them as presets To open an OPT panel 1 Make sure your Yama...

Page 1349: ...is a listing of some of the panels that are included with SONAR Panel name What it s for Line 6 POD Provides control for the Line 6 POD 2 0 Pro amp modeler Line 6 POD Provides control for the Line 6 B...

Page 1350: ...a particular panel Instead this section tells you how to use the different types of controls and how to record the changes you make to each control as part of your project There are three types of co...

Page 1351: ...1351 Working with StudioWare External devices There are a variety of ways to adjust the values of buttons sliders and knobs MMC General MIDI...

Page 1352: ...alue Here s how these values are used When you move any control in the group to its starting value all controls in the group are set to their starting value When you move any control in the group to i...

Page 1353: ...ange for the control is adjusted so that its current position corresponds with the current position of other controls in the group Example to set two faders for a crossfade 1 Move the two faders to th...

Page 1354: ...control movements as indicated in the following table The first approach is useful for example when your project contains a variety of distinct sections and you want to make a sudden change in one or...

Page 1355: ...these changes are played back visually on the StudioWare panel Press this button to make sure that automation parameters and changes made on the external MIDI device are displayed in the StudioWare p...

Page 1356: ...f the Now time is the very beginning of the project then the snapshot will change the track parameters to match the controls in the panel instead of recording automation events To record a snapshot wh...

Page 1357: ...your project A MIDI output When you want to record the movements of controls within a panel you must make sure that MIDI data from the control are directed to a MIDI track StudioWare Panel drawing spe...

Page 1358: ...1358 External devices Working with StudioWare...

Page 1359: ...Escape key Press OK to confirm that you want to interrupt the CAL program As a rule you shouldn t interrupt a CAL program in this way unless you suspect it is stuck in an infinite loop To open a CAL...

Page 1360: ...xible editing SPLIT CHANNEL TO TRACKS cal This program splits a track by channel into 16 new tracks This can be useful for Type 0 MIDI files which may have data recorded on many channels but only one...

Page 1361: ...aftertouch ChanAft events It asks you for the thinning factor THIN PITCH WHEEL cal This works almost exactly like the previous two programs but it thins pitch wheel events It asks you for the thinnin...

Page 1362: ...1362 Using CAL Sample CAL files...

Page 1363: ...tant places to look for help Check the ReadMe file that came with your software It contains additional information that wasn t available when this online Help was written To view the ReadMe file selec...

Page 1364: ...sample rates on page 1372 Patching an effect into SONAR causes a dropout on page 1372 I can t open my project File Recovery mode on page 1373 No sound from my software instrument synth on page 1375 S...

Page 1365: ...dvanced Attributes dialog box If the preceding steps do not resolve the issue and there is no other user account to log into please create a new user account with administrative rights It is possible...

Page 1366: ...2 Bit 3 Select the Share Drivers With Other Programs check box 4 Select the Always Open All Devices check box 5 Click Audio Sync and Caching 6 In the Playback I O Buffer Size KB list select 512 7 In t...

Page 1367: ...dit Preferences Audio Playback and Recording 3 In the Driver Mode list select ASIO 4 Click Audio Sync and Caching 5 In the Playback I O Buffer Size KB list select 512 6 In the Record I O Buffer Size K...

Page 1368: ...ect to crash Try opening the project in Safe Mode 1 Go to File Open and select the project that crashes but do not open it yet 2 Hold down the SHIFT key and click Open The File Open Safe Mode dialog b...

Page 1369: ...ck First Synth Audio Output Synth Property Page Synth Rack View Recall Assignable Controls Ask This Every Time 3 Click OK Cakewalk TTS 1 is added to your project 4 Open the Track Inspector View Inspec...

Page 1370: ...m the track for recording Press SONAR s Record button not the Play button The correct instrument definition for your MIDI device may not have been imported and configured correctly To import an instru...

Page 1371: ...rect signal that goes straight through your sound card and then an instant later you hear the sound that is processed by SONAR including any plug in effects you may be using You can eliminate the echo...

Page 1372: ...y Freeze tracks and synths that you presently don t need to edit For details see Freeze tracks and synths on page 909 Use the Bounce to clips command to mix down clips that contain a lot of edits clip...

Page 1373: ...orruption on a DAW can occur due to various reasons a few of which include Your hard drive might suffer data loss Windows delayed writes might fail leading to data corruption Many hard disks have a wr...

Page 1374: ...event In many cases File Recovery Mode may be able to open damaged projects with minimal data loss However the level of success depends on the nature and extent of the data corruption so the results a...

Page 1375: ...current MIDI track s Output control is assigned to the soft synth Make sure that the Input Echo button on the current MIDI track is set to Input Echo Auto Thru or Input Echo On If your MIDI controlle...

Page 1376: ...ctX plug ins install globally into Windows and are seen by any DirectX host program such as SONAR If your new DirectX plug in is not appearing in SONAR first check to make sure it is installed properl...

Page 1377: ...contain any actual audio data 2 Press CTRL A to select all files inside the folder then press the DELETE key to delete the files SONAR will automatically regenerate the waveform displays the next tim...

Page 1378: ...ncing which has different requirements from normal playback latency For more information see AUD INI on page 1416 More Frequently asked questions on page 1364 The Now time is not smooth during playbac...

Page 1379: ...se the Cakewalk Plug in Manager dialog box 7 Use Notepad to open the XRayExclude ini file that s in your SONAR program folder C Documents and Settings username Application Data Cakewalk SONAR your ver...

Page 1380: ...Type a name in the File name field 7 Select the Add to Audio CD Track List check box 8 Click Export 9 Go to Utilities Burn Audio CD If you receive burning errors or your CD R W drive isn t recognized...

Page 1381: ...ance issues See Known issues on page 1381 Troubleshooting on page 1363 Session Drummer 2 issues Studio only MIDI drag and drop from Desktop captured by SONAR Dragging a MIDI file from the Desktop into...

Page 1382: ...ram which is required in order to open 32 bit help content files that have the HLP file extension This affects HLP files for a few legacy plug ins that are included with SONAR We will update SONAR s o...

Page 1383: ...on page 1363 SONAR x64 SONAR 5 was the first DAW application to provide a 64 bit audio engine in a 64 bit binary application Both a 32 bit and a 64 bit version of SONAR are included on the SONAR DVD...

Page 1384: ...saved in SONAR X3 that contain multiple automation envelopes per track may appear like automation data is missing when opened in an earlier version of SONAR To see all automation data for a track righ...

Page 1385: ...of changes made to SONAR s view persistence code in SONAR X3 See Known issues on page 1381 Troubleshooting on page 1363 Windows 7 In WASAPI mode if you set the audio latency lower than 4 milliseconds...

Page 1386: ...1386 Troubleshooting Known issues...

Page 1387: ...that may cause problems If you call for technical support with a problem concerning equipment that doesn t seem to be responding we ll probably suggest that you reconnect things in one of the ways lis...

Page 1388: ...ound modules Each MIDI device should be set to a unique MIDI channel or range of channels to avoid note doubling Refer to the manuals for your MIDI devices for information on how to set their MIDI cha...

Page 1389: ...instead Each MIDI device should be set to a unique MIDI channel or range of channels to avoid note doubling Refer to the manuals for your MIDI devices for information on how to set their MIDI channels...

Page 1390: ...ntrol to adjust the master input and output volumes and to control which recording inputs are active If you don t hear audio tracks or if you can t easily control the audio volume in SONAR go to Contr...

Page 1391: ...does not accept a 4 db input you will need to attenuate lower the F X rack s signal To do this use a mixer between the rack s output and the Y adapter If the rack has only a mono output a 1 4 inch mo...

Page 1392: ...ng a dual RCA to 1 8 inch stereo mini Y adapter Many portable cassette players come with this kind of adapter or even with a single cable with all the necessary jacks In the following diagram a stereo...

Page 1393: ...the sound card with a setup of the following kind Note If your mixer has buses use them This helps to avoid feedback 1 4 inch instrument cable to input 3 Main mixer outs to power amp Stereo Amplifier...

Page 1394: ...1394 Hardware setup Set up to record digital audio...

Page 1395: ...track SONAR also lets you save and load files in the RIFF MIDI file format This is a standard Resource Interchange File Format specification that encapsulates a Standard MIDI File of either format 0 o...

Page 1396: ...Type list 3 Enter a file name and click Save See Timebases on page 1396 Supported MIDI file meta events on page 1397 Features not supported by MIDI files on page 1397 Other MIDI file handling notes o...

Page 1397: ...r MIDI file handling notes Here are a few specific points about how SONAR works with MIDI files SONAR places Lyric events found in Format 0 MIDI files into Track 4 in accordance with conventions used...

Page 1398: ...loading the Turn GM System On Sysx bank in the Sysx View gmsystem syx in your Cakewalk directory and then either inserting a sysx event at time 1 1 0 or using the Auto setting for that bank When load...

Page 1399: ...f Format 1 Some sequencers cannot read the more complex Format 1 files particularly sequencers embedded in some types of hardware such as karaoke players Load the Turn GM System On system exclusive ba...

Page 1400: ...1400 MIDI files...

Page 1401: ...ialog boxes However you can also change these files directly In some cases there is no way to change the settings in the application and changing the file directly is the only way See Initialization f...

Page 1402: ...these files in any way Changes to these other files could cause SONAR to stop operating properly Before making any changes to any of the ini files you should make a backup copy in case you make a mist...

Page 1403: ...edraw waveforms when scrolling during playback the entry in the file looks like this Wincake DrawPlayingAudio 1 The variable names contain no spaces They are not case sensitive See Cakewalk ini on pag...

Page 1404: ...sends the now time with no pause and no throttle timer If 0 the setting of JogPauseTimer is don t care For example Wincake JogPosTimer 120 PauseOnJog 0 WavePreviewSampleFreque ncy 1 10 Integer 1 By d...

Page 1405: ...lling during playback By setting the value to 1 you can force the Track view to always redisplay audio data even during playback This is recommended only for very fast machines ForegroundForSMPTE 0or...

Page 1406: ...ol When TRUE value 1 widgets stay in the header bar regardless of the height of a track Note the following controls will never appear in the track header bar Send widgets meters and vertical effects b...

Page 1407: ...1 Boolean 1 The Piano Roll view and Inline Piano Roll note event colors are based on the track color By default note events use a track s foreground data color instead of the background clip color To...

Page 1408: ...reScanMeasures num Integer 16 measures This line specifies how far back in measures SONAR should search for long elements in order to display them in the Staff view If a long element does not start wi...

Page 1409: ...the height of controls in the Track view The value shouldn t be changed more than 1 or 2 from the default value or you may experience unexpected results TVControlWidth number of pixels Integer 41 Spec...

Page 1410: ...ps Icons background does the same for the Console view and Track Inspector CPUMeterMode 0 2 Integer 0 This variable specifies how the CPU meter appears in the status bar on multiprocessor systems The...

Page 1411: ...de to the plug in restoring back to whatever state the plug in was in before they opened the GUI window To make this work SONAR would need to take an initial snapshot of the plug in s state and some p...

Page 1412: ...MPTE flywheel time in 1 10 seconds This is the maximum dropout time length SONAR will allow before aborting sync MfxLookAhead ticks Integer 960 4 Defines how much extra MIDI data is sent to MFX plug i...

Page 1413: ...ies which output MMC is to be transmitted on The value is 0 based so a value of 0 means output 1 and a value of 1 means output 2 etc MMCPreRoll num Integer 20 2 seconds This line specifies the MMC pre...

Page 1414: ...sync signal in order to survive dropouts better when the SMPTE source speed is slightly off Setting this to 0 defeats this If you have a slower computer and dense work to play defeating this can resu...

Page 1415: ...1 Boolean 1 enable This line specifies whether or not SONAR should use nonstandard Cable meta events for storing Sysx bank output number into Standard MIDI files by default n 1 Variable Type Default...

Page 1416: ...ferred to as a Meter Frame The default size for a meter frame is 40 milliseconds which is an accuracy of 25 FPS The MeterFrameSizeMS variable allows you to change the size of this interval It goes in...

Page 1417: ...it to 1 causes SONAR to attempt disk writes first This yields the best results when you are attempting to record a large number of tracks at high latency FlushMultiple 0 or 1 Boolean 1 This variable...

Page 1418: ...gapping completely MixDezipperUsec 0 1000 Integer 50 This variable is similar to GapDezipperUsec except that it controls how the mixer itself renders abrupt gain transitions due to envelopes in the p...

Page 1419: ...le to a large value can cause out of memory errors DropoutMsec num Integer 250 Under high system load conditions the SONAR audio pump mechanism may become starved When this condition is detected SONAR...

Page 1420: ...ther SONAR manages the ASIO thread priority when necessary This defaults to 1 EnableCacheWriteThru 0 or 1 Boolean 1 This variable enables disk write thru caching When write thru caching is on data rec...

Page 1421: ...vers change the reported sample position based on how long a buffer switch took to complete and this can cause problems since SONAR expects the reported position to be in sync with the number of buffe...

Page 1422: ...1422 Initialization files Initialization file format...

Page 1423: ...Producer only on page 1445 Skylight enhancements on page 1447 Media Browser enhancements on page 1448 Track color customization on page 1449 YouTube Publisher on page 1450 Overloud Tape Emulator ProC...

Page 1424: ...page 999 VST enhancements Background scanning for new VST plug ins By default SONAR performs a silent background scan to detect if any VST plug ins have been added or removed You can specify in the P...

Page 1425: ...ouping in automation menus VST3 plug in parameters are organized into a hierarchical categorized list in all automation menus such as a track s Edit Filter Sample accurate automation Plug ins that sup...

Page 1426: ...in substitution results when opening projects containing VST plug ins Improved logic for substituting 32 bit plug ins with 64 bit equivalents SONAR has logic for hiding and substituting 32 bit plug in...

Page 1427: ...r mono sidechain input in SONAR Automation envelope tooltips show dynamic parameter values When editing automation envelopes the tooltip shows dynamic parameter values Plug in Browser lists plug ins b...

Page 1428: ...m plug in menu layout If you exceed this plug in count limit in SONAR X3 plug in menus will display ellipsis after the plug in type name Audio FX and Soft Synths and clicking the menu command opens a...

Page 1429: ...X 1 Select an audio region or clip you wish to process with an ARA plug in To select a region on the timeline use the Smart tool or Select tool and drag across the bottom part of the clip s To select...

Page 1430: ...o data This may be sufficient for some types of plug ins like reverb and EQ but not for plug ins that need to analyze the entire musical context notes rhythm tempo key etc in order to produce optimal...

Page 1431: ...bottom part of the clip s To select an entire clip simply click the clip For details see Selecting clips on page 350 2 In the Track view click the Region FX menu click the name of the desired ARA plu...

Page 1432: ...t off key vocals and out of tune melodic instruments Fix timing errors in melodic and rhythmic material Create harmonies Convert audio to MIDI You can even use vocal or other audio source as a MIDI in...

Page 1433: ...a MIDI or Instrument track to convert it to a MIDI clip See Melodyne Producer and Studio only on page 1048 Using Region FX on page 1043 ARA Audio Random Access on page 1046 New features in SONAR X3 on...

Page 1434: ...ding is done the newly recorded material is unmuted and all other takes are muted for the duration of the new material Each take appears on its own Take lane with the newest take on top For details se...

Page 1435: ...the duration of the new material The Record button in the Control Bar s Transport module looks like when Comping mode is enabled To change record modes right click the Record button For details see Re...

Page 1436: ...r bar which allows you to select and move the takes as a group Figure 390 The Comp clip is a visual representation of the track s unmuted takes A Comp clip B Takes When you hide Take lanes Comp clips...

Page 1437: ...ws you to select a region on one Take lane and automatically mute the same region in all other Take lanes on the same track This lets you quickly combine the best parts from each Take lane and create...

Page 1438: ...ically heal any split clips if possible in order to reduce the number of clips You can simply focus on identifying the regions you want to hear isolate and SONAR will automatically split mute unmute a...

Page 1439: ...arate Take lane When a clip is moved pasted or recorded to a Take lane any clip data already in that area will be cropped or removed to accommodate the new data Adding audio or MIDI data to a project...

Page 1440: ...s you want to keep To do so 1 Select a take you want to audition 2 Press SHIFT SPACEBAR to start audition playback Audition will loop continuously You will see temporary Loop markers in the time ruler...

Page 1441: ...lection playback on page 389 Tip If you want to audition takes in context with other tracks enable Dim Solo mode in the Control Bar s Mix module For details see Dim Solo mode on page 205 Tip Before sp...

Page 1442: ...ecify the default auto crossfade duration go to Edit Preferences Customization Editing and change the Auto Crossfade Comps 0 25ms value Multi track grouping You can specify how clips should be grouped...

Page 1443: ...lane is created When dragging clips to a track that has Take lanes open the clips are placed in an existing Take lane When dropping data on top of locked clips the drop is aborted and no change takes...

Page 1444: ...are messages that appear at the bottom of the screen SONAR uses toast notifications to inform you of relevant time sensitive information Clicking a toast notification provides quick access to related...

Page 1445: ...ti touch and has an integrated FFT spectrum analyzer The QuadCurve Equalizer fly out panel can be accessed from the ProChannel in the Inspector or Console view Figure 396 QuadCurve EQ fly out panel To...

Page 1446: ...ther of the following happens The track focus changes Other major UI changes occur such as floating the Inspector or any other change that causes the parent ProChannel module to be closed For details...

Page 1447: ...racks no longer snap to track strip boundaries Tracks can now be scrolled partially into view Figure 397 Smooth vertical scrolling Misc UI enhancements Muted clips are now dimmed and no longer display...

Page 1448: ...urrent folder content is modified The Media Browser will automatically refresh itself whenever the current folder content is modified internally or externally For example if you select the Project Aud...

Page 1449: ...view and Inspector can have a custom color tint which allows you to color code your tracks and clips for better project organization Figure 398 Click a track s Track Color bar to assign a custom track...

Page 1450: ...type list select YouTube Publish 4 Enter a file name in the File name box 5 Click Export Cakewalk YouTube Publisher opens 6 Enter the required settings in Cakewalk YouTube Publisher see Cakewalk YouT...

Page 1451: ...Credentials Select this check box to remember the Account and Password settings for future use Title required Enter a name for the video Description Type a description of the video Private Enable thi...

Page 1452: ...rojects Test Video Click to show a preview of the video in the default media player Upload Upload the video to YouTube Cancel Cancel the operation and close Cakewalk YouTube Publisher See Preparing au...

Page 1453: ...oChannel module Producer only Figure 400 ProChannel Tape Emulator module The Tape Emulator module by Overloud lets you add the analog warmth and richness of magnetic tape saturation to your digital mi...

Page 1454: ...hich features dual multimode filters with 47 unique and different sounding filter types plus 8 distortion types FM AM wave shaping bit crushing resampling comb filtering vocal filtering EQ and reverb...

Page 1455: ...s and feels Create your own unique drum sound by mixing and matching drum kits beats and kit pieces and applying professional effects You can also expand the library of sounds and beats to suit your p...

Page 1456: ...ile electric piano instrument that delivers authentic Rhodes and Wurlitzer sounds Highlights Custom presets Classic Rhodes and Wurlitzer electric pianos Real time controls over hammer hardness tine co...

Page 1457: ...ghlights 12 presets 215 MIDI loops Included modules Session Global pick fingers guitar body chords strumming tuning pitch wheel after touch loop player equalizer reverb Reproduces not only the richnes...

Page 1458: ...ndle Producer and Studio only Figure 405 Nomad Factory Blue Tubes bundle The Blue Tubes Bundle V3 from Nomad Factory is a collection of 19 vintage style audio processor plug ins that recreate the warm...

Page 1459: ...V 2080 from Nomad Factory is a vintage style studio reverb designed to recreate the qualities of digital reverbs from the 1980s It includes individual two band equalization as well as ambiance decay R...

Page 1460: ...ctory is a vintage style analog channel strip featuring single triode to dual triode tube emulation gate expander compressor and equalizer Analog TrackBox combines all the best elements of the Blue Tu...

Page 1461: ...nd files mixes or entire sessions directly from the SONAR interface Gobbler helps to keep your files secure and provide access to them from anywhere with an Internet connection Figure 408 The Control...

Page 1462: ...n envelopes even on empty audio tracks Many plug ins do not update their UI properly until they receive audio input This option is enabled by default and can be configured under Edit Preferences Audio...

Page 1463: ...1463 Misc enhancements New features in SONAR X3...

Page 1464: ...hat include a specific text string in the name Figure 409 Type a word in the Search box to filter the color list See New features in SONAR X3 on page 1423 Note The search filter is applied to the curr...

Page 1465: ...epth Sample Rate 64 bit float 384kHz 64 bit float 384kHz 64 bit float 384kHz Max number of effects instruments Unlimited Unlimited Unlimited Max simultaneous buses Unlimited Unlimited Unlimited Max au...

Page 1466: ...hannel QuadCurve Zoom x Audio plug in effects Alias Factor x x x Boost 11 Peak Limiter x x x Classic Phaser x x x Compressor Gate x x x HF Exciter x x x Modfilter x x x Multivoice Chorus Flanger x x x...

Page 1467: ...64 Transient Shaper x BiFilter2 x BREVERB SONAR x LP 64 EQ x x LP 64 Multiband x x Nomad Factory Blue Tubes Bundle x x Nomad Factory BlueVerb DRV 2080 x x Nomad Factory Blue Tubes Analog TrackBox x x...

Page 1468: ...h x x x Session Drummer 3 x x x Square I x x x Studio Instruments Suite x x x Cyclone x x Pentagon I x x PSYN II x x Rapture x Rapture LE x RXP REX Player x x SFZ Sound Font Player x x Z3ta Classic x...

Page 1469: ...Keys x Hollywood Edge FX x Dimension Pro Expansion Pack 1 x Dimension Pro Expansion Pack 2 x Classic Sounds for Dimension Pro x Audio Loops MIDI Clips Projects 500 MB REX Loopmasters x 500 MB REX WAV...

Page 1470: ...1470 Comparison...

Page 1471: ...Producer and Studio only on page 1494 Dynamics processing Boost 11 Peak Limiter on page 1475 Compressor Gate on page 1478 LP 64 Multiband Producer and Studio only on page 1479 Nomad Factory Blue Tube...

Page 1472: ...ay on page 1486 Sonitus fx Modulator on page 1488 Tempo Delay on page 1492 EQ LP 64 EQ Producer and Studio only on page 1478 Nomad Factory Blue Tubes bundle Producer and Studio only on page 1480 Nomad...

Page 1473: ...ffects Alias Factor on page 1475 Tone2 BiFilter2 Producer only on page 1494 HF Exciter on page 1478 Modfilter on page 1479 Nomad Factory Blue Tubes bundle Producer and Studio only on page 1480 Perfect...

Page 1474: ...ge 1507 PSYN II on page 1508 Rapture Producer only on page 1508 Rapture LE Studio only on page 1509 Roland GrooveSynth on page 1509 RXP REX Player on page 1510 Session Drummer 3 on page 1510 sfz Sound...

Page 1475: ...low pass resonant filter to the decimator for a new means of tweaking your sound For more information see the Alias Factor online Help Boost 11 Peak Limiter Figure 411 Boost 11 Peak Limiter The Boost...

Page 1476: ...ble precision signal path VST Automation For more information see the Boost 11 Peak Limiter online Help BREVERB SONAR Producer only Figure 412 BREVERB SONAR BREVERB SONAR by Overloud provides world cl...

Page 1477: ...ically decode Mid Side channel recordings Enhance the spatial characteristics of your mixes Adjust for phase problems due to microphone placement Swap the left and right channels Invert the polarity p...

Page 1478: ...r lets you enhance the higher end of the frequency spectrum This produces the psycho acoustic affect that the signal is brighter and clearer This is done by adding harmonic content that is not present...

Page 1479: ...sor consists of five high quality compressors each operating on a single adjustable frequency band Unlike typical limiters the filters that split up the frequency bands in the LP 64 Multiband Compress...

Page 1480: ...tudio only Figure 421 Nomad Factory Blue Tubes bundle The Blue Tubes Bundle V3 from Nomad Factory is a collection of 18 vintage style audio processor plug ins that recreate the warm sound qualities of...

Page 1481: ...bines all the best elements of the Blue Tubes Tube Emulator CP2S compressor and PEQ332 parametric equalizer to create a truly flexible and spectacular sounding valve front end for any track For more i...

Page 1482: ...stereo convolution processor The process of convolution allows you to apply the acoustic characteristics of any space or sound to any input signal Perfect Space can work with a latency as low as 64 sa...

Page 1483: ...ponse is a standard mono stereo or multi channel uncompressed WAV or AIFF file of any bit depth In addition to using the impulse responses included with SONAR and files from your own libraries you can...

Page 1484: ...in one convenient plug in PX 64 Percussion Strip is designed to make it fast and easy to enhance any drum or percussion track For more information see the PX 64 Percussion Strip online Help Sonitus f...

Page 1485: ...omprised of four stereo compressors After you patch the compressor into a surround bus you can direct any combination of the bus s input channels to any of the four compressors sending any combination...

Page 1486: ...ay with tempo sync For more information see the Sonitus fx Delay online Help Sonitus fx EQ Figure 431 Sonitus fx EQ fx equalizer is a 6 band parametric equalizer with selectable filter types for each...

Page 1487: ...imply gates or blocks signals whose amplitude lies below a certain threshold and lets other signals through This is useful for eliminating background noises such as hiss or hum during periods of silen...

Page 1488: ...combines six time varying modulation effects into one integrated plug in For more information see the Sonitus fx Modulator online Help Sonitus fx Multiband Figure 434 Sonitus fx Multiband fx multiband...

Page 1489: ...hat differences in equalization between different sources are less noticeable Multiband compressors suppress or enhance the dynamic properties of specific frequency ranges Based on this they can also...

Page 1490: ...coustic environment Reverb can be seen as a series of echoes so dense that they can t be told apart from each other fx reverb emulates the phenomenon of sound being reflected off walls in a virtual ro...

Page 1491: ...trol and graphical path editing For more information see the Sonitus fx Surround online Help Sonitus fx WahWah Figure 438 Sonitus fx WahWah fx wahwah is a guitar effect emulator A classic guitar effec...

Page 1492: ...lementation This eliminates the digital grunge and harshness that occurs even in the best studio reverberation systems which are implemented using less advanced fixed point processing The Studioverb2...

Page 1493: ...on includes 10 amplifier models 10 cabinet models 10 stomp box effects models 3 microphone models delay and reverb master effects and dozens of presets Easily build or modify your own signal path For...

Page 1494: ...e of their real analog counterpart as they respond to different input audio The result is the coveted warm lively and realistic analog sound of classic vacuum tube processors and amplifiers Digital au...

Page 1495: ...is a transient Unlike a typical compressor TS 64 Transient Shaper lets you shape the audio signal s attack phase independently of the decay sustain phase TS 64 Transient Shaper is primarily designed f...

Page 1496: ...Strip is designed to make it fast an easy to enhance any vocal track VX 64 Vocal Strip features include 5 professional quality effect modules each with its own bypass toggle All modules are specifical...

Page 1497: ...l time You can make it arpeggiate with a swing feel or straight and staccato or legato vary its speed and direction and specify its range MFX Change Velocity Figure 448 MFX Velocity The Velocity effec...

Page 1498: ...ears in the Chords recognized box You can play the notes on your MIDI input device and have the Chord Analyzer identify the chords in real time You do not have to set to playback You can open the Chor...

Page 1499: ...Event Filter effect works almost identically to the event filter used by the Edit Select By Filter command For more information see Event filters on page 782 MFX Quantize Figure 452 MFX Quantize The...

Page 1500: ...Process MIDI Effects Cakewalk FX Transpose command is a flexible transposition feature You can perform simple chromatic or diatonic transpositions transpose from one key to another or define your own...

Page 1501: ...atile electric piano instrument that delivers authentic Rhodes and Wurlitzer sounds Highlights Custom presets Classic Rhodes and Wurlitzer electric pianos Real time controls over hammer hardness tine...

Page 1502: ...ss and responsiveness of real instruments but also the main elements of the fretting hand and picking hand playing technique of a guitar player Elaborate modeling of the vibrations of the strings pick...

Page 1503: ...nth that lets you quickly find preview and play sound programs You can browse programs by categories and subcategories and even search for patches by name Finding the right sounds for your songs has n...

Page 1504: ...Cakewalk TTS 1 is a GM2 General MIDI 2 compatible multi timbral multi output software synthesizer featuring a newly developed software synthesis engine with 256 sounds and 9 drum sets built in For mor...

Page 1505: ...make other changes on the slice level For more information see the Cyclone online Help Dimension LE Synth with Garritan Pocket Orchestra Studio only Figure 459 Dimension LE This special version of th...

Page 1506: ...l Modeling Waveguide synthesis These two synthesis methods allow a broad sound palette ranging from synthesized analog sounds to plucked instruments to precise reproductions of acoustic instruments Fo...

Page 1507: ...to add your own style to a track Just drag and drop a sample into DropZone and make it part of your beat It is the ideal synth for creating remixes or for building the perfect hook for your song DropZ...

Page 1508: ...ities two filters five envelope generators three low frequency oscillators and a very flexible modulation array are the resources PSYN offers combined with full automation and a powerful MIDI Learn mo...

Page 1509: ...ter changes For more information see the Rapture online Help Rapture LE Studio only Figure 466 Rapture LE Combining power elegance control and unbeatable sounds Rapture is one of the most exciting syn...

Page 1510: ...n player It features Cakewalk s patented Expression Engine technology an anti aliased real time sound production system for multisample audio playback Session Drummer 3 accurately replicates the sound...

Page 1511: ...gging them to an instrument pad Session Drummer 3 features include MIDI pattern playback Multi velocity acoustic and electronic drum kits A comprehensive collection of presets and MIDI based loop file...

Page 1512: ...ments Bass Guitar Figure 472 Studio Instruments Bass Guitar Bass Guitar accurately replicates the sound of a classic electric bass guitar sound and features a highly detailed user interface as well as...

Page 1513: ...nd of its real world counterpart and features a highly detailed user interface as well as simple but powerful controls It uses Cakewalk s patented and acclaimed Expression Engine technology an anti al...

Page 1514: ...kewalk s patented and acclaimed Expression Engine technology an anti aliased real time sound production system for multi sample audio playback For more information see the Studio Instruments Electric...

Page 1515: ...playable piano sounds through its combination sampling modeling and synthesis sound design TruePianos sounds and feels great just like a real acoustic piano with all the important characteristics sym...

Page 1516: ...empos and feels Create your own unique drum sound by mixing and matching drum kits beats and kit pieces and applying professional effects You can also expand the library of sounds and beats to suit yo...

Page 1517: ...ive bandlimited Waveshaping technology makes Z3TA one the best and most respected synths in the industry Whether you re looking for lush warm pads slowly evolving atmospheres searing leads or sparklin...

Page 1518: ...1518 Included plug ins Instruments...

Page 1519: ...479 Cyclone A Import Sound Bank B Loops C Key Map view tab D Export Sound Bank E Trash button F Play button G Stop button H Auto Preview button I Pad J Pad Group K Volume knob L Pan knob M Sync button...

Page 1520: ...tons Button Description Import Sound Bank Opens the Open dialog box so you can load an existing Sound Bank Export Sound Bank Opens the Save As dialog box to save the current settings as a Sound Bank c...

Page 1521: ...r Pan knob Adjusts the pan of the Pad Group The pan value is displayed in the Pad Inspector File Load button Opens the Open dialog box where you can navigate to the directory or directories where you...

Page 1522: ...oot value for each additional loop Velocity Low The minimum velocity value that triggers the pad group Velocity High The maximum velocity value that triggers the pad group Key Map Unity The MIDI note...

Page 1523: ...er slice with a shorter one leaving room for a tail to sound Latch The Latch option gives you a second mode for triggering pads In Latch mode a Groove Clip plays continuously when triggered until it i...

Page 1524: ...ag the white triangles to extend the range of MIDI note values that trigger the pad group Figure 481 Key Map view A Current Loop B Key Map Low C Key Map High D Unity note plays loop at the Pad Root pi...

Page 1525: ...ort you need to create and patch additional MIDI tracks manually to feed the additional audio tracks You can insert synths into effects bins of individual audio tracks If you use this method you need...

Page 1526: ...y the selected pads If the Loop button for that pad is depressed the loop plays indefinitely you can stop it by clicking the Pad again If the Loop button is not depressed the loop stops when it reache...

Page 1527: ...markers show what MIDI keys trigger the Pad The yellow key is the Root Note which triggers the loop at its original pitch 3 Drag the edge of the Pitch Range the blue keys within the white triangle ma...

Page 1528: ...is to import a loop to an individual Pad Mute button Click this to mute or unmute the loop that s assigned to an individual Pad Solo button Click this to solo or unsolo the loop that s assigned to an...

Page 1529: ...each of the slices to hear it If the loop is assigned to a Pad the slices also appear in the Pad Editor as a series of events which you can also click to hear Clicking an event in the Pad Editor also...

Page 1530: ...ck and the Track Length marker To set the number of divisions for a slice You can set the number of divisions in each slice This controls how exact the placement of your slices is within the Pad Edito...

Page 1531: ...Press CTRL Z To redo an edit Do one of the following Click the Edit menu and choose Redo Press SHIFT CTRL Z Keyboard Shortcut Description SHIFT select Hold the SHIFT key to select multiple slices in t...

Page 1532: ...1532 Cyclone Using Cyclone...

Page 1533: ...ates on page 1164 on page 269 File Open The File Open command opens the Open dialog box Use the Open dialog box to open an existing project See Open dialog on page 1770 for more information File Rever...

Page 1534: ...DI File that has all channels merged into one track MIDI Format 1 Standard MIDI File that keeps each channel on a separate track Riff MIDI Format 0 Riff MIDI File of Format 0 Riff MIDI Format 1 Riff M...

Page 1535: ...16 but you can choose to import the tracks at a higher bit depth if desired See Importing audio CD Tracks on page 321 File Import Video SONAR s File Import Video command lets you include an AVI MPEG...

Page 1536: ...formation about video files see Video playback import and export on page 251 and Preparing audio for distribution on page 963 File Export MIDI Groove Clip The File Export MIDI Groove Clip command open...

Page 1537: ...current project File Recent File The recent file list at the bottom of the File menu lets you choose any file you have opened recently Choosing a file in the list opens it immediately File Exit The F...

Page 1538: ...istory of your editing actions You can set how many editing actions you want the Undo History dialog box to store by changing the number in the Maximum Undo Steps field The default value is 128 See Un...

Page 1539: ...on page 757 Event Filter Select Some Search Replace dialog on page 1722 Edit Select By Time The Edit Select By Time command lets you specify times from which and through which SONAR selects To select...

Page 1540: ...measure the Thru time is the start of the next measure which actually makes it a to time and not a through time Edit Select Thru End The Edit Select Thru End command lets you specify the end of a piec...

Page 1541: ...e kinds of objects to cut in the Cut dialog on page 1715 You can paste the contents of the Clipboard elsewhere See Edit Paste on page 1542 See also Moving and copying clips on page 352 Erasing tracks...

Page 1542: ...mand lets you put the contents of the Clipboard into any appropriate place in your project If you want to specify what where and how to paste use the Edit Paste Special command instead to open the Pas...

Page 1543: ...th partial clips on page 368 Deleting measures or time from one or more tracks on page 761 Edit Delete Special The Edit Delete Special command removes selected objects from the project It doesn t put...

Page 1544: ...r more information see Working with loops and Groove Clips on page 697 Clip Mute Unmute This command mutes or unmutes all selected clips Split The Split command opens the Split Clips dialog on page 18...

Page 1545: ...open the Browser view You can preview and import files using the Browser view without having to leave your work environment For more information see Browser on page 2013 See also Browser on page 605 V...

Page 1546: ...ndaries The Piano Roll view makes it easy to add edit and delete notes and controller data from a track See also The Piano Roll view on page 724 Views Step Sequencer Open the Step Sequencer by using t...

Page 1547: ...more information see The Staff view on page 1180 Views AudioSnap Palette The Views AudioSnap Palette command opens the AudioSnap Palette which allows you to set AudioSnap options For more information...

Page 1548: ...can use it to cue yourself or your group with the lyrics during playback and recording For more information about the Lyrics view see Lyrics view on page 1970 See also Working with lyrics on page 1224...

Page 1549: ...Tempo view see Tempo view on page 2006 See Using the Transport module on page 419 Views Meter Key Open the Meter Key view by using the Views Meter Key command The Meter Key view lets you set and chang...

Page 1550: ...ack View Show Icons This command hides or shows icons in the Track view if the global command to show icons is not enabled Views Icons Track View Large Icons This command displays icons in the Track v...

Page 1551: ...tor Show Large Icons This command displays icons in the Track Inspector in large format Views Icons Track Inspector Show Small Icons This command displays icons in the Track Inspector in small format...

Page 1552: ...Rack in large format Views Screensets Screenset 1 Select screenset 1 See also Screensets on page 1154 Views Screensets Screenset 2 Select screenset 2 See also Screensets on page 1154 Views Screensets...

Page 1553: ...54 Views Screensets Screenset 6 Select screenset 6 See also Screensets on page 1154 Views Screensets Screenset 7 Select screenset 7 See also Screensets on page 1154 Views Screensets Screenset 8 Select...

Page 1554: ...evert the current screenset to its last saved state on page 1158 See also Screensets on page 1154 Views Screensets Lock Unlock Current Screenset Lock the current screenset to prevent any modifications...

Page 1555: ...Views Screensets Duplicate Current Screenset to Screenset 2 Duplicate the current screenset to screenset 2 See also Screensets on page 1154 Views Screensets Duplicate Current Screenset to Screenset 3...

Page 1556: ...Views Screensets Duplicate Current Screenset to Screenset 6 Duplicate the current screenset to screenset 6 See also Screensets on page 1154 Views Screensets Duplicate Current Screenset to Screenset 7...

Page 1557: ...eensets Import screensets from another open project Any locked screensets in the current project are not overwritten See To import screensets from another project on page 1157 See also Screensets on p...

Page 1558: ...ou click its Help button Insert ReWire Device The Insert ReWire Device command displays a submenu of all installed ReWire soft synths Clicking the name of one of the soft synths either displays the In...

Page 1559: ...also find by right clicking an empty area of the Bus pane in the Track view or Console view inserts a surround bus into the empty space of the Bus pane For more information see Surround buses on page...

Page 1560: ...s not receive a double dose of the same effects See Real time audio effects processing on page 846 Process Apply Effect MIDI Effects The Process Apply Effect MIDI Effects command opens the Apply MIDI...

Page 1561: ...rt the phase of one or both channels and produce any amount of possible gain or cut values See Using the Normalize and Gain commands on page 838 for more information See also Basic audio processing on...

Page 1562: ...can manipulate any curve in the dialog box to look exactly as you want See also To apply a fade to audio data on page 844 Process Apply Effect Crossfade The Process Apply Effect Crossfade command lets...

Page 1563: ...step instructions To use the Quantize command on page 770 To use the Groove Quantize command on page 771 To define a new groove on page 772 To save a groove pattern on page 773 To copy an existing gro...

Page 1564: ...al key signature As an option you can choose to transpose selected audio clips along with any selected MIDI clips SONAR uses pitch shifting to perform the transposition You can transpose audio only a...

Page 1565: ...The Process Nudge Right 2 command moves a selected clip to the right by any of three increments that you set in the Nudge 2section in Edit Preferences Customization Nudge You can assign a hotkey short...

Page 1566: ...a note down a pitch at a time in the Piano Roll view For more information see Nudge on page 366 Process Nudge Settings This command opens Edit Preferences Customization Nudge where you can customize...

Page 1567: ...shrinking events on page 762 Process Scale Velocity The Process Scale Velocity command lets you create crescendos volume swells and decrescendos on those instruments that respond to MIDI velocity Most...

Page 1568: ...ch command opens the Deglitch dialog on page 1717 See also To use the Deglitch filter on page 1194 Process Fit to Time Process Fit to Time stretches or shrinks the selection so that it ends at a speci...

Page 1569: ...ne event for every single beat with no extra beats or missing beats The first beat of the reference track should be at 1 01 000 You can use any editing command to adjust the reference track See also T...

Page 1570: ...a tempo change on page 419 Changing tempos on page 418 Project Insert Series of Tempos The Project Insert Series of Tempos command lets you change Tempo on page 2059 smoothly over a specified time ran...

Page 1571: ...he default is C See also Using pitch markers in the Track view on page 712 Project Set Timecode at Now The Project Set Timecode at Now command opens the Set Timecode at Now Time dialog box which allow...

Page 1572: ...see Change Audio Format dialog on page 1706 Utilities Share with SoundCloud The Utilities Share with SoundCloud command opens the Cakewalk SoundCloud interface which lets you share your music with ot...

Page 1573: ...ncoder Configuration Utility command opens the Cakewalk Encoder Configuration Utility which lets you configure external audio encoders so that you can use them seamlessly in SONAR s Export Audio dialo...

Page 1574: ...ler Format Milliseconds The Time Ruler Format Milliseconds command which is also available from the Clips pane pop up menu changes the unit of measurement in the time ruler to milliseconds Window Full...

Page 1575: ...ols shortcuts on page 1582 Edit Filter shortcuts on page 1583 Snap to Grid shortcuts on page 1583 Nudge shortcuts on page 1584 Screenset shortcuts on page 1584 Marker shortcuts on page 1585 Loop short...

Page 1576: ...rowser B Expand collapse MultiDock D Maximize restore MultiDock SHIFT D Close current floating window CTRL F4 Show Tools HUD T Show AudioSnap Palette A Zoom in horizontally CTRL RIGHT ARROW Zoom out h...

Page 1577: ...Undo CTRL Z Edit Redo CTRL SHIFT Z Edit Select All CTRL A Edit Select None CTRL SHIFT A Edit Cut CTRL X Edit Cut Special CTRL ALT X Edit Copy CTRL C or CTRL INSERT Edit Copy Special CTRL ALT C Edit P...

Page 1578: ...3 Step Sequencer ALT 4 Matrix view ALT 5 Staff view ALT 6 Loop Construction view ALT 7 Event List view ALT 8 Lyrics view ALT SHIFT 1 Video view ALT SHIFT 2 Big Time view ALT SHIFT 3 Markers view ALT S...

Page 1579: ...track visibility H Show only selected tracks CTRL SHIFT H Hide selected tracks CTRL H Show all tracks SHIFT H Open Close current Track Folder ALT SHIFT H Expand Collapse Take lanes for current track S...

Page 1580: ...tracks and MIDI notes in all MIDI tracks ALT UP DOWN ARROW Scale audio waveform in current audio track or scale MIDI notes in current MIDI track CTRL ALT UP DOWN ARROW Put focus in Track pane SHIFT U...

Page 1581: ...op rewind to Now marker on off CTRL W Audition selection SHIFT SPACEBAR Go to time G Go to selection start From time SHIFT G Go to next marker CTRL SHIFT PAGE DOWN Go to previous marker CTRL SHIFT PAG...

Page 1582: ...nd Shortcut Show Tools HUD T Smart tool F5 Select tool F6 Move tool F7 Cycle through Edit tools Edit Timing Split F8 Cycle through Draw tools Freehand Line Sine Triangle Square Saw Random F9 Cycle thr...

Page 1583: ...key and click the control Toggle between the last two data types Hold down the SHIFT key and right click Show the Tools HUD T or click the middle mouse button Envelope Offset mode O Table 257 Edit Fi...

Page 1584: ...Numeric Keypad 5 Nudge Right 2 Numeric Keypad 6 Nudge Left 3 Numeric Keypad 7 Nudge Right 3 Numeric Keypad 8 Table 259 Nudge keyboard shortcuts Command Shortcut Screenset 1 1 Screenset 2 2 Screenset 3...

Page 1585: ...nset to Screenset 8 CTRL 8 Copy current Screenset to Screenset 9 CTRL 9 Copy current Screenset to Screenset 10 CTRL 0 Command Shortcut Insert marker M Next marker CTRL SHIFT PAGE DOWN Previous marker...

Page 1586: ...Remove selected clips from clip group SHIFT Create Melodyne Region FX clip CTRL M Table 263 Clip keyboard shortcuts Command Shortcut Toggle Track Mute for selected track ALT M Toggle Track Solo for s...

Page 1587: ...alog Q Open Input Quantize settings SHIFT Q Input Quantize on off CTRL Q Table 266 Quantize keyboard shortcuts Command Shortcut Open V Vocal Editor SHIFT V Create V Vocal Region FX clip SHIFT V Note A...

Page 1588: ...teps or strips pane move focus to the toolbar CTRL UP ARROW When focus is on the toolbar move focus to the strips pane CTRL DOWN ARROW When focus is on steps toggle step or tie on off for buttons turn...

Page 1589: ...Fine resolution SHIFT drag controls Angle Width etc Moves to next previous widget in surround panner UP DOWN ARROW keys Moves to next previous panner in same track LEFT RIGHT ARRROW keys Moves to surr...

Page 1590: ...ONAR Online Videos command opens your web browser to the Cakewalk Videos Web page Help Audio Configuring your audio interface The Help Audio Configuring your audio interface command opens your web bro...

Page 1591: ...ge in your default web browser where you can download the latest online Help file SONAR CHM Help View ReadMe The Help View ReadMe command tells you all about the current version of SONAR Help Quick St...

Page 1592: ...er of the product and your licensing information Delete Track This command which you find by right clicking a track name or number in the Track view removes the track on which you right click Group Th...

Page 1593: ...d together with the Set Start Current command only functions when you use custom grouping These two commands set the range that a grouped control moves through when the members of its group move throu...

Page 1594: ...of that fader or knob to its current value When you double click a fader or knob it jumps to its snap to position For more information about the Console view see Preparing to mix on page 881 90 dB Ra...

Page 1595: ...rack view or Console view changes the range that the meter measures to 12 dB For more information about meters see Metering on page 899 Set As Current Track This command which you find by right clicki...

Page 1596: ...u times For more information about looping see Looping on page 194 Set Punch Points This command which you find by right clicking in the Time ruler on page 2059 sets the Punch In time to the start tim...

Page 1597: ...eaches the next node See Creating and editing automation envelopes on page 1119 Linear This command draws a straight line between two nodes See Creating and editing automation envelopes on page 1119 F...

Page 1598: ...g on page 1708 Mirror Fretboard This command displays the Staff view s fretboard with low strings at the top and high strings at the bottom Rosewood Hi This command changes the fretboard to appear as...

Page 1599: ...video see Video playback import and export on page 251 Insert This command which you find by right clicking in the Video view inserts a video file into a project See also Video playback import and exp...

Page 1600: ...sible but only enlarges it by whole number multiples For more information about video see Video playback import and export on page 251 Full Screen This command which you find by right clicking in the...

Page 1601: ...ont for the video view s time display For more information about video see Video playback import and export on page 251 Background Color Black This command which you find by right clicking in the Vide...

Page 1602: ...return to 0 C Delete Node This command deletes the node over which you have right clicked Lock Contents This command forces SONAR to open a new instance of the current view the view you are locking r...

Page 1603: ...the previous zoom level For more information about displaying tracks see Configuring the Console and Track views on page 883 Show All Tracks This command shows all tracks in the current project For m...

Page 1604: ...command sets the meter to RMS For more information about RMS meter display see Metering on page 899 Record Meter Options Peak RMS Available in the Playback Meter Options Record Meter Options and Mains...

Page 1605: ...s and Mains Meter Options submenus this command sets the meter to RMS For more information about RMS meter display see Metering on page 899 Playback Meter Options Peak RMS Available in the Playback Me...

Page 1606: ...ns and Mains Meter Options submenus this command sets the meter to RMS For more information about RMS meter display see Metering on page 899 Output Bus Meter Options Peak RMS Available in the Playback...

Page 1607: ...mmand sets the meter to measure the volume level in the signal path prior to entering the fader Playback Meter Options Post Fader This command sets the meter to measure the volume level in the signal...

Page 1608: ...tail of the waveform being shown Show and Fit Selection This command zooms vertically and horizontally in the Track view to fit just the selected clips Show only Selected Tracks Hides all tracks which...

Page 1609: ...erted envelopes to have a node at both the beginning and end of the track If unchecked an envelope appears as a dotted line with no active nodes Snap to Grid Click this button to turn Snap to Grid on...

Page 1610: ...iple tracks a track folder a track template or a single stereo or surround SONAR Producer only bus Split tool This button activates the Split tool which allows you to split a clip into separate clips...

Page 1611: ...is button enables Exclusive Solo mode When you solo a track or bus in Exclusive Solo mode all other soloed tracks or buses are automatically unsoloed See Exclusive Solo mode on page 206 Add Clip to Po...

Page 1612: ...35 Quantize to Pool This command opens the Quantize to AudioSnap Pool dialog box which lets you quantize audio beats to the Pool See To quantize an audio clip to another audio clip Quantize to Pool on...

Page 1613: ...Video Thumbnails track The Video Thumbnails track can be displayed even if there is no video in your project You can also show or hide the this track by pressing V on your keyboard See Video playback...

Page 1614: ...e Clips pane between each track Track view View Display Display Clip Names If you name any of your clips enabling this option causes SONAR to display the names Track view View Display Display Clip Con...

Page 1615: ...rid Lines In Front of Clips Enabling this option causes SONAR to display vertical lines in the Clips pane that are one measure apart Vertical grid lines are displayed and drawn on top of clips always...

Page 1616: ...to the previous zoom level undo zoom For more information about displaying tracks see Configuring the Console and Track views on page 883 Track view View View Redo This command negates the last Undo...

Page 1617: ...rossfades on page 430 Track view Options Crossfade Type Default Fade In Curve Fast Curve This command sets as a default a fast fade in curve when dragging the beginning of a clip For more information...

Page 1618: ...ck view Options Crossfade Type Default Crossfade Curves Fast Out Fast In This command sets as default a crossfade in which the first clip fades out fast and the second clip fades in fast For more info...

Page 1619: ...tions Crossfade Type Default Crossfade Curves Linear Out Slow In This command sets as default a crossfade in which the first clip fades out at a steady rate and the second clip fades in slowly For mor...

Page 1620: ...you to focus on the edit location without worrying that the screen will eventually scroll away from the edit location When you are done with the edit and want the Clips pane to scroll again during pla...

Page 1621: ...ll view to open when you double click a MIDI clip Track view Options Click Behavior Double Click Audio Clips Nothing Enabling this option prevents any view from opening when you double click an audio...

Page 1622: ...ptions Vertical Meters Show vertical meters in the Track view Track view Options Meter Options Show Numeric Peak Values Show or hide peak values in each track s header Track view Options Meter Options...

Page 1623: ...ack view Options Meter Options Record Meter Options RMS This command sets the meter to RMS For more information about RMS meter display see Metering on page 899 Track view Options Meter Options Record...

Page 1624: ...n about meters see Metering on page 899 Track view Options Meter Options Record Meter Options 60 dB This command changes the range that record meters measure to 60 dB For more information about meters...

Page 1625: ...peaks is not checked or until the end of playback or recording if Lock Peaks is checked Track view Options Meter Options Record Meter Options Lock Peaks This command when checked and the Hold Peaks i...

Page 1626: ...th prior to entering the fader Track view Options Meter Options Track Meter Options Post Fader This command sets the meter to measure the volume level in the signal path after exiting the fader Track...

Page 1627: ...e to 60 dB For more information about meters see Metering on page 899 Track view Options Meter Options Track Meter Options 78 dB This command changes the range that track playback meters measure to 78...

Page 1628: ...nd when checked and the Hold Peaks is also checked causes the peak to be locked at its highest point on the meter until the end of playback Track view Options Meter Options Bus Meter Options Peak This...

Page 1629: ...meter to measure the volume level in the signal path after the effects bin and prior to the fader Track view Options Meter Options Bus Meter Options 12 dB This command changes the range that bus mete...

Page 1630: ...ack view Options Meter Options Bus Meter Options 90 dB This command changes the range that bus meters measure to 90 dB For more information about meters see Metering on page 899 Track view Options Met...

Page 1631: ...ns the Mouse Wheel Zoom Options dialog box This command shows options for changing the mouse s zoom behavior For more information about Fast Zoom see To zoom using the mouse wheel Fast Zoom on page 34...

Page 1632: ...ill remain assigned to the same software instrument only available for Instrument tracks Track view Tracks Bounce to Track s This command lets you combine one or more audio tracks into a submix For mo...

Page 1633: ...selected tracks To display them again select Tracks Track Manager or press H on your keyboard to open the Track Manager dialog box Track Manager This command opens the Track Manager dialog box For mo...

Page 1634: ...Use this command to assign the same input port to the selected tracks For details see To assign the same audio input port to multiple tracks on page 222 and Track Inputs dialog on page 1895 Track view...

Page 1635: ...lips dialog box which allows you to create or edit fades on selected clips For more information see Fades and crossfades on page 430 Track view Clips Add to Clip Group New This command places all sele...

Page 1636: ...ap offset at the Now Time A snap offset is a value in samples at which the Snap Grid uses to align the clip Clips without a snap offset always align at the very beginning of a clip For more informatio...

Page 1637: ...clip s on page 1965 Track view Clips Convert MIDI Controllers to Envelopes This command opens the Convert MIDI To Shapes dialog on page 1711 This command lets you convert a controller envelope create...

Page 1638: ...events that are stacked such as chords Show All Controllers Show all controllers in all displayed tracks Track view MIDI Select Controllers Along With Notes When Select Controllers Along with Notes i...

Page 1639: ...rocessor from the Region FX clip For more information about Melodyne see Melodyne Producer and Studio only on page 1048 Track view Region FX Melodyne Open Editor This command opens the Melodyne interf...

Page 1640: ...o any MIDI or Instrument track For more information about Melodyne see Melodyne Producer and Studio only on page 1048 Track view Region FX V Vocal Create Region FX This command creates a V Vocal Regio...

Page 1641: ...lips on page 1063 Save as groove This command opens the Define Groove dialog box which lets you save the groove to a file The groove can then be applied to other audio or MIDI clips See To Groove Quan...

Page 1642: ...dio only on page 635 Clip follows project tempo This command forces the selected audio clips to follow the project s global tempo map See Synchronizing audio and the project tempo on page 656 AudioSna...

Page 1643: ...ll View Grid Resolution Quarter Triplet The Quarter Triplet option creates grid lines in the Drum Grid pane at quarter note triplet intervals three lines per half note Piano Roll View Grid Resolution...

Page 1644: ...lution 32nd Triplet The 32nd Triplet option creates grid lines in the Drum Grid pane at 16th note triplet intervals three lines per 32nd note Piano Roll View Grid Resolution 64th The 64th option creat...

Page 1645: ...in the current view Staff view Print Export to ASCII Tab This command opens the Save As dialog on page 1879 where you can set the name and location for an ASCII text file of a track s tablature Staff...

Page 1646: ...ious note from the Now time Staff view Edit Play Next Clicking this button plays the next note from the Now time Staff view View Show Hide Fret Pane Show or hide the guitar fretboard display Staff vie...

Page 1647: ...ny note events that are smaller than a 32nd note will automatically display as a 32nd note Staff view View Fill Durations Visually rounds up notes to the next note or beat whichever comes first useful...

Page 1648: ...view Strips Instrument Show hide Instrument tracks Console view Strips Muted Show hide muted tracks Console view Strips Archived Show hide archived tracks Console view Strips Frozen Show hide frozen...

Page 1649: ...nts For more information about the Event List view see Event List view on page 1967 Event List view View Key Aftertouch This option shows or hides all key aftertouch events For more information about...

Page 1650: ...his option shows or hides all NRPN events For more information about the Event List view see Event List view on page 1967 Event List view View Sysx Bank This option shows or hides all Sysx banks For m...

Page 1651: ...or hides all audio clips For more information about the Event List view see Event List view on page 1967 Event List view View Shape This option shows or hides all automation shapes For more informati...

Page 1652: ...nt useful for editing Lyrics view Fonts Font B Selects the second font By default this is a larger font useful for reading lyrics at a distance Lyrics view Fonts Fonts Opens the Font dialog box where...

Page 1653: ...IDI In and Out ports of the synthesizer to the MIDI interface Also make sure that your instruments are set up to receive and or transmit Sysx Synthesizers that you normally use only to play sounds for...

Page 1654: ...mat The text representation requires three to four times more memory than the data itself and the Edit System Exclusive Bytes dialog box can contain roughly as much text as Notepad Sysx view Edit Name...

Page 1655: ...Zoom Level 1 The Horz Zoom Level 1 command selects horizontal zoom level 1 in the Navigator view See Using the Navigator view on page 348 Horz Zoom Level 2 The Horz Zoom Level 2 command selects horiz...

Page 1656: ...ng the Navigator view on page 348 Horz Zoom to Project The Horz Zoom to Project command shows the entire project in the Navigator view See Using the Navigator view on page 348 Track Height Short The T...

Page 1657: ...ule The Insert Module command inserts a new module in the channel s ProChannel See To insert a module on page 1003 Remove Module The Remove Module command removes the selected ProChannel module See To...

Page 1658: ...mand stores the current ProChannel configuration as the default for new tracks See To specify the default ProChannel configuration on page 1004 Set Modules as Default for Buses The Set Modules as Defa...

Page 1659: ...nfigure the selected control See To customize an assignable control on page 939 To map an assignable knob or button to a plug in parameter on page 941 Remove control The Remove control command removes...

Page 1660: ...All Parameters Set End The All Parameters Set End command sets the End value for all plug in parameters assigned to the FX Chain knob or button The values are determined by the current position of ea...

Page 1661: ...ton to a plug in parameter on page 941 Customize UI The Customize UI command opens the Settings dialog box which lets you configure the appearance of the FX Chain property page See Customizing the FX...

Page 1662: ...ove Empty Take Lanes Remove Empty Take Lanes The Remove Empty Take Lanes command removes all empty Take lanes in the current track See To remove all empty Take lanes in a track on page 413 Comping on...

Page 1663: ...ics called Getting Started or Tutorials The basic way that you use a computer to record and play sound is this your computer has a circuit board in it called a sound card which converts the sound from...

Page 1664: ...microphone cable into a preamp or a mixer with a preamp and plugging the outputs of the mixer or preamp into the Line input of the sound card instead of the Mic input You would then need an adapter t...

Page 1665: ...at used by CDs Wave files and MP3s can not After you record your MIDI data you can use Cakewalk to convert the MIDI data into digital audio so that you can create CDs MP3s or Windows Media files MIDI...

Page 1666: ...piece of hardware called a MIDI interface which can be a stand alone module connected to your computer s parallel serial or USB port an internal module installed in a slot inside your computer or can...

Page 1667: ...e This process of a computer sending back out the MIDI messages that it just received is called echoing By using echoing you can play one MIDI instrument but cause other MIDI instruments to play Your...

Page 1668: ...click OK If you don t see the name of your interface listed you need to install its driver from the CD floppy disk or Web site that your interface s documentation recommends After you have installed...

Page 1669: ...I messages that play other sounds You usually assign each track to its own MIDI channel A typical MIDI project might have separate tracks for drums bass and piano In this example you might assign the...

Page 1670: ...es out on what sound patch the track is sending the messages to how loud the overall track volume is what MIDI instrument you re sending the track s data to and several other property choices Notice t...

Page 1671: ...on the first 16 tracks would only be sent out through the cable that comes out of the first output port the messages from the next 16 tracks would only come out of output 2 and so on So if your MIDI...

Page 1672: ...el as MIDI RX Since most projects have several tracks in them and each track is usually assigned to a different sound how do you control what sound you hear when you press a key on your MIDI controlle...

Page 1673: ...d Better sound cards usually keep their converters in a separate box that s not in the computer itself because the computer s fan and disk drives add noise to the sound card s signal Digital audio wor...

Page 1674: ...turned down on your software mixer or wave playback is muted If your sound card only has one stereo output your sound card probably responds to the Windows Mixer If your sound card has more than one s...

Page 1675: ...Output button or Out field If the name of your sound card the one you have connected to an amp and speakers is not selected on the pop up menu select it If it s not listed go to Edit Preferences Audio...

Page 1676: ...actual sound that is recorded The MIDI track s graph is much simpler since it only represents commands to turn a certain note on for a certain time period then turn another note on etc We zoomed in on...

Page 1677: ...ze A clip that is an exact number of beats or measures and is suitable for repetition such as a drum pattern is frequently called a loop Clips are also sometimes called events A track can have no clip...

Page 1678: ...rdware sound cards and drivers on page 1689 MIDI on page 1665 Track by track playback You can change a track s volume by dragging its volume fader see the following figure You can silence a track by c...

Page 1679: ...your sound card on page 1680 Choosing inputs on page 1686 Audio hardware sound cards and drivers on page 1689 MIDI on page 1665 Track status What it means Normal The track plays unless one or more of...

Page 1680: ...ronic instruments such as electric guitars The Mic input is calibrated to accept the input from microphones however you can usually get a better recorded sound by plugging a mic into a preamp or mixer...

Page 1681: ...electric instrument cable For mics that have an XLR plug on their cable XLR to 1 4 inch adapter Plug both instruments and mics into the Left or Right input of a pair of inputs If your instrument has...

Page 1682: ...ect Microphone To open the Windows Mixer double click the Speaker icon that s on your Windows taskbar to open the Play Control dialog box In the Play Control dialog box use the Options Properties comm...

Page 1683: ...pro level instead 4 dB and your sound card does not accept a 4 db input you will need to attenuate lower the F X rack s signal To do this use a mixer between the rack s output and the Y adapter If th...

Page 1684: ...al RCA to 1 8 inch stereo mini Y adapter Many portable cassette players come with this kind of adapter or even with a single cable with all the necessary plugs In the following diagram a stereo compon...

Page 1685: ...l if you wanted not the usual way to record 4 Since you re already hearing the guitar through the main outputs you probably don t want to hear its signal again coming back through the sound card s out...

Page 1686: ...ixer double click the Speaker icon that s on your Windows taskbar to open the Play Control dialog box If you don t see the Speaker icon on your taskbar you can open the Windows Mixer by using the foll...

Page 1687: ...ough the analog inputs on your sound card you probably only need to set your sound card s clock to internal and in SONAR s Track view choose the correct number of the inputs you re connected to in the...

Page 1688: ...a track test the input level and adjust input volume and record your track 5 When you re finished recording set your sound card s clock back to internal and listen to your recording There s one more...

Page 1689: ...es bundled with a computer Consumer grade sound card characteristics Number of inputs and outputs Consumer cards nearly always have two inputs mic and line in and one output Usually these inputs and o...

Page 1690: ...te of up to 96 KHz Onboard DSP Some sound cards have effects processors for things like reverb and delay built into the sound card These can take a big load off of your computer High quality A to D an...

Page 1691: ...vendor has a WDM driver it s usually a good idea use it The following table compares their characteristics IRQs An IRQ Interrupt Request is an assigned location where the CPU expects to be interrupted...

Page 1692: ...ninstall the hardware you want to move along with its driver put the hardware devices in their new slots and reinstall their drivers Once you have completed this check the IRQ settings again If moving...

Page 1693: ...age 1665 Audio hardware sound cards and drivers on page 1689 Audio playback in SONAR on page 1674 Tracks on page 1676 Tracks on page 1676 Clips on page 1677 Track by track playback on page 1678 Connec...

Page 1694: ...1694 Beginner s guide to Cakewalk software Audio hardware sound cards and drivers...

Page 1695: ...hat uses the External Insert plug in the bounce operation must be performed in real time Audible bounce The Audible bounce option is only available when in real time bounce mode when Fast bounce is un...

Page 1696: ...puts dialog box Use this command to assign a series of consecutive mono input ports to the selected audio tracks The First Input to Assign combo box lets you specify the audio input port that should b...

Page 1697: ...n in the track list order Delete Track Remove a track from the list Target Drive The Target Drive specifies the CD writing device to be used The program scans your system to locate all available CD wr...

Page 1698: ...ed audio file You usually include everything If you include either Track FX or Bus FX it s a good idea to add an extra measure to the end of your project to contain any reverb tails that your effects...

Page 1699: ...t show what parameters of the plug in are automation write enabled You can check or uncheck each of these check boxes Enable All Click this button to enable all check boxes Disable All Click this butt...

Page 1700: ...ted may necessarily be compatible while re compressing video through Export to AVI If an incompatible compression codec is selected an error message may be displayed during the export If No Compressio...

Page 1701: ...r after you click the Save button This is the Properties dialog box that allows you finer control over the configuration of the AVI file you are creating The available parameters are Microsoft Direct...

Page 1702: ...ul when you have MIDI playback modules connected to several different ports of your MIDI interface and you want to control which module receives a particular Sysx message See also Using the System Exc...

Page 1703: ...hat s next to it to save the preset Source Category Select one of the following options Note 1 If you select any data in your project only that data is included when you choose to bounce tracks Altern...

Page 1704: ...each track or bus selected in the Source Buses Tracks field Stereo Creates a separate stereo track for each track or bus selected in the Source Buses Tracks field Split Mono Creates separate mono tra...

Page 1705: ...appens in real time Uncheck this option if you are using a synth that only works in real time This option is checked by default Audible Bounce The Audible Bounce option is only available when in real...

Page 1706: ...bit signal For more information see Bit depths and float resolution on page 1297 Improving audio performance on page 1293 and Dithering on page 973 Chord Fret Number dialog When you right click a cho...

Page 1707: ...another utility program that protects you from accidentally deleting important files such as Norton Protect you may need to disable that program Otherwise the next time you use the Clean Audio Folder...

Page 1708: ...the file window Delete All button Click this button to delete all the audio files that are listed in the file window For more information see To delete unused audio files on page 1292 Associated Audi...

Page 1709: ...w track s to become linked clips with the identical clips in the original track s Clone Properties Select this check box if you want to copy the properties of the highlighted track s such as the name...

Page 1710: ...stration code either by phone or email enter it in the field named Registration Code and then click Complete If you are logged in with Administrative privileges you will be prompted to raise privilege...

Page 1711: ...n is grayed out if you open the dialog box with the Property Page button Input Port Use this field to select the MIDI port that the control surface will use to send MIDI control data to SONAR Output P...

Page 1712: ...r beat 32nd Triplet 12 steps per beat Preserve original timing using time offsets Select this option if you want the Step Sequencer to preserve the original timing of the note events instead of quanti...

Page 1713: ...or delete an envelope for each parameter by checking or unchecking its check box If you patched the effect into a bus you can open the same dialog box by clicking in the Bus pane and choosing Create...

Page 1714: ...e end of the crossfade Linear Crossfade This option causes the selected audio to change volume at a constant rate throughout the crossfade Crossfade graph The crossfade graph illustrates any type of c...

Page 1715: ...es all Track and Bus automation from the selection Tempo Changes If you select this check box SONAR removes all tempo changes in the selected object Meter Key Changes If you select this check box SONA...

Page 1716: ...R asks if you want to overwrite erase that pattern Delete button Click this button if you want to delete the groove pattern that is listed in the Pattern field See also To save a groove pattern on pag...

Page 1717: ...e are three filters in the Deglitch dialog Pitch With the Pitch filter you can set the maximum pitch allowed in the track If a MIDI event has a higher pitch than the maximum you set it is removed Velo...

Page 1718: ...the start of each song The Delay dialog box has these fields No Delay Click this option to cause the song to start immediately following the previous song Wait for Key Press Click this option to caus...

Page 1719: ...n the selected clip s Markers Removes all markers in the selected clip s You have the following options in the Delete dialog Delete Hole If selected the Delete Hole option removes the space in the tra...

Page 1720: ...tells SONAR to mix the new data with the old with the following option Replace Old with New Choosing this option tells SONAR to delete the old data with the following option Delete Whole Measures Choo...

Page 1721: ...ice Config Number When you click the Receive button in the Sysx view and choose to receive sysx data from a synthesizer your system has trouble identifying the Dump Request Macro needs your input dial...

Page 1722: ...t Filter Select Some Search Replace dialog Edit Select By Filter opens the Event Filter Select Some dialog box Use this command to select events of a specific nature that you specify in the dialog box...

Page 1723: ...Click RPN to include registered parameter controllers in your selection Consult your sound module s documentation to see what RPNs it responds to NRPN Click NRPN to include non registered parameter c...

Page 1724: ...all check boxes in the dialog box See Also Searching for events on page 781 Event Manager dialog You can open the Event Manager dialog box in two ways Right click in the Event List view and choose Ev...

Page 1725: ...the following embedded information Description A brief description of the contents of the Broadcast wave Limited to 256 characters Originator The author of the Broadcast wave This information is taken...

Page 1726: ...as an MP3 mp3 file MP3 files are the smallest and fastest files to upload to SoundCloud however they will not be as high quality as Wave or FLAC files Various surround formats If you have installed an...

Page 1727: ...verted from a higher bit resolution to a lower resolution it is necessary to apply dither to avoid introducing undesirable quantization noise or harmonic distortion into the signal You can select from...

Page 1728: ...ngine If you don t usually run SONAR in 64 bit mode in order to save CPU you can turn 64 bit mode on when you export audio by enabling this check box Remember to turn it off after you export your audi...

Page 1729: ...st Macro needs your input Patch Voice Config Number When you click the Receive button in the Sysx view and choose to receive sysx data from a synthesizer your system has trouble identifying the Dump R...

Page 1730: ...the Level field or by clicking and dragging up or down Edit System Exclusive Bytes dialog When you select a bank in the Sysx view and click the Edit button the Edit System Exclusive Bytes dialog box a...

Page 1731: ...Preferences Customization Colors This dialog box has the following fields Save in Select the directory in which you want SONAR to store the file that you want to export file and folder window This la...

Page 1732: ...eld lists the MIDI Groove clip characteristics that the clip contains such as Beats in Clip Follow Project Pitch and Reference Note For more information see Exporting and importing MIDI Groove clips o...

Page 1733: ...Include Archived Tracks Check this option to export tracks in the project that are currently archived Mix Each Groove Clip as a Separate Clip Check this option to save each Groove clip as a separate c...

Page 1734: ...his is a destructive edit it permanent alters the data that you apply it to To apply a nondestructive volume change to selected data see Creating and editing automation envelopes on page 1119 The Proc...

Page 1735: ...e gaps is accomplished automatically by rolling out the first clip s right edge and the second clip s left edge to create a crossfade XFade The duration of the automatic crossfade Max Gap This value s...

Page 1736: ...ds describing the song here for future reference Project Description Text Box Project description or other information See also File Statistics dialog on page 1736 File Statistics dialog The File Stat...

Page 1737: ...l Click this button to skip all missing audio files When you skip all missing audio files you project opens without those pieces of missing audio Search Click this button to begin a search of all avai...

Page 1738: ...ing Choose how you want to change the selection to change its duration Usually you change the Tempo Map this method preserves the note durations and bar lines of your project Choose from these options...

Page 1739: ...6 Folder Properties dialog Right clicking a the title bar of a track folder and choosing Folder Options opens the Folder Properties dialog which has the following fields Name This field which you can...

Page 1740: ...frozen track Checking this option will create separate clips from a single clip that has areas of silence in it Freeze Tail Duration n seconds This value allows for a reverb or delay tail the reverber...

Page 1741: ...if you want to reverse the phase of the new left channel mix New Right Channel From Left slider Drag the From Left slider to determine the amount of the original left channel that will be mixed to the...

Page 1742: ...k OK the Now time becomes the time in the To Time field When you enter a time in MBT format the beat and tick value are optional You can use a colon period space or vertical bar to separate the parts...

Page 1743: ...t from the list Groove File Use this field to choose what groove file you want to choose a groove pattern from Groove files have the extension GRV Groove Pattern Use this field to choose the pattern y...

Page 1744: ...s the durations of the selected notes to the groove s durations Velocity Drag the slider in this field to set how closely SONAR moves the velocities of the selected notes to the groove s velocities De...

Page 1745: ...og box lets you specify the relations of controls in a group and edit the name and color of the group that is listed in the Group field The dialog box has the following fields Group The name of the gr...

Page 1746: ...t Value number field End Value number field This field is not active unless the group is a custom group Edit the End Value of the control that is highlighted in the Name column by typing a new number...

Page 1747: ...Import Audio dialog The File Import Audio command opens the Import Audio dialog box Use this command to import any of the following kinds of audio into your project Wave extension wav Sony Wave64 exte...

Page 1748: ...on which is the default This option imports audio at whatever bit depth the imported audio is currently using Copy Audio to Project Folder check box If you check this option SONAR makes a new copy of...

Page 1749: ...lable Click the arrow next to the drive letter to refresh the Source Drive This process will verify if an Audio CD has been inserted into the drive Once the Audio CD has been verified the available tr...

Page 1750: ...pen the Import Instruments Definition dialog box go to Edit Preferences MIDI Instruments click the Define button to open the Define Instruments and Names dialog box then click the Import button The Im...

Page 1751: ...I file Import Video File dialog SONAR s Import Video File dialog box lets you include an AVI MPEG or QuickTime video in your project This video is shown in real time as your project plays The Video vi...

Page 1752: ...n the File name field Files of Type Use this field to select what type of video files to display Note If your system has a basic Windows installation with DirectShow installed you may not be able to i...

Page 1753: ...ommand lets you change controller event values smoothly over a specified time range Choose from the following options Insert this field let you choose what kind of data to insert Pitch Wheel Controlle...

Page 1754: ...re Device name of the ReWire device you want to insert command or click the Insert button in the Synth Rack view and choose a synth from the pop up menu This dialog box inserts the soft synth whose na...

Page 1755: ...play Automation On Automation track drop down menu By default the automation data for a synth appears on the synth track associated with that synth Use this menu to choose any other track to display t...

Page 1756: ...o slide over to make room for the new amount of time At Time The time at which you want to insert time seconds ticks or frames Insert Set the number of one of the following to insert at the At Time Me...

Page 1757: ...t the output channel that you want the new MIDI tracks to use Find Change and Event Filter dialog The Process Find Change command is a search and replace command that uses two dialog boxes The command...

Page 1758: ...including Start Times Choose this option if you want the start times of the selected events to shift by a percentage of their distance from the beginning of the selection For example if a note starts...

Page 1759: ...or select the filename of the pattern that you want to load Files of type The Load Pattern dialog box can only load the Step Sequencer Patterns file type which has the extension ssp Lyric Properties d...

Page 1760: ...27 through 127 Use the keys to increase or decrease the value Vel Multiplies the velocity of the note by the percentage you enter Values range from 10 to 200 Map Manager button Opens the Map Manager d...

Page 1761: ...ating and using markers on page 372 Markers dialog This dialog box lets you choose any marker Closing the box and the associated Go dialog box moves the Now time to the specified marker See also Creat...

Page 1762: ...elect the key signature For step by step instructions see Setting the Meter and Key signatures on page 270 Microsoft Media Format Encode Options dialog You can create settings and a description for yo...

Page 1763: ...he controller you want to edit Channel Use this field to choose the MIDI channel that you want the envelope to send data on For more information see Creating and editing automation envelopes on page 1...

Page 1764: ...allow you to choose what MIDI channels you want this particular track to respond to on the port listed in the Input Port field All Omni This button turns all of the 1 16 check boxes on or off with on...

Page 1765: ...00 bit per second providing extremely high quality compression Selection of 320000 bits per second or lower requires that your project was created using at least a 32 kHz sampling rate If your project...

Page 1766: ...der provides the user with the ability to specify how much time the encoder should spend analyzing the file When the slider is positioned to the far left the encoder will spend more time analyzing and...

Page 1767: ...ter a file name for your project This option is only available if you have Use Per Project Audio Folders selected in Edit Preferences File Audio Data Location Select a folder in which your project fil...

Page 1768: ...malize dialog box appears when you use the Process Apply Effect Normalize command This dialog box has the following controls Presets window Use this window and the Save and Delete buttons that are nex...

Page 1769: ...43 Note Properties dialog In the Staff view or Piano Roll view when you right click on a note the Note Properties dialog box appears This dialog box lets you edit the note s time pitch velocity and ot...

Page 1770: ...e Groove File field in the Groove Quantize dialog box The Open Groove File dialog box has the following fields Look In This field lists the name of the folder whose contents are displayed in the windo...

Page 1771: ...py data from more than one track at a time Checking this check box causes SONAR to paste multiple tracks data into a single track Linked Repetitions Checking the Link Repetitions check box causes all...

Page 1772: ...d data with these two options Paste as New Clips Check this option if you want the new data to become separate discrete clips Paste into Existing Clips Check this option if you want to include the new...

Page 1773: ...s the whole list but doesn t actually delete the search text Name column This column lists all the patch names of all the Instruments you have assigned to MIDI outputs Clicking the heading of the Name...

Page 1774: ...stain pedal mark that you clicked Time Use this field to change the location of your pedal mark Channel Use this field to set the MIDI channel of your pedal mark Value Enter 0 to turn off the pedal no...

Page 1775: ...that you want to appear on the staff when particular MIDI pitches play Default This tiny window displays the default note the note that all unbound MIDI notes display as Recommended for window When y...

Page 1776: ...Pick Track s dialog Choosing the Pick Tracks command in the Piano Roll Event List Staff or Lyrics views opens the Pick Tracks dialog box which allows you to choose which tracks data you want to displ...

Page 1777: ...nized into the following categories MIDI Devices on page 1796 MIDI Instruments on page 1798 MIDI Control Surfaces on page 1800 MIDI Playback and Recording on page 1803 MIDI Drum Map Manager Advanced o...

Page 1778: ...board Shortcuts Advanced on page 1862 Customization Audio Meter Advanced on page 1865 Each section is organized into different basic and advanced subcategories To only see basic preferences click the...

Page 1779: ...age 1805 File Folder Locations on page 1807 File Audio Data on page 1810 File VST Settings on page 1812 File Initialization File Advanced on page 1816 File Advanced Advanced on page 1818 Project Recor...

Page 1780: ...by clicking the name in the first column and typing in your preferred name or friendly name for the driver The Devices section contains the following settings Input Drivers Input drivers are used for...

Page 1781: ...udio dialog box Each available audio port exposes Left Right and Stereo channels For more information see Improving audio performance on page 1293 See also Preferences dialog on page 1777 Audio Driver...

Page 1782: ...contains the following settings Playback Timing Master If you re using multiple wave drivers for playback this list lets you specify which audio device should control the playback timing Record Timing...

Page 1783: ...gnal is center panned 3dB center sin cos taper constant power This choice causes no boost in a signal that s panned hard left or right and 3dB dip in output level in either channel when the signal is...

Page 1784: ...ne of the following sampling rates 11025 Hz 22050 Hz 44100 Hz 48000 Hz 88200 96000 176400 and 192000 Hz The default used by SONAR is 44100 Hz the same rate as audio CDs However you may choose a higher...

Page 1785: ...ntains the latest DMA settings for commonly used sound cards The Wave Profiler utility runs automatically the first time you run SONAR You need not run it again unless you install a new sound card or...

Page 1786: ...rmine which driver your hardware uses WDM KS drivers are the latest available and typically have very low latency MME is an older driver type and has higher latencies ASIO drivers also offer lower lat...

Page 1787: ...Disadvantages higher perceived loudness than Pow r dither Pow r 1 Noise shaped dither Advantages less CPU intensive than Pow r types 2 and 3 lower perceived loudness than Rectangular or Triangular Di...

Page 1788: ...clip SONAR lets you audition that edit for N seconds the value you fill into this field Record Pre allocate File seconds When this option is set to a value greater than zero SONAR will pre allocate t...

Page 1789: ...The Audio Profiles section shows the sound card buffer settings that the Wave Profiler has come up with Show Profile for This list shows the name of the sound card driver that the displayed settings...

Page 1790: ...These fields list the buffer characteristics for each sound card that the Wave Device profiler has come up with In general it is better not to change these settings without consulting SONAR technical...

Page 1791: ...s are stored in a file named Aud ini SONAR provides a convenient way to edit reload and reset the audio configuration settings The Configuration File section contains the following options Edit Config...

Page 1792: ...a brief description of the property is shown below the list You will typically only need to make any changes if you are instructed to do so by Cakewalk Technical Support See also AUD INI on page 1416...

Page 1793: ...ynchronization SONAR gives you two choices for synchronizing your audio tracks to SMPTE or MIDI Time Code Trigger and Freewheel With this option audio playback starts or triggers at the exact timecode...

Page 1794: ...start playback Switch the clock to Audio from SMPTE or Sync and start playback This cancels SMPTE or Sync mode Maintain current clock source and wait for timecode Do not switch the clock Stay in SMPTE...

Page 1795: ...ASIO mode enter 0 in the Manual Offset field and leave the Reported Input Latency check box checked this check box only appears in ASIO mode This will line up audio in most cases If you think you can...

Page 1796: ...devices can successfully send MIDI data into your Cakewalk application You can make up your own friendly names for the MIDI input and output devices listed in this dialog box The friendly name for a M...

Page 1797: ...to Top button Click this button to move a checked device farther up in the list directly behind any other checked devices If you want a particular device to become MIDI output 1 deselect all other de...

Page 1798: ...e names and controller names that you see during your SONAR session Suppose that you have a Roland GS compatible synthesizer attached to MIDI output 1 By assigning all 16 channels of MIDI output 1 to...

Page 1799: ...ceiving on channels 11 through 16 In this case you d use three different instrument definitions for your one and only MIDI output The Instruments section contains the following settings Output Channel...

Page 1800: ...ol Surfaces Figure 502 The Control Surfaces section The Control Surfaces section allows you to enable as many control surfaces as you want to control with SONAR and configure the control surfaces inte...

Page 1801: ...age 1711 which lets you to add another control surface to the list Delete Button Clicking this button deletes and disables a selected control surface from the list You can re enable it by clicking the...

Page 1802: ...xternal devices on page 1323 Controller Surface Settings dialog on page 1711 Control Strips Visible in SONAR allows control surfaces to display all channel strips in a project or only the channel stri...

Page 1803: ...size and which MIDI events should be recorded The Playback and Recording section contains the following settings Record Use the fields in this section to choose what MIDI events you want to record Cho...

Page 1804: ...h you should also check the buffer options in Edit Preferences Audio Sync and Caching If you are using MIDI effects you may want to try smaller values for example 100 milliseconds Doing so means that...

Page 1805: ...ntrol Surfaces on page 1800 MIDI Drum Map Manager Advanced on page 1805 MIDI Drum Map Manager Advanced Figure 504 The Drum Map Manager section The Drum Map Manager section lets you create and save dru...

Page 1806: ...he MIDI note value that plays on the destination sampler Name The user defined name for the row Channel The channel on which the note is transmitted There is an option to follow the track s Channel se...

Page 1807: ...hurt anything as long as you remember where you put things Note The only folder location you have to be careful with is the Global Audio folder listed in Edit Preferences File Audio Data which SONAR c...

Page 1808: ...riety of other track related parameters The default directory is C Cakewalk Content SONAR X3 Producer or Studio Track Templates Track Icons These files store standard or customized icons The default d...

Page 1809: ...more information about drum maps see Drum maps and the Drum Grid pane on page 807 Plug in Layouts You can create menu layouts for your plug ins by using the Plug in Manager Utilities SONAR Plug in Ma...

Page 1810: ...ding rendering and importing audio data The Audio Data section contains the following settings All Projects Global Audio Folder The Global Audio Folder is where audio files are stored for all projects...

Page 1811: ...cue markers that may exist in wave files Many field recorders such as the Edirol R 4 can add cue markers to the wave files that they record If you import these wave files into SONAR the markers appea...

Page 1812: ...ers that are scanned for VST plug ins Scanning a VST plug in means adapting the plug in s file format so that the plug in works in SONAR To add folders remove folders or set defaults for the listed fo...

Page 1813: ...n correctly to be rescanned during the next scan Rescan existing plug ins Checking this option causes plug in s that did scan correctly to be rescanned during the next scan This is a way to implement...

Page 1814: ...ge servers select the server that you want plug ins to be loaded into After a specific server is selected all plug ins subsequently loaded will be loaded into that specific server bypassing SONAR s au...

Page 1815: ...lization File Advanced on page 1816 File Advanced Advanced on page 1818 Note Server management is common for all loaded projects If you have multiple projects open simultaneously you can potentially o...

Page 1816: ...kewalk ini file which allows you to store information about your preferences and configuration Note There are two other initialization files stored in the SONAR program folder TTSseq ini Aud ini You c...

Page 1817: ...list See also Initialization files on page 1402 Initialization file format on page 1403 Variables in the MIDI Input Devices section on page 1415 Variables in the MIDI Output Devices section on page 14...

Page 1818: ...anced Figure 509 The Advanced File section The Advanced section lets you specify auto save file versioning and other project file settings The Advanced section contains the following settings Auto sav...

Page 1819: ...roject SONAR will close any project that is already open and ask if you want to save any changes Ask before Sending System Exclusive When Opening Projects If you check this option and then open a proj...

Page 1820: ...hat already contain other clips If you use loop recording you can also specify whether to record takes in sequential tracks or stacked in a single track The Record section contains the following setti...

Page 1821: ...nly For Inputs In Project option instructs SONAR to only open hardware input ports that are currently active in the project i e assigned to a track Auto Punch Choose this option to punch record and th...

Page 1822: ...ake lanes when this option is enabled Multi track grouping You can specify how clips should be grouped when recording multiple tracks simultaneously The following options are available Group all clips...

Page 1823: ...llowing options Transmit MMC Choosing this option causes SONAR to send standard MMC commands such as start stop rewind etc to any MMC devices that are connected to your computer Timecode Master s Unit...

Page 1824: ...ry time it restarts even in the middle of a song If you have a drum machine slaved to SONAR and the drum machine is playing looped patterns you probably want it to start at the beginning of its loop w...

Page 1825: ...n page 1270 Synchronizing your gear on page 1265 See also Preferences dialog on page 1777 Project Record on page 1820 Project Metronome on page 1826 Project AudioSnap on page 1828 Project Clock Advanc...

Page 1826: ...etronome section contains the following settings General Record count In Specifies the number of count in measures or beats Measures Choosing this option sets the Count In units to measures Beats Choo...

Page 1827: ...you want to use for the audio metronome MIDI Metronome Use MIDI Note Choosing this option causes the metronome to sound by playing a MIDI note First Beat Choose a Key a note and a Velocity for the fir...

Page 1828: ...us AudioSnap settings The AudioSnap section contains the following settings Quantize Pool Transient Window ms When you double click a marker not only does the marker become selected but all markers to...

Page 1829: ...ion Radius Mix Advanced Settings Radius Pitch coherence Pitch coherence preserves naturalness of timbre for pitched solo voices such as human speech saxophone or vocals The default value for this cont...

Page 1830: ...ter note The Clock section has the following sections Source This section lets you choose what device SONAR uses as a timing source and has the following options Internal Choose this option to use the...

Page 1831: ...PTE MTC Offset This section allows you to start SONAR playing after it starts receiving time code by an amount you choose in this field of the dialog box Choose an amount in hours minutes seconds fram...

Page 1832: ...e surround format speaker assignments bass management and downmixing settings The Surround section contains the following settings Presets You can save your current settings as a preset This allows yo...

Page 1833: ...S Surround SMPTE ITU Surround Media LCRS LFE 5 1 Standard 3 2 5 1 Film Alternative 5 1 Music Alternative 5 1 SMPTE ITU 6 0 Hexagon 6 0 Film Alternative 6 0 Music Alternative 6 1 Film Alternative 6 1 M...

Page 1834: ...ibutes a center panned image into left and right for instance 4 5 dB Since 3 dB and 6 dB represent the extreme limits of power addition on the one hand or of phase dependent vector addition on the oth...

Page 1835: ...ront channels too much in mixdown situations LFE Level Choose INF or 12 dB For more information see Surround Mixing Producer and Studio only on page 975 See also Preferences dialog on page 1777 Projec...

Page 1836: ...are small text names or explanations that appear when you hold the mouse over a tool Show MIDI Activity on Windows Taskbar Check this option to display the MIDI Input Output Activity icon on the Wind...

Page 1837: ...g in windows and certain view windows to work in the window behind the current window You use the X Ray Windows feature by pressing a hotkey while the mouse is over an X Rayable window In addition to...

Page 1838: ...esets You can create lots of different color schemes and save each one as a preset After you create a color scheme that you like type a name for it in the Presets window and then click the floppy disk...

Page 1839: ...to import a color arrangement or a group of presets Export Colors button This button opens the Export Color Set dialog box which allows you to export a color arrangement or a group of presets Choose...

Page 1840: ...p colors The Show strip colors option allows you to tint track and bus strips in the Track view Console view and Inspector when you assign a custom track color Disable this option if you only want to...

Page 1841: ...lor of selected events and tempo changes in the Tempo view Drawing Colors used to show your drawing in the Piano Roll and Tempo views Erasing Color used to show your erasing in the Tempo views Lasso s...

Page 1842: ...ip Text Color of text label on a folder clip Folder Line Color of the line on the left side of the Track pane connecting a track folder to the tracks that are contained in the folder Record Preview Cl...

Page 1843: ...ackground color of all audio tracks that end in the number 3 3 13 23 etc Audio Tracks 4 14 24 Foreground Foreground color of all audio tracks that end in the number 4 4 14 24 etc Audio Tracks 4 14 24...

Page 1844: ...that end in the number 1 1 11 21 etc MIDI Tracks 2 12 22 Foreground Foreground color of all MIDI tracks that end in the number 2 2 12 22 etc MIDI Tracks 2 12 22 Background Background color of all MIDI...

Page 1845: ...number 0 10 20 30 etc MIDI Tracks 10 20 30 Background Background color of all MIDI tracks that end in the number 0 10 20 30 etc Track View Active Outline Color of the border around the active pane in...

Page 1846: ...ck View Header Track Number Color of the track number in the track header Track View Audio Track Name Background Color of background of audio track names in Track view Track View Audio Track Name Text...

Page 1847: ...rol surface listed in Edit Preferences MIDI Control Surfaces Third controller surface color choice Highlight color of any SONAR controls being controlled by the third control surface listed in Edit Pr...

Page 1848: ...pe Sets the color of this parameter s automation envelope Track View Bus Send 4 12 Level Control Envelope Sets the color of this parameter s automation envelope Track View Bus Send Level 5 13 Control...

Page 1849: ...his parameter s automation envelope Bus Send Angle 8 16 Envelope Sets the color of this parameter s automation envelope Bus Send Focus1 9 Envelope Sets the color of this parameter s automation envelop...

Page 1850: ...Envelope Sets the color of this parameter s automation envelope Bus Send Front Rear Balance 2 10 Envelope Sets the color of this parameter s automation envelope Bus Send Front Rear Balance 3 11 Envelo...

Page 1851: ...ent entered into the Piano Roll or Inline Piano Roll view Continuous Event 3 The color of the third type of continuous event entered into the Piano Roll or Inline Piano Roll view Continuous Event 4 Th...

Page 1852: ...h track names in Console view Console Synth Track Name Text Color of text of Synth track names in Console view Console Instrument Track Name Text Color of text of Instrument track names in Console vie...

Page 1853: ...also Preferences dialog on page 1777 Customization Display on page 1836 Customization Nudge on page 1854 Customization Snap to Grid on page 1856 Customization Editing Advanced on page 1858 Customizati...

Page 1854: ...1854 Preferences dialog Customization Nudge Figure 518 The Nudge section...

Page 1855: ...lay on page 1836 Customization Snap to Grid on page 1856 Customization Editing Advanced on page 1858 Customization Keyboard Shortcuts Advanced on page 1862 Customization Audio Meter Advanced on page 1...

Page 1856: ...1856 Preferences dialog Customization Snap to Grid Figure 519 The Snap to Grid section...

Page 1857: ...together Landmarks Snap to the selected landmarks when the Events button is enabled in the Control Bar s Snap module Markers Snap to any marker Now Time Snap to the current Now Time Clips Snap to the...

Page 1858: ...zation Editing Advanced Figure 520 The Editing section The Editing section lets you specify drag drop behavior auto crossfade settings MIDI editing options and Microscope settings The Editing section...

Page 1859: ...the new data fills the space up to the next measure Ask This Every Time Choosing this option causes the Editing section to appear every time you drag some data Clips Choose from these clip editing op...

Page 1860: ...in slowly Default Crossfade Curves Fast Out Linear In This command sets as default a crossfade in which the first clip fades out fast and the second clip fades in at a steady rate Default Crossfade C...

Page 1861: ...tion to these options there are some other parameters that can be configured by adding the following INI variables to the WinCake section of Cakewalk ini see Cakewalk ini on page 1403 See also Prefere...

Page 1862: ...ore quickly and efficiently The Keyboard Shortcuts section lets you specify which keys and key combinations to use for specific SONAR commands The Keyboard Shortcuts section contains the following set...

Page 1863: ...or combination is already bound to a global command by default the name of the key appears in bold text and the command it is bound to appears at the bottom of the dialog box under Assigned to Bindin...

Page 1864: ...application s Export Click this button to export your currently loaded set of key bindings so that you can reload them if you want See Also Key bindings on page 1167 See also Preferences dialog on pa...

Page 1865: ...Advanced Figure 522 The Audio Meter section SONAR s meters are extremely adjustable The Audio Meter section lets you specify the appearance and behavior of audio meters These settings control meter ba...

Page 1866: ...e in signal Fall msecec The time it takes for an RMS meter to register a 20dB fall in signal Peak Rise msecec The time it takes for a Peak meter to register a 20dB rise in signal Fall msecec The time...

Page 1867: ...the number of copies you want to print for the above page range Collate Prints copies in page number order instead of separated multiple copies of each page Properties button Opens a dialog box that...

Page 1868: ...The Zoom Out button zooms out the page display in the Print Preview dialog box Close The Close button closes the Print Preview dialog box Print Setup dialog The Print Setup dialog box specifies the pa...

Page 1869: ...y in which the project s audio files are stored This is the same as the next field unless you re using per project audio folders Global Audio Folder The default directory in which project audio files...

Page 1870: ...s is the standard quantizing command that adjusts the start time and duration of selected notes so that they line up with a fixed size grid Process Groove Quantize This command extracts a grid or groo...

Page 1871: ...100 percent quantizes every note See Window on page 769 Offset This value moves the quantization grid forward or backward in the track away from the beat boundaries See Offset on page 767 Auto XFade A...

Page 1872: ...on is centered at the cursor or the Now Time in horizontal Zoom and select whether the Zoom out action is centered at the cursor or the Active Track in vertical Zoom Simultaneous Horizontal and Vertic...

Page 1873: ...you can designate a specific finger span and lowest fret which causes the TAB of a selected region to be displayed within this range This usually creates a more compact fingering system The Regenerat...

Page 1874: ...nes the lowest fret the TAB can use for the selected notes 1st Channel The value in this field determines the first MIDI channel of six consecutive channels that SONAR assigns notes to depending on wh...

Page 1875: ...m one of its faders or controls and you set a fader in SONAR to respond to Controller 7 the selected fader in SONAR will move up or down as the value of Controller 7 that your MIDI controller sends ri...

Page 1876: ...pens the Remove DC Options dialog box which allows you to remove audio artifacts cause by electrical mismatches between recording hardware and input instruments or devices This dialog box has the foll...

Page 1877: ...gate officially closes when loudness falls below this level although it can stay open later because of the Release Time see Release Time Attack Time ms The value in this field is the interval of time...

Page 1878: ...NAR to use that folder for its audio storage and retrieval as well 2 Automatically import any custom Instrument Definitions you used in your previous Cakewalk version 3 Automatically import other cust...

Page 1879: ...ct the type of file you want to save your project as If you are saving a project you have the following options Normal Saving as type Normal saves your MIDI data all project settings and references to...

Page 1880: ...led Audio Data The Audio Data folder is created in the folder where you save your project For example if you save your project to the following folder C My Project Your project s audio is saved in the...

Page 1881: ...r pattern is always saved as a Step Sequencer Patterns file type which has the extension ssp Scale Defaults dialog In the Track Inspector click the Scale control in the Snap to Scale section and choos...

Page 1882: ...This button opens a dialog box that offers to restore factory supplied scales to their default values New button Click this button to create a new scale When you click this button the Scale Manager di...

Page 1883: ...rcentages If you use percentages enter a number between 0 and the approximate percentage that would create a velocity of 127 when multiplied by the existing velocity of the last event SONAR rounds off...

Page 1884: ...for Steps dialog by right clicking to the right of any row in the Step Sequencer and selecting Set Default Velocities for Steps from the pop up menu From the Set Default Velocities for Steps dialog b...

Page 1885: ...controller data but not markers Markers If you select any locked markers SONAR asks whether you want to slide them too By Enter a number in the By field to control how many units your selected data m...

Page 1886: ...down menu Click the arrow at the end of the drop down menu to display a list of projects you opened recently Choose the one you want to open and click the button it has a folder icon on it to open it...

Page 1887: ...der field Muted Choosing this option causes SONAR to put the muted tracks either first or last depending on whether you choose Ascending or Descending in the Order field Archived Choosing this option...

Page 1888: ...ip s starting at the location you choose in the Starting at Measure field and again at every interval of measures that you choose in the And Again Every N Measures field Split at Each Marker Time Choo...

Page 1889: ...ids check box What fonts you want for any text track names or numbers in the Staff view Set Font pop up menu Staff properties clef split point In the Staff properties section of the Staff View Layout...

Page 1890: ...ays uses the Sound on Sound record mode regardless of the current record mode The Step Record dialog box has an extra set of controls called Advanced mode that only appear when you click the Adv butto...

Page 1891: ...ertion point You can enter a positive after the insertion point or negative value before the insertion point Insertion Point Field This field lists the current insertion point in MBT format Scroll Bar...

Page 1892: ...in the SurroundBridge Plugin Linker When you select a stereo preset the settings apply to each instance of the plug in If you save a surround preset it saves the settings in each instance as well as...

Page 1893: ...e on the neck these notes should be played When Fixed is selected the Finger span and Lowest fret fields are used together to define the box where the notes are displayed The Finger span parameter det...

Page 1894: ...modify tablature for selected parts of a track select part of a track and use the Regenerate TAB on page 1210 command See Also The Fretboard on page 1183 Quick TAB on page 1210 Staff pane layout on p...

Page 1895: ...mn This column lists the currently selected input sources for each track You can change inputs by selecting one or more tracks don t mix audio and MIDI tracks and clicking either the Audio Inputs menu...

Page 1896: ...that is listed on the button You can check or uncheck all selected modules by clicking one of the selected modules See also To choose the tracks that are displayed using the Track Manager on page 883...

Page 1897: ...a single octave in either direction 12 to 12 and you cannot transpose audio when you are using diatonic transposition The Transpose dialog box contains the following fields Amount The number in this f...

Page 1898: ...imum Undo Steps field To revert to an earlier version of a project highlight the entry in the History list that represents the point to which you d like to return and click OK SONAR performs the neces...

Page 1899: ...is dialog box only appears if you have the Use per project audio folders option selected in Edit Preferences File Audio Data Project Name Enter a file name for your project The default name is the sam...

Page 1900: ...Name Location and Audio Path fields If you deselect this option the project is saved with the same file name to the default directory using the default audio directory The file s new extension is cwp...

Page 1901: ...Type Choose Video for Windows AVI Windows Media Video or QuickTime If you have an external FireWire device connected you can choose AVC Compliant Device or whatever your device is named See Exporting...

Page 1902: ...onds of the video file and starts playing your video file at the 10 second mark in the video Trim out Time If you have blank or unwanted video at the end of your video file enter the time in SMPTE for...

Page 1903: ...n the Preset field for all audio tracks MIDI Strip In this column check off each control that you want to see for the preset that you chose in the Preset field for all MIDI tracks Bus Strip In this co...

Page 1904: ...video which you can t do from this dialog box Copyright Enter any copyright information for the file Description Enter a note about the file Variable Bit Rate VBR encoding makes the quality of the enc...

Page 1905: ...creating a Variable Bit Rate VBS video the file quality will improve some if you tell the encoder to go through your source material twice make two passes at it Windows Media Video WMV profiles SONAR...

Page 1906: ...w and Console view Patch Effect Select the Patch Effect check box if you want to create an effect bus When selected click Choose Effect to choose the desired effect plug in that will be patched in the...

Page 1907: ...the project was saved SONAR s port assignments can change if you load the project on a different hardware configuration or change driver models If there is any discrepancy between the port assignment...

Page 1908: ...n the Matrix view Matrix Options dialog box appears The following options are available Empty cells stop active cells when triggered This option determines how playing cells are affected when triggeri...

Page 1909: ...slider fine tunes the value in the Max Distance From Pool menu A window of 100 percent includes all markers that lie within the Max Distance From Pool value Quantize Strength This slider controls quan...

Page 1910: ...tretching is preferred for more extreme stretching There are numerous other differences between the two features see Working with Groove Clip audio on page 706 and AudioSnap Producer and Studio only o...

Page 1911: ...emitone to B Another example The clip pitch is E The desired clip pitch is D If the Follow Project Pitch option is not checked and a value of 2 is entered in the Pitch semitones field the clip is tran...

Page 1912: ...see AudioSnap Producer and Studio only on page 635 Algorithm Description Default This means the algorithm that is listed in the Online field of the AudioSnap Options dialog box Groove clip This choice...

Page 1913: ...control on the pop up menu This dialog box lets you configure assignable knobs and buttons The Control Properties dialog box contains the following settings Name The name of the assignable control sh...

Page 1914: ...rs Button image Assignable button images Rotary image Assignable knob images Colors section Preset text color Color of preset name Label text color Color of button and knob text labels See Customizing...

Page 1915: ...encoding type within the major file format Here is the master list of subformats supported in SONAR AIFF Apple SGI extension aiff Signed 8 bit PCM Signed 16 bit PCM Signed 24 bit PCM Signed 32 bit PC...

Page 1916: ...2kbs G721 ADPCM 24kbs G723 ADPCM CAF Apple Audio File extension caf Signed 8 bit PCM Signed 16 bit PCM Signed 24 bit PCM Signed 32 bit PCM 32 bit float 64 bit float U Law A Law FLAC FLAC Lossless Audi...

Page 1917: ...w64 Signed 16 bit PCM Signed 24 bit PCM Signed 32 bit PCM Unsigned 8 bit PCM 32 bit float 64 bit float U Law A Law IMA ADPCM Microsoft ADPCM GSM 6 10 WAV Microsoft extension wav Signed 16 bit PCM Sign...

Page 1918: ...w closely SONAR moves the selected notes to the resolution value or grid See Strength on page 768 Swing Use this value to make groups of even eight notes or whatever note you want to enter in the Reso...

Page 1919: ...oose this option SONAR moves any non scale note that you move to the next higher note in the selected scale Adjust to Previous Lower Note If you choose this option SONAR moves any non scale note that...

Page 1920: ...1920 Snap Scale Settings dialog...

Page 1921: ...view on page 1967 Staff view on page 1968 Big Time view on page 2008 Lyrics view on page 1970 Video view on page 2005 Tempo view on page 2006 Meter Key view on page 2008 Markers view on page 2008 SYS...

Page 1922: ...panes by dragging the vertical or horizontal splitter bars that separate them Figure 523 The Track view A Track view menu B Time ruler C Track strips D Track pane E Splitter bar F Clips pane G Clips Y...

Page 1923: ...Show or hide a horizontal line between each track in the Clips pane Display Clip Names Show or hide clip names Display Clip Contents Show or hide a graphical depiction of the audio or MIDI data that...

Page 1924: ...g that the screen will eventually scroll away from the edit location When you are done with the edit and want the Clips pane to scroll again during playback click in the background of the Clips pane t...

Page 1925: ...Instrument tracks Bounce to Track s Combine one or more audio tracks into a submix Clone Track s Copy the selected track s You can choose to include events properties sends and or effects in the copie...

Page 1926: ...at are linked to the selected clip Unlink Open the Unlink Clips dialog on page 1899 Unlink Step Sequencer Clips Unlink the selected step sequencer clips allowing each clip to be edited separately from...

Page 1927: ...omatically follow future tempo changes to SONAR s tempo map Copy MIDI Events Convert the selected Melodyne Region FX clip to MIDI data and copy to the clipboard The data can be pasted to any MIDI or I...

Page 1928: ...ack If a control is selected the selection moves to the same control in the adjacent track or the next track of the same type if the control only applies to a specific track type for example the Patch...

Page 1929: ...age 1101 Bus pane The Bus pane contains all of your project s buses You display the Bus pane by clicking the Show Hide Bus Pane button which is located at the bottom of the Track view You use the buse...

Page 1930: ...so If you hold down the CTRL key while you click the Now time jumps to that spot Figure 525 The Navigator pane A Now Time B Drag node to zoom C Clips You can do the following with the Navigator pane S...

Page 1931: ...ft UI Automation put the access string in the CWACCESS window and make this window visible 4 enable Microsoft UI Automation without enabling the CWACCESS window See also Customizing track bus colors o...

Page 1932: ...note names Time is displayed running left to right with vertical measure and beat boundaries In the Drum Grid pane the drum sounds are mapped according to the current drum map in the Note Map pane Lik...

Page 1933: ...commands Show Notes Show or hide Note events in the Piano Roll view Show Durations Show note durations for drum notes in the Drum pane Show Velocity Show or hide velocity tails in the Piano Roll view...

Page 1934: ...ller pane on page 1936 Track List pane on page 1936 Note Map pane The Note Map pane is where you map notes to specific drum sounds The Note Map pane has the following columns Name A user assigned name...

Page 1935: ...age 1935 Controller pane on page 1936 Track List pane on page 1936 Notes pane In this pane you can add edit and delete notes for a track or tracks You can also edit controllers in this pane if you cho...

Page 1936: ...List pane on page 1936 Track List pane To show or hide the Track List pane click the Piano Roll view View menu and choose Show Hide Track Pane The Track List pane is home to a list of all tracks curr...

Page 1937: ...age 1947 Using the Step Sequencer with drum maps on page 1963 Step sequencer interface The Step Sequencer interface consists of five sections Menu Use the menu to load save and clear patterns and spec...

Page 1938: ...Step sequencer interface A Menu B Rows C Toolbar D Controllers pane controls on the left side E Notes pane See Step Sequencer view menu on page 1939 Toolbar on page 1940 Rows on page 1942 Notes pane o...

Page 1939: ...s command lets you specify a level of compression or expansion for a pitch The value range is 0 10 2 00 and the default value is 1 00 no compression or expansion A value below 1 00 is compression and...

Page 1940: ...or polyphonic D Play E Step Record F Position indicator The Step Sequencer toolbar consists of the following controls Pattern Length The pattern length is determined by the following settings Beats p...

Page 1941: ...r shows the current measure and beat position in the step sequencer See Step Sequencer view menu on page 1939 Rows on page 1942 Notes pane on page 1945 Controllers pane on page 1946 Step sequencer int...

Page 1942: ...rs and select the row or rows you want to edit in the Controllers pane If multiple rows are selected the Controllers pane is displayed below the top most selected row The Controllers pane is hidden if...

Page 1943: ...flam is a quiet grace note that is added to the beginning of a louder primary note resulting in a fuller sounding note when played almost simultaneously The value range is 50 to 50 With a value of 50...

Page 1944: ...omatically enable notes every n steps on page 1953 See Working with rows on page 1950 Step Sequencer view menu on page 1939 Toolbar on page 1940 Notes pane on page 1945 Controllers pane on page 1946 S...

Page 1945: ...t editing steps see Working with steps on page 1952 Beat Counter The Beat Counter is displayed above the step grid and each light in the counter represents a step Each beat is displayed in an alternat...

Page 1946: ...nts see Working with Controller events on page 1959 and Adding and editing controllers in the Piano Roll on page 743 A Click a row s Select button to show the Controllers pane below the row B Select t...

Page 1947: ...move focus to the steps pane CTRL RIGHT ARROW When focus is either on the steps or strips pane move focus to the toolbar CTRL UP ARROW When focus is on the toolbar move focus to the strips pane CTRL...

Page 1948: ...65 Keyboard shortcuts on page 1947 Save the current pattern CTRL ALT S Enable disable MIDI step recording ALT R Go to previous step when step recording COMMA Go to next step when step recording PERIOD...

Page 1949: ...o MIDI clips are selected 2 Do one of the following Select Views Step Sequencer Press ALT 4 The Step Sequencer window appears See Working with rows on page 1950 Working with steps on page 1952 Working...

Page 1950: ...ete so it has focus 2 Do one of the following Click the Delete Row button Press the DELETE key To reorder a row 1 Click the drag handle for the row that you want to reorder and keep the mouse button p...

Page 1951: ...e Controllers pane is displayed below the selected row If multiple rows are selected the Controllers pane is displayed below the top most selected row If no rows are selected the Controllers pane is h...

Page 1952: ...down by one row on page 1955 To clear all steps on page 1955 To merge unmerge notes on page 1955 To edit a note s velocity on page 1955 To specify the default velocity value for new notes on page 1956...

Page 1953: ...Options menu and select Trigger Note on Click The Trigger Note on Click option is disabled by default To automatically enable notes every n steps You can quickly enable notes every 2 3 4 5 or 6 steps...

Page 1954: ...row 1 Right click to the right of the row that contains the notes you want to cut copy and select Cut Row Steps or Copy Row Steps from the pop up menu The events are placed on the Clipboard 2 Right cl...

Page 1955: ...button pressed then drag across all other notes you want to merge Unmerge adjacent notes Hold down the CTRL key right click the first note you want to unmerge and keep the mouse button pressed then dr...

Page 1956: ...nge the default velocity value for new notes 1 Click the Step Sequencer view Options menu and select Set default velocity for steps The Set Default Velocity for Steps dialog box appears 2 Specify the...

Page 1957: ...d that a note will play The value range is 1 seldom to 100 always To step record notes from a MIDI device In addition to entering note events with the mouse you can also use a MIDI input device to ent...

Page 1958: ...Step Sequencer toolbar and select Use Fixed Default Velocity for Step Recording from the pop up menu For more information about configuring the default velocity value see To specify the default veloci...

Page 1959: ...choose Control if you want to edit volume Value This field is unavailable if you choose Wheel or ChanAft in the Type field If you choose Control RPN or NRPN in the Type field choose which Control RPN...

Page 1960: ...e type of controller you want to add for example choose Control if you want to edit volume Value This field is unavailable if you choose Wheel or ChanAft in the Type field If you choose Control RPN or...

Page 1961: ...brand new pattern on page 1961 To edit an existing pattern on page 1962 To save a pattern on page 1962 To load a pattern on page 1962 To preview a pattern on page 1963 To step record a pattern on page...

Page 1962: ...menu click Preferences and then click File Folder Locations 2 Specify the folder location for Step Sequences To load a pattern Do one of the following Click the Step Sequencer view Pattern menu and se...

Page 1963: ...ps on page 1965 Using the Step Sequencer with drum maps By default all rows in a Step Sequencer clip are assigned to the track s output port which could be a hardware MIDI port a software instrument o...

Page 1964: ...ed For more information see The Map Properties dialog on page 811 Clicking on another row in the Step Sequencer window will update the Map Properties to display information for the new row See Using d...

Page 1965: ...e events instead of quantizing them to the nearest step select Preserve original timing using step offsets The notes will be adjusted to fit the steps and per step timing offsets will be created so th...

Page 1966: ...ext menu 2 Select Unlink Step Sequencer Clips from the context menu point the mouse over the bottom of the context menu in order to show any hidden commands The clip is now unlinked from the other cli...

Page 1967: ...kind of event with the exception of Shape events which can only be deleted Events are displayed in a list format You can insert delete or modify any kind of event including notes pitch wheel data vel...

Page 1968: ...t make it easy for you to compose edit and print music You can choose from a wide variety of clefs to display your music see To change the Staff pane layout on page 1183 For guitar players who are new...

Page 1969: ...he next note useful for displaying recorded MIDI notes but not for entering notes with the Draw tool Tracks Menu The Tracks menu contains the following commands Pick Tracks Open the Pick Tracks dialog...

Page 1970: ...marks on page 1203 Adding hairpin symbols on page 1205 The Fretboard on page 1183 Tablature on page 1208 Working with lyrics on page 1224 Beaming of rests on page 1195 Setting up a percussion staff o...

Page 1971: ...he Console view is docked in the MultiDock below the Track view This allows you to simultaneously arrange in the Track view and mix in the Console view Figure 530 The Console view A Console view menu...

Page 1972: ...see Console view menu on page 1993 and To show hide specific tracks buses and mains on page 1996 Track Bus and Mains panes The Console view has three separate panes the left most pane contains track...

Page 1973: ...ps See Channel strips on page 1974 Modules on page 1987 Console view menu on page 1993 Audio track controls on page 1981 MIDI track controls on page 1982 Instrument track controls on page 1983 Bus con...

Page 1974: ...xternal MIDI devices or software instruments For details see MIDI track controls on page 1982 Instrument track Use to control software instruments For details see Instrument track controls on page 198...

Page 1975: ...d in a channel strip vary according to the channel strip type To show hide a channel strip type Click the Strips menu in the Console view and choose the desired channel strip type Figure 533 Console v...

Page 1976: ...ack ranges from 127 to 127 x x Input pan Sets the pan of the audio data sent to the bus Note The Input Pan control is not visible in narrow channel strips x ProChannel Producer only ProChannel Produce...

Page 1977: ...e signal to the bus prior to the track s volume fader post means the Send signal goes to the bus after the volume fader x x x Send destination Displays name of bus that the Send is sending data to x x...

Page 1978: ...automation writing Note The Write Automation control is not visible in narrow channel strips x x x x Mute Mute unmute the channel strip x x x x x Solo Solo unsolo the channel strip x x x x Arm for re...

Page 1979: ...ns allow you to quickly identify a track s contents by instrument You can assign a new track icon create your own track icons and save an icon as part of a track template x x x x x In Out Input The in...

Page 1980: ...x x WAI The colored WAI bar shows which tracks and or buses are currently being controlled by a controller surface Each controller surface uses a different color For details see The WAI display on pag...

Page 1981: ...sole view A Input gain B ProChannel Producer only C Effects bin D Sends E Mute Solo Arm Input Echo Phase Invert Stereo Interleave Read Automation Write Automation F Pan G Volume H Meter I Track icon J...

Page 1982: ...k controls in the Console view A Velocity trim B Effects bin C Channel Bank Patch D Mute Solo Arm Input Echo Read Automation Write Automation E Pan F Volume G Meter H Track icon I Input and output J T...

Page 1983: ...k controls in the Console view A Input gain B ProChannel Producer only C Effects bin D Sends E Mute Solo Arm Input Echo Read Automation Write Automation F Pan G Volume H Meter I Track icon J Input and...

Page 1984: ...controls in the Console view A Input gain and pan B ProChannel Producer only C Effects bin D Sends E Mute Solo Read Automation Write Automation F Pan G Volume H Meter I Bus Icon J Output K Bus name an...

Page 1985: ...ors The Console view shows if a control is grouped with one or more other controls armed for automation and if automation exists for the control Grouped control indicator Small color coded squares are...

Page 1986: ...For details see To arm a channel strip for automation writing on page 2002 Automation present indicator A small automation icon appears next to any controls that have existing automation data Figure 5...

Page 1987: ...wn hidden The following modules are available Input Gain module on page 1988 ProChannel module Producer and Studio only on page 1988 EQ Plot module version of SONAR only on page 1988 FX Bin module on...

Page 1988: ...k Instrument track and bus Figure 544 ProChannel module Producer only A Pre Post B Global input meter C Expand collapse ProChannel D Preset E Global On Off F Equalizer graph For information about ProC...

Page 1989: ...racks buses and MIDI tracks For audio tracks you can create effects sends submixes headphone mixes etc For MIDI tracks you can choose the bank patch and channel which determine the instrument sound th...

Page 1990: ...ontrol module The Pan module lets you adjust the channel strip s pan setting Figure 549 Pan Control module A Stereo Pan control B Surround Panner For information about panning see Adjusting volume and...

Page 1991: ...Adjusting volume and pan on page 228 For information about using meters see Metering on page 899 Icon module The Icons module lets you assign a graphic icon to the channel strip This makes it easy to...

Page 1992: ...ce is used for playback Figure 552 In Out module A Input B Output For information about assigning inputs and outputs see Assigning Inputs Outputs on page 221 See Channel strips on page 1974 Console vi...

Page 1993: ...FX Bin Show hide effects bins Sends Bank Patch Show hide Send Bank and Patch controls MSR Show hide Mute Solo and Arm for Recording controls Pan Control Show hide Pan controls Volume Show hide Volume...

Page 1994: ...racks Delete Track Delete the selected track Bus menu The Bus menu contains the following commands Insert Stereo Bus Insert a new stereo bus Insert Surround Bus Insert a new surround bus Options menu...

Page 1995: ...nd Lock Peaks Track Meter Options Meter mode Peak RMS or Peak RMS meter location pre fader or post fader meter range 12 dB to 90 dB Show Labels Hold Peaks and Lock Peaks Bus Meter Options Meter mode P...

Page 1996: ...modules on page 1996 Show wide or narrow channel strips see To set the width of channel strips on page 1997 Resize the Track Bus and Mains panes see To resize the Track Bus and Mains panes on page 19...

Page 1997: ...narrow mode click the Strips menu and choose Narrow All Strips To toggle an individual channel strip between wide and narrow mode right click the channel strip and choose Narrow Strip on the pop up me...

Page 1998: ...1998 View reference Console view Figure 555 You can show all or individual channel strips in Narrow mode in order to see more channel strips simultaneously Normal display Narrow display...

Page 1999: ...on page 1972 Console view menu on page 1993 Console view on page 1971 Using the Console view To insert a new track on page 2000 To insert a new bus on page 2000 To delete a track or bus on page 2000 T...

Page 2000: ...ip on page 2004 To insert a new track Right click a track channel strip and choose Insert Audio Track or Insert MIDI Track on the pop up menu To insert a new bus Right click a bus channel strip and ch...

Page 2001: ...ag up or down Point to a control and scroll the mouse wheel Double click the center of a knob and type the desired value Double click the value display below a volume fader and type the desired value...

Page 2002: ...subset of its controls To insert a plug in effect Do one of the following Click the Insert FX button in the FX Bin module and choose a plug in on the pop up menu Right click the effects bin and choose...

Page 2003: ...narrow mode click the Strips menu and choose Narrow All Strips To toggle an individual channel strip between wide and narrow mode right click the channel strip and choose Narrow Strip on the pop up me...

Page 2004: ...up then select the desired group on the submenu Repeat the steps for each control you want to assign to the same group You can adjust all grouped controls by adjusting any group member To temporarily...

Page 2005: ...ata can be saved together in a new AVI file by using the File Export Video command For more information see Preparing audio for distribution on page 963 Use these options in the Video File dialog box...

Page 2006: ...rectly onto the graph In the tempo list you can insert edit and delete individual tempo changes Click the Tempo List button to display or hide the Tempo list If an entire project has a single tempo th...

Page 2007: ...Tempo view on page 423 To erase tempo changes in the Tempo view on page 423 SONAR deletes all tempo changes in the area you marked The last tempo setting prior to the erased region is now in effect in...

Page 2008: ...T 4 The Markers view lets you add move rename or delete Marker on page 2054 labels for places in your song The markers make it easier to move from one point to another See Creating and using markers o...

Page 2009: ...enu The Clip menu contains the following commands Save Loop Opens the Save As dialog box In the Save As dialog box you can save the current loop Groove clip as a Riff Wave file which are compatible wi...

Page 2010: ...key Options menu The Options menu contains the following commands Auto Slice Preview On Off Turns on slice auto preview Auto Slice Preview Loop On Off This control is only available if the Enable Slic...

Page 2011: ...transpose the loop to match the project s key Coarse Pitch You can set the transposition of a clip independent from the project pitch using the Coarse Pitch field A positive number transposes the clip...

Page 2012: ...dited For information on editing slicing markers see To edit the slicing markers in a Groove Clip on page 710 Beat markers Beat Markers mark where the beats fall in your clip There are as many beat ma...

Page 2013: ...om Factor reads 10 then the waveform is zoomed in by a factor of 10 For more information see Working with loops on page 705 Working with Groove Clip audio on page 706 Creating and editing Groove Clips...

Page 2014: ...e grid and each row can be routed to any track in your project You can record the Matrix performance to the Clips pane The Matrix view can be used as a stand alone pattern trigger or it can be synchro...

Page 2015: ...16 Rows Each row is assigned to a track and can play one pattern at a time A row can be routed to any track in your project For details see Rows on page 2019 Columns Each column contains one cell for...

Page 2016: ...Capture of a single pattern For details see To render a single pattern to the Clips pane Quick Capture on page 2037 Follow Transport This toggle lets you specify if the Matrix view should follow SONA...

Page 2017: ...the middle of a pattern in order to synchronize with the project s Now time The two modes are as follows Always from Beginning When you trigger a cell the pattern will start playing from the beginning...

Page 2018: ...a column that contains empty cells will force the corresponding row to stop playing This option is disabled by default AutoScroll to Column when Triggered by MIDI This option allows the Matrix view t...

Page 2019: ...ged into the row Direct Mode MIDI rows only By default a MIDI row is routed through the assigned MIDI track and all track processing is applied including MIDI FX Arpeggiator volume etc To bypass all t...

Page 2020: ...e track so all rows that are assigned to track 2 are highlighted Figure 567 Rows assigned to the active track are highlighted A Rows 2 3 are highlighted since they are assigned to the active track See...

Page 2021: ...sert a new empty column on page 2034 Duplicate Column Use this command to duplicate an entire column For details see To duplicate an existing column on page 2034 MIDI Learn Use this command to assign...

Page 2022: ...the same row starts to play A cell blinks when it is triggered but not yet playing In this state the cell has been queued for playback and will play as soon as the current Trigger Resolution is reach...

Page 2023: ...Trigger Resolution as specified in the Matrix view toolbar You can also assign a custom trigger resolution to each cell instead of following the global trigger resolution For details see To use a per...

Page 2024: ...ty cells Clear MIDI Learn Use this command to remove any MIDI assignment from the cell The cell will no longer be triggered via MIDI remote control Trigger Resolution Assign the desired trigger resolu...

Page 2025: ...s to subsequent rows on page 2027 To assign multiple patterns to subsequent columns on page 2027 To remove a pattern from a cell on page 2027 To remove all patterns on page 2027 To specify how soon a...

Page 2026: ...n the Matrix view Do one of the following Select Views Matrix view Press ALT 5 To assign a pattern to a cell You can drag audio MIDI Groove Clips Step Sequencer patterns and Project5 patterns from the...

Page 2027: ...select Clear Cell from the pop up menu Drag the pattern to a different cell To remove all patterns Click the arrow next to the Stop All Cells button in the Matrix view toolbar and select Clear All Ce...

Page 2028: ...trigger the pattern To configure a cell as one shot Right click the cell and select One Shot Trigger on the context menu The Loop Mode and Latch Mode buttons in the cell are hidden When One Shot Trigg...

Page 2029: ...t s Now time During playback the cell displays a play icon and a circular progress indicator to show the position of the loop as it is playing Patterns repeat themselves until you stop playback or unt...

Page 2030: ...ck the cell point to Trigger Resolution on the pop up menu and select one of the following options Follow Global default Immediate Measure Beat 1 4 1 8 1 16 1 32 1 64 2 Do one of the following Click t...

Page 2031: ...ells in a column simultaneously Click the Column Trigger at the top of the column All the patterns in the column start playing and any other playing cells are turned off The shorter patterns in a colu...

Page 2032: ...y pad or button on your MIDI controller All cells that are assigned to the incoming MIDI message will be triggered To disable MIDI remote control Make sure the Cell MIDI Trigger button in the Matrix v...

Page 2033: ...d playing cell then press ENTER If the cell has been assigned to a MIDI event press the appropriate key pad or button on your MIDI controller For details see To trigger a cell or column via MIDI remot...

Page 2034: ...Click the cell s Latch Mode button The cell now uses its own independent Latch mode and no longer follows the Global Latch Mode setting To use independent Loop mode per cell Click the cell s Loop Mod...

Page 2035: ...the row s Solo button to solo unsolo a row To route a MIDI row directly to a soft synth or hardware output Click the row s Direct Mode button Doing so will bypass the assigned track s MIDI processing...

Page 2036: ...pattern to another cell Drag a pattern to an empty cell To copy a pattern to another cell Hold down the CTRL key and drag the pattern to another cell To record a performance into the Clips pane You ca...

Page 2037: ...ip in the Clips pane and MIDI patterns record as MIDI clips If you want to undo the recording press CTRL Z See also To render a single pattern to the Clips pane Quick Capture on page 2037 To render a...

Page 2038: ...the Track view You can move the Track Rectangle or change its size For more information see Using the Navigator view on page 348 Shortcut Focus in cell Focus in header ENTER Trigger cell Trigger heade...

Page 2039: ...e you ve created the list you can play back the entire sequence automatically You can even program the list to pause between songs for a fixed amount of time or to wait for a keystroke before proceedi...

Page 2040: ...large panner and a white square in the small panner The large panner also has a corresponding volume level in dB directly in front of each icon The position of each speaker icon shows you each speake...

Page 2041: ...er View reference Figure 573 Large Surround Panner A Angle and focus marker B Width markers C Right speaker icon For more information about surround mixing see Surround Mixing Producer and Studio only...

Page 2042: ...2042 View reference Surround panner...

Page 2043: ...2048 Bit depth on page 2048 Broadcast wave on page 2049 Bundle file on page 2049 Cakewalk Application Language CAL on page 2049 Channel on page 2049 Channel aftertouch ChanAft on page 2049 Chord on p...

Page 2044: ...2051 Frame on page 2051 Frame rate on page 2051 From time on page 2051 Full duplex on page 2052 Groove clip on page 2052 Groove pattern on page 2052 Groove quantize on page 2052 Group on page 2052 Gu...

Page 2045: ...ge 2054 MMC MIDI Machine Control on page 2054 MME on page 2054 MTC Sync on page 2054 Mute on page 2055 Normal template on page 2055 Now time on page 2055 NRPN on page 2055 Offline on page 2055 Offset...

Page 2046: ...Shape on page 2057 Size on page 2057 Slip editing on page 2057 SMPTE on page 2057 Snapshot on page 2057 Solo on page 2058 Split point on page 2058 Staff on page 2058 Striping on page 2058 Submix on pa...

Page 2047: ...lossary Track on page 2059 Transients on page 2059 Vector on page 2059 Velocity on page 2060 Volume on page 2060 WASAPI on page 2060 WDM on page 2060 Widget on page 2060 Wipe on page 2060 xRPN on page...

Page 2048: ...k is a reference point for playing and recording a single digital audio file stored on your computer s hard drive The inputs of the audio track are where you would like to record a signal from and the...

Page 2049: ...otes of the instrument on the specified channel Chord Three or more notes played simultaneously Typically represented by a single letter representing its root numbers representing additional notes and...

Page 2050: ...music during which the volume gradually decreases Digital audio Music or sound recorded digitally as on a compact disk as opposed to an analog signal recorded to tape DMA Direct Memory Access DMA set...

Page 2051: ...scendo con amore etc in the Staff view See Adding expression marks on page 1203 Fade Gradual increase or decrease in volume See Fades and crossfades on page 430 and Automation on page 1101 Fade in A g...

Page 2052: ...and on page 771 Group An entity consisting of multiple controls or buttons and specifying relationships between or among them Guitar chord grid Displays chord symbols as well as the fingerings on the...

Page 2053: ...n samples for audio to travel from its source through a sound card s drivers and converters into SONAR and back through the sound card to your speakers Linked clips Clips so specified that any change...

Page 2054: ...he rate is set by the tempo of the project See Tempo on page 2059 MIDI Musical Instrument Digital Interface The means by which computers communicate with most sound cards keyboards and other electroni...

Page 2055: ...number of units For example you could offset the start of a track by two measures Overload Loss of audio information caused by the audio level exceeding 0 db Pan Degree to which a sound or piece of mu...

Page 2056: ...at all groove clips and ACIDized loops in your project follow if there are no pitch markers in the project You can set the project pitch with the Project Set Default Groove Clip Pitch command Property...

Page 2057: ...oating You can create up to 10 screensets per project and freely switch between screensets at any time See Screensets on page 1154 Scrub A tool used for previewing audio The Scrub tool allows you to p...

Page 2058: ...Short for System Exclusive refers to MIDI messages that only a specific device can use and understand Cakewalk s System Exclusive library which can store record and display for viewing or editing 256...

Page 2059: ...y spaced intervals It appears in the Track Staff and Piano Roll views You can use the Time Ruler to change the Now Time make a time selection and insert markers For more about the Time Ruler see The T...

Page 2060: ...SONAR that allows it to communicate with the new audio features in Windows 7 WDM Windows Driver Model low latency audio driver that bypasses the operating system s audio streaming software so that the...

Page 2061: ...ing knob to cells in ACT MIDI prop page 1332 ACT Lock button 1347 ACT MIDI Controller Plug in 1330 Active Controller Technology 1346 Adjusting timing of notes See Quantizing AES EBU connecting to 1688...

Page 2062: ...mporting 321 Audio clips 828 Bounce to Clip s 835 changing name off 830 changing start time of 830 combining 835 836 copying 831 deleting 831 moving 831 pasting 831 properties of 830 size of 846 split...

Page 2063: ...Console view 1109 jump 1125 lanes 1111 methods 1104 quick guide 1103 recording automation from an external controller 1138 recording individual fader or knob movements 1109 snapshots 1135 surround pan...

Page 2064: ...nspector 603 Buses 80 892 893 sending audio data to 889 C Cakewalk Generic Surface plug in 1333 CAL programs sample 1360 1361 CD creating 962 quality 827 sampling rate 275 CD Burning 974 CD burning pr...

Page 2065: ...ving 352 355 moving to a specific start time 355 pasting as new 352 pasting into existing 352 performance effects of 1303 renaming 346 reversing notes in 757 765 revert to original time stamp 358 sele...

Page 2066: ...ge 1330 1333 generic surface dialog 1338 synchronize with SONAR channel strips 1328 Controller MIDI definition 1667 Controller surfaces connecting and disconnecting 1326 Controllers 783 786 790 assign...

Page 2067: ...65 creating using Process Scale Velocity 765 Default bus setting 334 setting for inserted tracks 333 Default pitch changing a project s 713 Define Groove dialog 1716 Defining instruments 72 definition...

Page 2068: ...me 1196 Duration dialog 1729 E Echo adding 798 eliminating during recording 1371 Echoing MIDI 1667 Edit Config File 1791 Edit tool 473 Edit Apply Trimming 1634 Edit Bounce to Clip s 1635 Edit Bounce t...

Page 2069: ...e Scale 1133 Envelope mode 1131 EQ 1019 per track 948 Equalizer 999 1019 Erase tool 495 Errors timing 767 Euphonix EuCon 1343 Event deleting 793 inserting new 793 Event Filter dialog 1757 Event filter...

Page 2070: ...art Stop 192 Fade Selected Clips 686 Fade type choosing 430 Fade Envelope 843 844 Fade Envelope dialog 1734 Fade in create a 430 Fade in delete a 431 Fade in edit a 431 Faders 951 Fades 430 FAQs 1363...

Page 2071: ...eo playback on 262 Fit Improvisation 766 Fit to Time 418 Fit to Time dialog 1738 Float file support 1297 Floating a view 1151 Floating views dual monitor support 88 Floating windows 1150 focus track f...

Page 2072: ...lowing project pitch 709 how they work 706 importing into project 707 MIDI 715 using 707 what they are 706 working with 706 Groove Pattern 771 copying 773 defining 772 deleting 774 saving 773 Groove Q...

Page 2073: ...299 turning on or off for all tracks 243 Input Quantizing 284 Inputs choosing in Console view 280 selecting 889 setting source of 279 Insert menu Audio Track 1557 MIDI Track 1557 Series of Controller...

Page 2074: ...companiments 316 Keyboard shortcuts 1167 1575 Keystrokes sending all to a plug in 918 Kilohertz 823 L Lanes 744 automation 1111 take 381 Lanes in tracks 381 Large Transport 195 Latency 1305 Layering s...

Page 2075: ...ing 375 deleting from the Markers view 375 editing 374 jump to 375 locking unlocking 375 moving 375 pitch 712 setting time range with 375 snap to grid 369 using 372 Markers module 196 Markers view 84...

Page 2076: ...nels vs tracks 1670 choosing channels 1670 choosing devices 221 connecting keyboard 63 controller 1667 converting MIDI to audio 887 devices 219 drivers 1668 echoing 1667 equipment connection 1387 file...

Page 2077: ...alog 718 transposing 716 using pitch markers 717 MIDI In and Out devices driver changes 72 MIDI input filtering 317 MIDI input presets creating and editing 243 317 MIDI keyboard multiple performers on...

Page 2078: ...display of Clips pane using 348 using 348 New track adding 333 Next Marker 375 NoControllerReset 1246 Non destructive editing 426 Normal template 269 Normalize 838 Normalize command 838 Notation editi...

Page 2079: ...n 973 saving projects as 972 OMF files exporting 972 Open Plug in Technology 1348 OPT panels 1348 Options menu Colors 92 Drum Map Manager 808 Time Ruler Format HMSF 1574 Time Ruler Format MBT 1573 Tim...

Page 2080: ...s 207 Piano Roll view 81 721 724 1546 colorize notes by velocity 738 Controllers pane 726 1936 Drum Grid pane 726 hide events in muted clips 742 inline version 753 Microscope Mode 750 MIDI data lanes...

Page 2081: ...nput ports to multiple audio tracks 222 assign same input port to multiple audio tracks 222 assign same output port to all buses 223 assign same output port to multiple audio tracks 223 assigning inst...

Page 2082: ...n time using 759 Process Transpose 1564 ProChannel 999 console emulator 1027 equalizer 1019 FX Chain 1031 PC4K S Type bus compressor 1016 PC76 U Type compressor 1014 tape emulator 1039 tube saturation...

Page 2083: ...83 Record latency adjustment 1795 Record Mode 278 Recording Arming tracks for 281 arming tracks for 281 audio 293 choosing an input 279 definition automation 1109 background noise in 293 changing timi...

Page 2084: ...14 Riff Wave files description of 1880 saving a Groove clip as 712 RPN Registered Parameter Numbers event 790 RPNs Registered Parameter Numbers 786 787 790 assigning to instruments 1245 S Sample rate...

Page 2085: ...nd to sidechain input 924 bouncing audio with sidechain plug ins 925 freezing a sidechain input 925 limit number of inputs 923 Signal flow diagram 888 Silence removing 840 841 Silencing tracks 203 Sin...

Page 2086: ...ling 97 SONAR Browser 605 Songs publishing 1399 quantizing 769 title 327 Sony Wave 64 format 275 Sort 331 Sort tracks 1633 Sort Tracks dialog 1887 Sound card built in 1295 high end 1295 Sound controls...

Page 2087: ...ecord via MIDI 1957 keyboard shortcuts 1958 specify velocity 1958 steps add flam 1956 add slide portamento 1957 audition when clicking 1953 compress or expand velocities 1956 default velocity 1956 dis...

Page 2088: ...e instruments 632 Synth Rack icons 860 Synth Rack view 850 Synth Tracks 852 Synthesizer patches 225 226 software 1295 with handshaking dump protocols 1257 Synths MIDI output support 869 System Exclusi...

Page 2089: ...roject 272 setting the 272 274 settings 272 view 421 424 Tempo commands using 419 Tempo dialog 1894 Tempo view 84 Text 790 Text event 790 Texture 234 THIN CHANNEL AFTERTOUCH CAL 1361 THIN CONTROLLER D...

Page 2090: ...ooltips appear when editing MIDI events 734 Touch 1171 Track current 241 focus 1670 lanes 381 locking height of 335 number vs channel 1670 Track color 234 Track folders 414 Track icons 338 Track input...

Page 2091: ...219 patch change in 225 226 percussion 1214 1215 recording in separate 316 re ordering 331 333 selecting several adjacent 331 selecting single 331 setting channels for 230 setting key offset of 231 s...

Page 2092: ...tory 425 Undo History dialog 1898 Unfreeze 909 Uninstalling SONAR 97 Unlink surround effect 995 Updates 1363 USB audio 24 bit problems 1377 UsesNotesAsControllers 1246 Utilities menu Change Audio Form...

Page 2093: ...ngs 215 VST Configuration 944 VST MIDI output 869 VST plug ins organizing in menus 944 VST support integrated 944 V Vocal context menu 1073 Dynamics editing 1073 Formant editing 1072 Pitch editing 106...

Page 2094: ...ring 55 publishing audio on 963 X XG 1398 X Ray Windows 89 1159 Y Yamaha OPT panels 1348 YouTube Publisher 1450 Z Zero Controllers When Play Stops 233 Zero crossings 826 Zoom keyboard shortcuts 86 Zoo...

Reviews: