232
Controlling playback
Changing track settings
Adjusting the note velocity (Vel+)
Each MIDI note event has a velocity, which represents how fast the key was struck when the track
was recorded. On playback, the
velocity offset
parameter adjusts the velocity data for all notes in the
track by the designated amount. The value can range from -127 to +127. The effect of changing
velocities depends on the synthesizer. Some synthesizers do not respond to velocity information.
For others, the effect varies depending on the sound or patch you have chosen. Normally, higher
velocities result in louder and/or brighter-sounding notes. This parameter does not affect the velocity
that is stored for each note event. When the clip is displayed in other views, like the Piano Roll view,
Staff view, or Event List view, you will see the original velocities as they are stored in the file. You can
edit the velocity values in those views, or use the
Process > Scale Velocity
or
Process > Find/
Change
command. Velocity is different from volume in that it is an attribute of each event, rather
than a controller that affects an entire MIDI channel. Here’s an example of where this distinction
might be important. Suppose you have several tracks containing different drum parts. All of these
parts would probably be assigned to MIDI channel 10 (that’s the default channel for percussion in
General MIDI). If you change the volume setting for any track that uses channel 10, all the different
drum parts—regardless of what track they’re in—would be affected. If you change the note velocity
for one drum track, it will be the only one whose volume is affected.
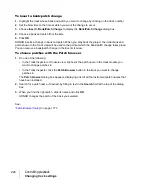
To set the velocity offset for a track
1.
Open the Track Inspector or Console view.
2.
Select the track you want to edit.
3.
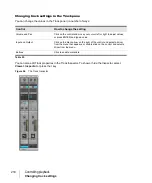
Adjust the Vel+ knob at the top of the channel strip.
Adjusting the time alignment of a MIDI track (Time+)
Each event takes place at a known point in the project. On playback, the
time offset
(Time+)
parameter adjusts the times for MIDI events in the track by the designated amount. The value can
be as small as a single clock tick or as large as you want. This parameter can be used to make a
part play behind the beat or in front of it or to compensate for tracks that sound rushed or late. The
time shift can be used to create a chorus or slap-back echo effect by making a copy of a track and
then applying a small offset to the copy. You can use larger time offsets to shift a track earlier or later
by several beats or measures. Note that you cannot shift any event earlier than 1:01:000. For
example, if the first event in the track starts at 2:01:000, you cannot shift its start time earlier by more
than one measure.
This parameter does not affect the time that is stored for each note event. When the clip is displayed
in other views, like the Piano Roll, Staff, or Event List view, you will see the original times as they are
stored in the file.
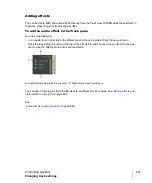
To set the time offset for a track
1.
Select the track and open the Track Inspector.
2.
In the Track Inspector, click the
Time+
control.
3.
Enter a value, or press the + or – key until you reach the value you want.
Summary of Contents for sonar x3
Page 1: ...SONAR X3 Reference Guide...
Page 4: ...4 Getting started...
Page 112: ...112 Tutorial 1 Creating playing and saving projects Saving project files...
Page 124: ...124 Tutorial 3 Recording vocals and musical instruments...
Page 132: ...132 Tutorial 4 Playing and recording software instruments...
Page 142: ...142 Tutorial 5 Working with music notation...
Page 150: ...150 Tutorial 6 Editing your music...
Page 160: ...160 Tutorial 7 Mixing and adding effects...
Page 170: ...170 Tutorial 8 Working with video Exporting your video...
Page 570: ...570 Control Bar overview...
Page 696: ...696 AudioSnap Producer and Studio only Algorithms and rendering...
Page 720: ...720 Working with loops and Groove Clips Importing Project5 patterns...
Page 820: ...820 Drum maps and the Drum Grid pane The Drum Grid pane...
Page 848: ...848 Editing audio Audio effects audio plug ins...
Page 878: ...878 Software instruments Stand alone synths...
Page 1042: ...1042 ProChannel Producer and Studio only...
Page 1088: ...1088 Sharing your songs on SoundCloud Troubleshooting...
Page 1140: ...1140 Automation Recording automation data from an external controller...
Page 1178: ...1178 Multi touch...
Page 1228: ...1228 Notation and lyrics Working with lyrics...
Page 1282: ...1282 Synchronizing your gear MIDI Machine Control MMC...
Page 1358: ...1358 External devices Working with StudioWare...
Page 1362: ...1362 Using CAL Sample CAL files...
Page 1386: ...1386 Troubleshooting Known issues...
Page 1394: ...1394 Hardware setup Set up to record digital audio...
Page 1400: ...1400 MIDI files...
Page 1422: ...1422 Initialization files Initialization file format...
Page 1463: ...1463 Misc enhancements New features in SONAR X3...
Page 1470: ...1470 Comparison...
Page 1518: ...1518 Included plug ins Instruments...
Page 1532: ...1532 Cyclone Using Cyclone...
Page 1694: ...1694 Beginner s guide to Cakewalk software Audio hardware sound cards and drivers...
Page 1854: ...1854 Preferences dialog Customization Nudge Figure 518 The Nudge section...
Page 1856: ...1856 Preferences dialog Customization Snap to Grid Figure 519 The Snap to Grid section...
Page 1920: ...1920 Snap Scale Settings dialog...
Page 2042: ...2042 View reference Surround panner...

