91
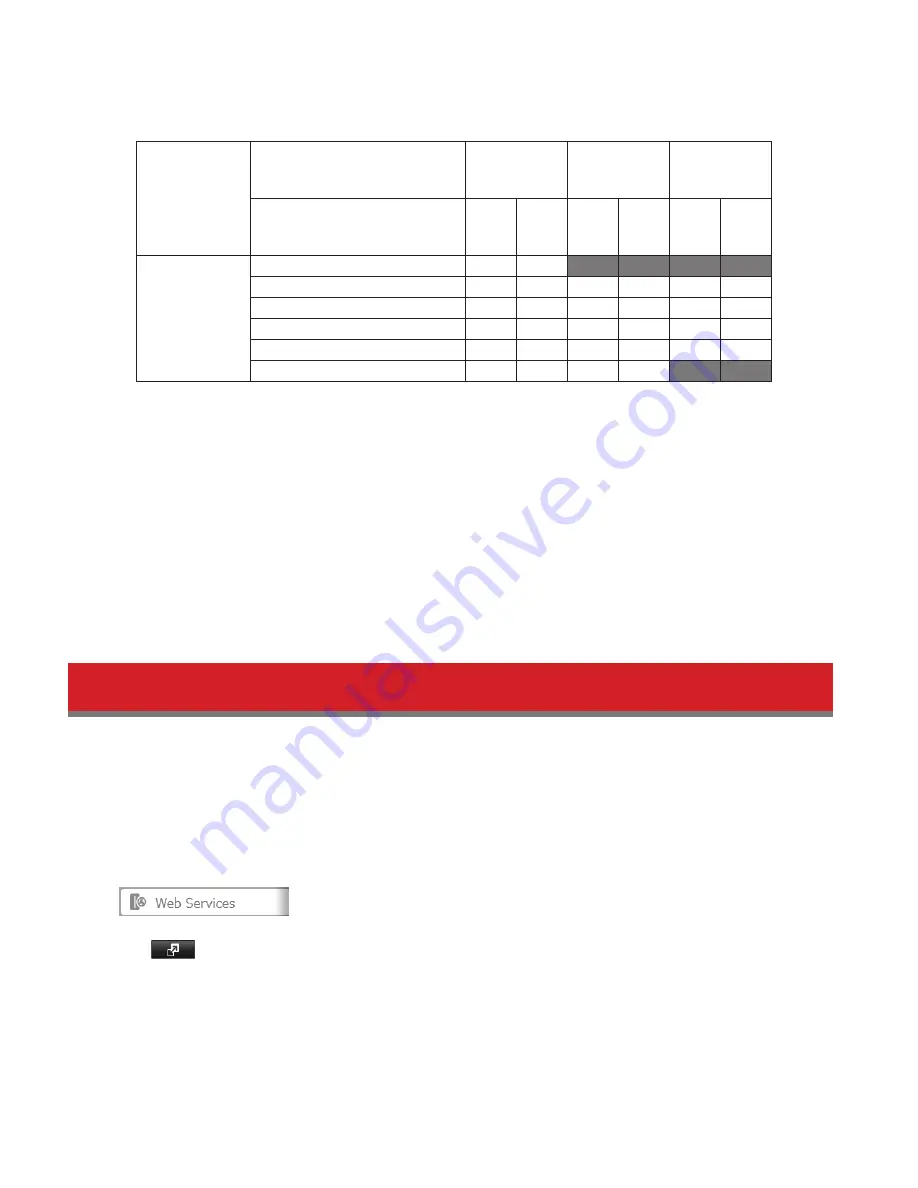
• When a user or group can access a folder through WebAccess depends on a combination of WebAccess settings
and the shared folder’s settings.
Folder Setup
WebAccess Public Mode
Allow
Anonymous
Allow All
Groups and
Users
Use Inherited
Folder
Permissions
Folder Attribute
Read
&
Write
Read
Only
Read
&
Write
Read
Only
Read
&
Write
Read
Only
WebAccess
Account
Not logged in
R
R
-
-
-
-
User with read & write access
R/W
R
R/W
R
R/W
R
User with read-only access
R/W
R
R/W
R
R
R
Group with read & write access
R/W
R
R/W
R
R/W
R
Group with read-only access
R/W
R
R/W
R
R
R
Other users
R/W
R
R/W
R
-
-
R: Read only, R/W: Read and write, -: No access
10
There are many ways to access WebAccess folders depending on your device.
• From a computer, supported browsers include Internet Explorer 8 and later, Firefox 3.6 and later, Safari 4 and
later.
Instructions: http://buffalonas.com/manual/en/
• Use compatibility mode to use WebAccess with Windows 8.1 and Windows 8 in desktop mode.
• To access from an iOS device, install the “WebAccess i” application from the App Store.
Instructions: http://buffalonas.com/manual/i/en/
• To access from an Android device, install the “WebAccess A” application from Google Play.
Instructions: http://buffalonas.com/manual/a/en/
• To access from a Windows Phone, install “WebAccess” from the Windows Phone Store.
Instructions: http://buffalonas.com/manual/wp/en/
WebAccess Remote
WebAccess Remote lets open a shared folder on a remote TeraStation or LinkStation from Explorer, My Computer, or
other file manager.
To use WebAccess Remote, the following conditions must be satisfied.
• You have TeraStations or LinkStations in two different locations, such as at home and at a remote location.
• WebAccess is enabled for both devices.
1
In Settings, click
Web Services
.
2
Click
to the right of “WebAccess Remote”.
3
Click
Edit
.
4
From
Target Folder
, select the shared folder that will be connected.
Summary of Contents for TeraStation 5000
Page 1: ...TeraStation 5000 User Manual www buffalotech com 35020018 04 2014 01...
Page 10: ...10 Chapter 1 Installation Diagrams TS5800D TS5600D TS5400D...
Page 69: ...69 4 Insert the new drive in the empty slot Slide the drive in with the locking mechanism open...
Page 70: ...70 5 Swing the lock back down until it clicks into place...


