background image

130

Chapter 10 Advanced Features

Antivirus Software

Trend Micro NAS Security

TM

 can protect your network and data from software viruses, malware, and spyware. To use 

Trend Micro NAS software, purchase an OP-TSVC license pack (sold separately). If your TeraStation includes activated 
antivirus software, no license registration is necessary.

Notes: 

•  To use the antivirus software effectively, the TeraStation should be connected to the Internet. The connection can 

be routed through a proxy server if the appropriate settings are configured in 

Administration

 - 

Proxy Settings

 from 

the left-side menu of the Trend Micro NAS Security settings page.

•  Trend Micro is a registered trademark of Trend Micro Incorporated.

Licenses

If the antivirus software on your TeraStation is not activated or has expired, please purchase an OP-TSVC license pack 
(sold separately). If your TeraStation includes activated antivirus software, no license registration is necessary. The total 
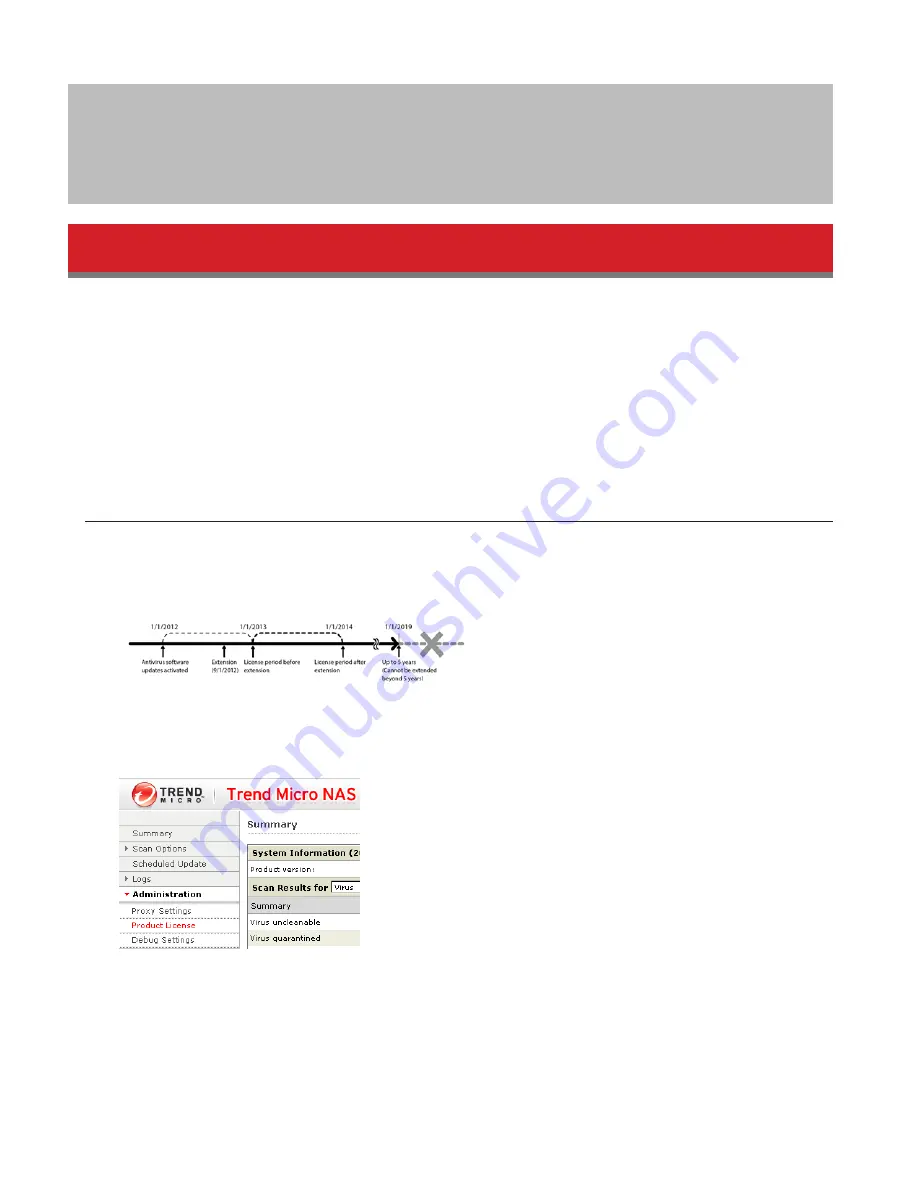
period for antivirus software updates may be extended up to 5 years.
This example shows an initial 1-year period for updates extended by an additional year.

Note: 

It’s not possible to register a serial number that would extend the total license period beyond 5 years, such as 

a second 3-year license after 3 years.

From the left-side menu, click 

Administration

 - 

Product License

.

Enter the serial number from the “Trend Micro NAS Security

TM

 License Pack Guide”, included in your package. Click 

Activate

.

Summary of Contents for TeraStation 5000

Page 1: ...TeraStation 5000 User Manual www buffalotech com 35020018 04 2014 01...

Page 2: ...alizing Settings 19 For Resetting Password 19 Chapter 2 Configuration 21 Opening Settings 21 Opening Easy Admin 23 Chapter 3 Access Restrictions 25 Configuring Access Restrictions for Users and Groups...

Page 3: ...rive 45 Dismounting Drives 46 Checking Drives 47 Formatting Drives 48 Encrypting Drives 50 Media Cartridges 50 Erase Data on the TeraStation Completely 50 Disk Quotas 52 Quotas for Users 52 Quotas for...

Page 4: ...stination 74 Configuring a Backup Job 75 Replication 78 Failover 80 Ethernet Cable Connection Methods 80 Configuring Failover 82 Backing Up Your Mac with Time Machine 83 Copying from a USB Device 86 A...

Page 5: ...03 Connecting Devices to the Network 104 Enabling Surveillance Cameras 104 Enabling the Free License 106 Registering Recording Policies 108 Checking Recording 111 Email Error Notification 112 Configur...

Page 6: ...ted to the Internet 124 TeraStation Not Connected to the Internet 126 Troubleshooting 129 Chapter 10 Advanced Features 130 Antivirus Software 130 Licenses 130 Activating Virus Scanning 131 Configuring...

Page 7: ...om a NFS Client 148 Encrypting Data Transmission 150 Encrypting Settings Data 150 Encrypting FTP Transfer Data 150 SSL Keys 151 Web Server 151 MySQL Server 152 SNMP 153 Saving and Applying Settings 15...

Page 8: ...3 Changing the IP Address 164 Chapter 11 Utilities 166 NAS Navigator2 for Windows 166 Mount as Network Drive 168 Changing the IP Address 169 NAS Navigator2 for Mac 169 Mount as Network Drive 170 Chang...

Page 9: ...9 Specifications 178 Compliance Information 179 FCC Statement 179 CE Mark Statement 180 Environmental Information 180 KC 180 BSMI 180 CCC 180 181 Models 181...

Page 10: ...10 Chapter 1 Installation Diagrams TS5800D TS5600D TS5400D...

Page 11: ...d this LED glows green It blinks when the connection is active 5 LAN2 LED When LAN port 2 is connected this LED glows green It blinks when the connection is active 6 LCD Panel This display shows the s...

Page 12: ...nd USB UPS connection can be connected USB hubs are not supported 17LAN Port 1 Use an Ethernet cable to connect this port to your network 18LAN Port 2 This second Ethernet port may be used for network...

Page 13: ...setup you may connect a second cable to LAN port 2 If you use LAN port 2 configure the IP address at Network IP Address in Settings 4 Follow the steps on the screen to install NAS Navigator2 5 Click...

Page 14: ...sword for the TeraStation it is password by default 8 Right click on your TeraStation s icon and choose Settings 9 Changing the password from the default is recommended 10Go to Management Name Time La...

Page 15: ...fied by a hostname instead of an IP address make sure that a DNS server address is configured in Network IP Address 11In NAS Navigator2 double click your TeraStation s icon This will open the shared f...

Page 16: ...k your TeraStation s icon and select Settings For Mac OS select the TeraStation s icon while holding down the control key then select Settings 3 Enter the username and password then click OK Note The...

Page 17: ...e shutdown process is complete Changing the Administrator Password After initial setup follow this procedure to change your password 1 Double click the icon NAS Navigator2 will start 2 Right click on...

Page 18: ...18 3 Click Easy Admin 4 Click Change Password 5 If this screen is displayed enter the current password and click OK The default password is password 6 Enter the new password twice...

Page 19: ...d by the recovery process 1 Insert a 1 GB or larger USB flash drive into a USB port on the TeraStation Note All data on the USB flash drive will be erased 2 In Settings navigate to Management Restore...

Page 20: ...ord 4 Select the USB memory device from Target USB drive list then click Execute 5 Enter the 4 digit confirmation number and click OK The TeraStation will create the password reset drive This will tak...

Page 21: ...following If there are a large number of registered users groups or shared folders use Firefox instead of Internet Explorer If you have a proxy server enabled in the browser settings disable the proxy...

Page 22: ...and your password Notes If the time out period is set to 10 minutes you will be logged out of Settings after 10 minutes of inactivity Click Secure Connection to log in with an encrypted connection 4...

Page 23: ...e steps below to open Easy Admin 1 Open NAS Navigator2 by double clicking the icon 2 Right click on your TeraStation s icon and choose Settings For Mac OS click the TeraStation icon while holding down...

Page 24: ...24 Notes If you click any buttons you will need to enter a username and password You can open Easy Admin anytime by clicking the icon at the top left of Settings...

Page 25: ...supported and may cause unexpected behavior You can also configure users groups and shared folders from Easy Admin by clicking Access Restrictions Shared folders with limited access can still be used...

Page 26: ...ed folder names configure the client language to match the characters in Management Name Time Language Recycle Bin To protect your data from accidental deletion you may configure your TeraStation to u...

Page 27: ...to the shared folder description Hidden Shares To hide a shared SMB folder select Hidden Share SMB Only and click OK To open a hidden folder click Start Search programs and files and enter TeraStation...

Page 28: ...r you may not be able to access shared folders Importing User Information You can import users in File Sharing Users by clicking Import CSV File Existing users will be overwritten Format for user data...

Page 29: ...ed Use numbers between 1000 and 1999 to set a group ID manually Don t use duplicate group IDs You may register up to 300 groups with the TeraStation If you are logged in as a member of the general use...

Page 30: ...ters when sharing data between Mac OS and Windows Windows does not support some characters that Mac OS and the TeraStation allow If you create a filename on a Mac with any of the following characters...

Page 31: ...n AppleShareServer the zone cannot be specified When files are copied to the TeraStation or to a USB drive connected to the TeraStation file information such as date created date modified and other da...

Page 32: ...kgroup Domain 3 Click Edit 4 Select Active Directory then click Next 5 Click Yes 6 Enter the desired settings then click OK 7 Choose Folder Setup 8 Click a shared folder that you want to set access re...

Page 33: ...r in an Active Directory domain the TeraStation should be logged in to the domain and accessed from a computer that is not a member of the domain with a valid domain account If the TeraStation is a me...

Page 34: ...Note To use Active Directory from Windows 2000 or Windows Server 2003 select Active Directory instead of NT Domain 6 Click Yes 7 Enter settings and click OK 8 Click to the right of Folder Setup 9 Clic...

Page 35: ...authentication method to Work group the account on the domain controller will not be deleted automatically If the TeraStation has joined a domain network you cannot connect to it via FTP Don t disable...

Page 36: ...shared folder for authorization testing and enter the name of the folder to use Click OK 7 A shared folder for authentication will be created on the TeraStation Users registered to the specified auth...

Page 37: ...the user will have read only access The names of registered users are listed in Users External Users To delete a user who was registered automati cally select that user and click Delete External User...

Page 38: ...the LCD panel changes from I46 or I47 to I18 RAID 6 RAID 6 arrays are available for TeraStations with 4 or more hard drives RAID 6 combines 4 or more drives into a single array The usable space is equ...

Page 39: ...Stations with 4 or more hard drives In this mode mirrored pairs of drives in RAID 1 arrays are combined into a RAID 0 array The usable space is equal to the capacity of the smallest drive multiplied b...

Page 40: ...Delete RAID Array Once JBOD is configured create shared folders on each drive to use them Changing RAID Mode To change the RAID mode first put the drives in JBOD 1 Select RAID 2 Click the array to del...

Page 41: ...ID 0 arrays If the TeraStation is rebooted during the resyncing process the resync will begin again from the beginning 8 Step through the wizard to create the array Notes You can also configure RAID s...

Page 42: ...t the drive that was configured as a hot spare then click Dismount Disk 3 Click Rediscover Disk 4 Navigate to Drives RAID 5 Select the RAID array to repair 6 Select the drive that was previously confi...

Page 43: ...irm Operation screen will open 9 Enter the confirmation number then click OK Adding a drive to an Existing RAID Array You can add a drive to a RAID 1 RAID 5 or RAID 6 array Drives that can be added to...

Page 44: ...anging the RAID Mode while Adding a Drive Select the drive you want to add to the RAID array and choose the mode for the array Enter the Confirm Operation number and click OK RAID Scanning RAID mainte...

Page 45: ...connect external drives to these ports Once connected they appear as shared folders on the TeraStation Formatted drives are detected automatically Unformatted drives should be formatted in Settings A...

Page 46: ...ard drive is not reconfigured after rebooting the TeraStation unplug and reconnect it Dismounting Drives If the TeraStation is powered on dismount drives internal and external before unplugging them Y...

Page 47: ...USB for integrity Errors are fixed automatically With large drives a disk check may run for many hours Shared folders cannot be accessed during a disk check Do not turn off the TeraStation until the...

Page 48: ...umstances data deleted when a drive is formatted can be recovered To ensure that data is gone forever a format might not be sufficient See Erase Data on the TeraStation Completely 1 In Settings click...

Page 49: ...the size of your drive the format may take several minutes or several hours to complete Formatting will be displayed on the LCD display until the format is complete Notes Do not turn off or disconnect...

Page 50: ...Cartridge during formatting To return it to its original state uncheck Media Cartridge and reformat the drive Media cartridges do not support RAID arrays LVM volumes Access restrictions Direct connect...

Page 51: ...shared folder on each drive All settings returned to their default values All logs deleted If you remove a drive and then erase all data on the TeraStation the LCD will show the error HDx Error E22 HD...

Page 52: ...a will always apply Quotas for Users Follow this procedure to limit the shared folder disk space available for a user 1 In Settings click to the right of Users 2 Select the user whose space will be li...

Page 53: ...k Close Size Limits If LVM is enabled volumes can be created with maximum size limits 1 In Settings click Drives 2 Select LVM 3 Select the drive or array where the volume will be located and click Ena...

Page 54: ...54 7 Click Create Volume 8 Configure the desired settings then click OK 9 Click OK 10Click Close 11Click Close 12Navigate to File Sharing Folder Setup 13Click Create Folder...

Page 55: ...ng used Also you may be unable to access the folder if certain characters are used in the name so the use of letters and numbers only is recommended The names of shared folders used for both AFP and F...

Page 56: ...tor Windows XP Windows 2000 Windows Server 2003 Windows 2000 Server Before using iSCSI equipment with Windows XP Windows 2000 Windows Server 2003 or Windows 2000 Server download and install the Micros...

Page 57: ...number then click OK 6 Click OK 7 Move the iSCSI switch to the position to enable iSCSI 8 Click to the right of iSCSI 9 Click Create Volume 10Enter a volume name volume description volume and size th...

Page 58: ...ter the IP address of the TeraStation in the Target field click Quick Connect 13The connected volume will be recognized by the computer as an unallocated volume Assign and format the volume in Windows...

Page 59: ...by the computer as an unallocated volume Assign and format the volume in Windows Checking Whether iSCSI Volume is Connected To check whether an iSCSI volume is connected navigate to Drives iSCSI iSCSI...

Page 60: ...mutual authentication two way authentication Dual passwords ensure that only authorized client computers can access the volume on the TeraStation Mutual Authentication Password Setup for the TeraStat...

Page 61: ...l no longer be displayed in the Volume field of the iSCSI Connection Tool If this happens navigate to Setup Set Mutual CHAP Secret in the iSCSI Connection Tool enter the TeraStation s password and cli...

Page 62: ...s When an iSCSI volume is deleted all data contained in the iSCSI volume is erased Before changing settings back up any important data Enable LVM previous page to delete or create volumes 1 In Setting...

Page 63: ...g Volumes From Settings you may temporarily disconnect iSCSI volumes from any initiators and clients Navigate to Drives iSCSI Select the iSCSI volume to disconnect and click Disable Connection To reco...

Page 64: ...TeraStation iSCSI volume or for each volume When the access restrictions are set the system asks for entry of a username and password when the TeraStation is connected by the iSCSI Connection Tool Set...

Page 65: ...to allow searching for or connecting to targets 6 Click Close Setting Access Restrictions for Individual Volumes 1 In Settings click Drives 2 Click to the right of iSCSI 3 Click the volume where you w...

Page 66: ...glow red 1 Error LED Glows red if a drive has failed 2 Status LEDs The failed drive s status LED will be glowing a steady red A drive with a red status LED is ready to hot swap Notes Do not unplug a d...

Page 67: ...rive is installed click Rediscover Disk in Settings If the message HDx Error E22 HDx Can t Mount remains on the LCD display after the RAID rebuild is finished reboot your TeraStation Hard Drive Replac...

Page 68: ...68 Hard drives without red status LEDs lit are still on Do not unplug or remove them 3 Pull out the drive cartridge and remove it from the TeraStation...

Page 69: ...69 4 Insert the new drive in the empty slot Slide the drive in with the locking mechanism open...

Page 70: ...70 5 Swing the lock back down until it clicks into place...

Page 71: ...RAID 51 or RAID 61 The TeraStation will start rebuilding the RAID array automatically After a few minutes the message RAID I18 ARRAY x Rebuilding will be displayed until the array is rebuilt If more t...

Page 72: ...the array is rebuilt If more than 3 drives were replaced in a RAID 51 array or if more than 4 drives were replaced in a RAID 61 array wait 10 minutes after I18 appears and navigate to Drives RAID in...

Page 73: ...d drive even after the RAID array is rebuilt with the hot spare This section describes the replacement process for a hard drive while the TeraStation is still on 1 Open the front cover with the includ...

Page 74: ...nfigure a password enter it in the Remote Backup Password field Leave this field blank if you don t want a password If the target device is configured with a backup password you can easily find the ba...

Page 75: ...m outside the subnet or connected by a VPN is used Notes To back up data between LinkStations or TeraStations on a network using jumbo frames make sure that both de vices are configured to use identic...

Page 76: ...e backed up to the destination Overwrite incremental The first time the backup job runs like a normal backup In subsequent backups files added to the source as well as files deleted from the source ar...

Page 77: ...agement backup should be a local folder on this TeraStation or on a USB drive attached to it The target folder will be set to read only Do not use folders from drives formatted with FAT 5 Click Add 6...

Page 78: ...lication connect an Ethernet cable to the LAN port of each TeraStation and follow the steps below Notes For best results use static IP addresses for both replication TeraStations source and target Rep...

Page 79: ...Replication Source 6 Select the shared folder that will be the replication source then click OK 7 Click Browse under Replication Target 8 Select the shared folder that will be the replication target t...

Page 80: ...tart the TeraStations For best results give both replication TeraSta tions static IP addresses Failover With failover two TeraStations are connected to the network for redundancy If a problem occurs i...

Page 81: ...he backup target and for the backup LAN port This is fault tolerant if network disconnections occur The main and backup TeraStations should be the same model and capacity Use fixed IP addresses for bo...

Page 82: ...annot be used as the backup location for Time Machine If email notification is enabled and failover occurs navigate to Management Email Notification Edit in the main TeraStation s settings and click O...

Page 83: ...sage I49 is displayed on the LCD panel of the backup TeraStation when operation switches from the main TeraStation to the backup TeraStation E27 LostBackupTarget This message E27 is displayed on the L...

Page 84: ...Time Machine 10Click Edit 11Click Browse 12Select the shared folder that you set in the previous step then click OK 13Click OK 14Click OK 15Move the Time Machine switch to the position to enable Time...

Page 85: ...sword with the rights to access the shared folder of the TeraStation then click Connect Note If access restrictions are not configured on the target share log in with the administrator account The def...

Page 86: ...evices are not supported USB hubs Mice Keyboards 1 In Settings move the Direct Copy switch to the position to enable Direct Copy 2 Connect the USB device The function button will begin to flash Note D...

Page 87: ...w the steps below to configure your TeraStation for use with Amazon S3 1 Create an account at the Amazon S3 website http aws amazon com s3 2 In Settings click Web Services 3 Click the icon to the righ...

Page 88: ...use after the network was temporarily disconnected click Remount If a file is added to the Amazon S3 bucket from a folder other than the TeraStation s Amazon S3 remote replication folder it may take...

Page 89: ...es Be careful when configuring WebAccess Certain settings can make the files in the shared folder available to any one on the Internet without any access restrictions You can also configure WebAccess...

Page 90: ...w dedicated share for WebAccess When accessing shared folders through WebAccess from a remote location a username and password may be required for certain operations For best results create a user acc...

Page 91: ...http buffalonas com manual en Use compatibility mode to use WebAccess with Windows 8 1 and Windows 8 in desktop mode To access from an iOS device install the WebAccess i application from the App Stor...

Page 92: ...tch to the position to enable WebAccess Remote 9 You can directly access the shared folder in the remote TeraStation by entering the path displayed in Target Folder into the address box in Explorer My...

Page 93: ...ray1 share mnt array2 share2 mnt usbdisk1 mnt usbdisk2 For JBOD mnt disk1 share mnt disk2 share2 mnt disk3 share3 mnt disk4 share4 mnt usbdisk1 mnt usbdisk2 Accessing the TeraStation with an Anonymous...

Page 94: ...is for users who are familiar with BitTorrent Note Use compatibility mode to use the download manager with Windows 8 1 and Windows 8 Configuration 1 In Settings click Applications 2 Click the icon to...

Page 95: ...rent switch to the position to enable BitTorrent 8 Click the icon to the right of BitTorrent 9 Click Open Download Manager The default username is admin and the default password is blank no password 1...

Page 96: ...NA compliant TVs stereo equipment game consoles and other devices within the network Configuration 1 Navigate to File Sharing Folder Setup 2 Select the folder that you want to share with media players...

Page 97: ...ork as the TeraStation and turn it on 2 Select the TeraStation in the software of the DLNA compatible device 3 Select the content to be played back Connected DLNA compatible Devices Follow the procedu...

Page 98: ...ies photos and music files are added to the TeraStation s DLNA folder the database must be updated before the new file can be streamed By default the database is updated at startup and again every 60...

Page 99: ...evices you do not want to allow to play media and click OK Supported File Types The TeraStation supports DLNA streaming of files with the extensions below Types File Extensions Video files avi divx as...

Page 100: ...eraStation and transfer them to iPod iPhone and iPad devices iTunes server supports playback from up to five computers Configuration 1 In Settings click Services 2 Click the icon to the right of iTune...

Page 101: ...ogitech that can play back music stored on your network using your wired or wireless LAN without a computer Squeezebox supports mp3 flac ogg he aac v2 and wma Configuration 1 In Settings click Service...

Page 102: ...wse 6 Select the shared folder that you want to make available to Squeezebox then click OK 7 Enter port number 9001 is recommended then click OK 8 Click OK 9 Click Open Squeezebox The Squeezebox s set...

Page 103: ...ws Server 2003 SP 2 OS X 10 5 8 or later CPU Intel Dual core 2 20 GHz or faster Hard drive 10 GB or more of available space RAM 2 GB or more Live Viewer Requirements Supported OSs Windows 8 1 64 bit o...

Page 104: ...BUFFALO SurveillanceServer Bin are blocked due to the OS firewall refer to the OS help for instructions about how to disable the firewall Install Client Tools on one or more computers connected to the...

Page 105: ...the icon to the right of Surveillance Cameras 3 Click Edit 4 From LAN Port select the LAN port connected to the same network as the network camera and computer where the client tools are installed 5 C...

Page 106: ...nly be used with the LAN connected to the selected LAN port Users with Two or More Network Cameras In the default settings only one network camera can be used To use two or more network cameras additi...

Page 107: ...107 To deactivate the license click 5 Check that the SurveillanceCamera and HardDisk were added to Installed Licenses The free license is now enabled...

Page 108: ...twork camera that is used 1 Click Start BUFFALO BUFFALO Surveillance Server Camera Policies For Windows 8 1 and Windows 8 click the Camera Policies 2 Click the icon 3 Click Next 4 Click Find Cameras 5...

Page 109: ...are already in use are indicated by an asterisk and they are gray 6 Enter the username and password then click Next Note Clicking Test Camera runs an operational check of the network camera 7 Enter th...

Page 110: ...110 8 Select the recording schedule then click Next 9 Select the TeraStation where the video will be recorded then click Next 10Check the registration information and if it is correct click Next...

Page 111: ...stered the recording policy of the network camera Checking Recording Wait at least 15 minutes after registering the recording policy before performing this procedure To check that recording is working...

Page 112: ...ording is low or when recording fails due to a camera malfunction network disconnection or other cause Configuration Viewing Saved Video Follow the procedure below to view recorded data saved in the T...

Page 113: ...mat video file 1 Click Start BUFFALO BUFFALO Surveillance Server Surveillance Video Manager For Windows 8 click the Surveillance Video Manager 2 Select the search criteria on the left side of the sear...

Page 114: ...n to export and click Export This will register the video to the export queue 5 Open the Export screen register the export information from Export Job Configuration and click Start Export The video is...

Page 115: ...he Camera folder on the right side of the screen To view content of a video that is currently being recorded double click the camera whose video you want to view or drag to a frame of the camera viewe...

Page 116: ...d time on the Scheduling tab To execute migration every hour select Repeatedly at a defined interval and Every 1 hour 6 Click and register the policy This completes the settings for moving recorded vi...

Page 117: ...o another TeraStation Automatically Delete Old Data when Space is Low Follow the procedure below to delete purge recorded video starting from the oldest when available space for recording video become...

Page 118: ...le the settings below delete old data when the amount of used media space exceeds 80 until it drops to 40 Set Watermark High to 80 and Watermark Low to 40 4 Set the job execution date and time from th...

Page 119: ...8 1 and Windows 8 click the Camera Policies 2 Click the icon on the tool bar and open the Camera Configuration screen 3 Double click the camera to which video will be saved This opens Modify Camera 4...

Page 120: ...al network camera You can also register the camera and define the recording video policy Live Viewer Live Viewer allows you to view video currently being recorded by a network camera Note To view the...

Page 121: ...se migration and duplication a separate Backup License must be purchased Policy Type Action Migration Moves recorded video data to another TeraStation Duplication Copies recorded video data to another...

Page 122: ...n Sets the security status Shuts down or restarts a portion Vault of the surveillance cameras Changes the properties Performs a diagnosis of the surveillance camera Loads a media device Prepares a med...

Page 123: ...and TeraStations located on the network are indicated by and labels These can be moved by dragging and dropping them Clients are displayed only when a job is being executed and activities are indicate...

Page 124: ...cation functions Use this procedure to activate an additional license When the TeraStation is Connected to the Internet 1 Click Start BUFFALO BUFFALO Surveillance Server Vault Admin For Windows 8 1 an...

Page 125: ...is not installed see Enabling the Free License to install it 4 Enter the product key for the license pack sold separately then click OK 5 Confirm that the new license was added to Installed License Yo...

Page 126: ...BUFFALO BUFFALO Surveillance Server Vault Admin For Windows 8 1 and Windows 8 click the Vault Admin 3 Select the TeraStation where you want to add the license right click it and click Properties 4 Op...

Page 127: ...connected to the same network as the TeraStation 9 In the computer connected to the same network as the TeraStation click Start BUFFALO BUFFALO Surveillance Server Vault Admin For Windows 8 1 and Wind...

Page 128: ...port license file then click Browse 13Select the license file that was saved before then click OK 14Check that the license pack was added to Installed Licenses This completes authentication of an addi...

Page 129: ...license I cannot enable the surveillance camera Failover is running Disable failover Surveillance cameras no longer record video The target shared folder for the recorded video was deleted Enable sur...

Page 130: ...tings page Trend Micro is a registered trademark of Trend Micro Incorporated Licenses If the antivirus software on your TeraStation is not activated or has expired please purchase an OP TSVC license p...

Page 131: ...e virus scanning 1 In Settings click Applications 2 Move the antivirus switch to the position A quarantine folder named TMNAS is automatically created on the TeraStation If a virus is detected viruses...

Page 132: ...oxy Server If you must pass through a proxy server to connect to the Internet in your network environment follow this procedure to set the IP address of the proxy server and other settings 1 From the...

Page 133: ...Scheduled Updates 2 Check Enable Scheduled Update 3 Select a time for updates to begin an interval for updates and an amount of time for updates to continue Select the components to update Click Save...

Page 134: ...s Scanning Three types of virus scans are available Real time Scan The virus scan runs in the background scanning every file that you read or write This is the default type of scanning Your TeraStatio...

Page 135: ...then the antivirus software notifies the user by email if a virus is found Setting email notification is recommended Depending on how many files are on your TeraStation a virus scan may take several...

Page 136: ...when settings are changed or an error occurs Notification emails may be triggered by any of the following events Backup job completed Change to RAID configuration RAID error Fan error Hard drive read...

Page 137: ...put the TeraStation into sleep standby mode where the hard drive and LEDs are turned off 1 In Settings click Management 2 Click to the right of Sleep Timer 3 Click Edit 4 Specify the timer interval wa...

Page 138: ...at a current time of 10 00 Wednesday Timer 1 Daily 12 00 24 00 Timer 2 Not used Timer 3 Not used No operation is performed at 12 00 and the unit goes into sleep mode at 24 00 Example 2 If running at...

Page 139: ...to the TeraStation After receiving the Wake on LAN packet the TeraStation may take approximately five minutes to be ready to use To use Wake on LAN you ll need Wake on LAN software such as AMD s Magic...

Page 140: ...UPS select Sync with UPS connected to another TeraStation on the same network After making this selection enter the IP address of the TeraStation that will be the sync source in Other TeraStation s IP...

Page 141: ...es all slave network interfaces in the active aggregator group according to the 802 3ad specification TLB The outgoing network packet traffic is distributed according to the current load relative to t...

Page 142: ...ed Other functions such as scanning will not be available The print server does not support Mac OS Don t disable the SMB protocol while the print server is enabled If you do you will need to enable SM...

Page 143: ...h to the position to enable the print server 3 Refer to the manual supplied with the printer 4 Click Start Control Panel 5 Click Network and Internet Connections 6 Click My Network Places View workgro...

Page 144: ...Setup 2 Click the shared folder to be indexed 3 Click Edit 4 Check Include this folder in the search index then click OK 5 Click OK 6 Click Close 7 Click Applications 8 Move the TeraSearch switch to...

Page 145: ...cted to the network again the updated files are written and synchronized Follow the procedure below to use offline files 1 In Settings click to the right of Folder Setup 2 Click the shared folder for...

Page 146: ...ows help 11When the offline settings and sync settings are completed using the wizard the files and folders set appear as shown 12If the network is disconnected after synchronization is completed the...

Page 147: ...stem is a set of client and server services that allows Windows users to organize many distributed SMB file shares into a distributed file system Follow the steps below to enable DFS on the TeraStatio...

Page 148: ...S links 7 Click OK 8 Move the DFS switch to the position to enable DFS Accessing from a NFS Client Note US purchasers only Buffalo s customer support will help configure the NFS settings on your TeraS...

Page 149: ...data from an NFS client 5 Click Close 6 Move the NFS switch to the position to enable NFS 7 Click the icon to the right of NFS 8 Click Client Settings 9 Click Add Client 10Enter the IP address and hos...

Page 150: ...de from User Mode default setting to Kernel Mode on the screen navigating to Services Edit If you configure Guest Permission to Forced on the screen navigating to Services Edit user ID and group ID sh...

Page 151: ...h server crt server certificate This is required for decrypting the data that was encrypted by the server certificate and this is normally not revealed Updating SSL Key To update a server certificate...

Page 152: ...shared folder for the web server then click OK 7 Choose an external port then click OK MySQL Server The TeraStation can be used as a MySQL server A MySQL database may be installed and linked with the...

Page 153: ...he MySQL server then click OK 7 Choose an external port then click OK SNMP If SNMP is enabled you can browse your TeraStation from SNMP compatible network management software The specific MIB manageme...

Page 154: ...tings are not saved or restored Category Settings File Sharing Shared folder information of USB drive and media cartridge Drives All settings in Drives All settings in RAID Options RAID Array Settings...

Page 155: ...fied operation cannot be executed Verify The device is connected to a USB 2 0 port not a USB 3 0 port The device has a capacity of 1 GB or larger The device is not write protected Applying Settings Th...

Page 156: ...ting an Initialization Drive A system initialization drive will restore the settings on your TeraStation to their factory defaults You can initialize them without logging in to Settings Follow the ste...

Page 157: ...bove 2 Insert the USB drive into a USB 2 0 port not a USB 3 0 port on the TeraStation 3 Set the boot mode switch to USB 4 Press the power button to turn on the TeraStation 5 When the message Recovery...

Page 158: ...e below 1 Create a USB password initialization drive as described above 2 Insert the USB drive into a USB 2 0 port not a USB 3 0 port on the TeraStation 3 Set the boot mode switch to USB 4 Press the p...

Page 159: ...lick OK FTP logs cannot be written to a syslog server Logs are in UTF 8 format Your syslog server must support UTF 8 encoding To create a link to the logs in the shared folder 1 Click Edit 2 Enable Sh...

Page 160: ...plete Name Date Time and Language Configure the TeraStation s hostname date time and language as follows Note If the TeraStation is being used as an iSCSI hard drive to change the settings navigate to...

Page 161: ...speeds Over a long period of time your network devices may show somewhat different times which can cause network problems If clocks on your network vary by more than 5 minutes it may cause unexpected...

Page 162: ...conditions to beep the alert then click OK LCD and LEDs You may configure the LEDs and LCD on the front of the TeraStation 1 In Settings click Management 2 Click to the right of Notifications 3 Click...

Page 163: ...it you may be able to increase network performance with jumbo frames 1 In Settings click Network 2 Click to the right of IP Address 3 Click the LAN port where the jumbo frames will be used 4 Click Edi...

Page 164: ...om NAS Navigator2 running on a computer connected to the same router subnet as the TeraStation The procedure to change the IP address in Settings is below Note If the TeraStation is being used as an i...

Page 165: ...not possible from LAN port 2 since it doesn t have a default gateway The following IP addresses are reserved and should not be used If you configure one of them by accident initial ize all settings wi...

Page 166: ...s or check its hard drive If you installed the TeraStation with the TeraNavigator CD NAS Navigator2 was installed automatically To launch NAS Navigator2 double click the icon Click your TeraStation s...

Page 167: ...ches for NAS devices on the network again I m here Causes your TeraStation to beep Right click your device s icon to show these options Browse Shares Opens the TeraStation s shared folder Settings Ope...

Page 168: ...address from the DHCP server automatically If there is no DHCP server in the network you cannot use this function Check Renew IP address to obtain an IP address from the DHCP server You can manually e...

Page 169: ...should not be used If you configure one of them by accident initialize all settings with the init button on the TeraStation Local loopback address 127 0 0 1 255 255 255 0 Network address 0 0 0 0 255 2...

Page 170: ...he icon View Options Lets you choose icon size position and view mode Auto Power Mode Auto power mode can turn supported TeraStations and LinkStations on the network on and off automatically To displa...

Page 171: ...k OK 4 The shared folder is now mounted as a network drive Changing the IP Address 1 Click the icon in the Dock NAS Navigator2 will start 2 Click the TeraStation icon while holding down the control ke...

Page 172: ...es Displays TeraStation s series name IP Address Displays TeraStation s IP address Subnet Mask Displays TeraStation s subnet mask Firmware Displays TeraStation s firmware version MAC Address TeraStati...

Page 173: ...tation without unregistering it or changing its IP address the registration information stays in your computer and searches will take longer For better performance unregister disconnected TeraStations...

Page 174: ...lex LINK SPEED 1000 Mbps Connected at 1000 Mbps full duplex Hostname IP Address TS xx xxx 192 168 11 150 Displays the hostname and IP address At the end of the IP address F fixed IP address or D IP ad...

Page 175: ...of hard drive x failed Format the hard drive After formatting if the error still appears after rebooting replace the hard drive If the error is displayed again contact Buffalo technical support for a...

Page 176: ...synchronization between the main TeraStation and the backup TeraStation failed during failover configuration In Settings navigate to Backup Replication and choose Resync to execute resynchronization I...

Page 177: ...er maintenance is in progress Do not turn off the TeraStation power FailOver I51 Initializing Initializing the failover configuration Do not turn off the TeraStation power New Firmware I52 Available A...

Page 178: ...g 14 bytes of the header and 4 bytes of FCS AFP Enabled FTP Disabled NTP Enabled Print Server Enabled WebAccess Disabled Time Machine Disabled TeraSearch Disabled RAID Mode TS5800D TS5600D TS5400D TS5...

Page 179: ...otruding parts 9 kg 19 8 lb TS5200D 170 x 170 x 230 mm 6 7 x 6 7 x 9 1 excluding protruding parts 4 5 kg 10 lb Operating Environment Temperature 5 35 C 41 95 F Environment Humidity 20 80 no condensati...

Page 180: ...se radio interference in which case the user may be required to take adequate measures Environmental Information The equipment that you have purchased required the extraction and use of natural resour...

Page 181: ...602 TS5200D0802 TS5200D TS5400D0404 TS5400D0804 TS5400D1204 TS5400D1604 TS5400D TS5600D2406 TS5600D1806 TS5600D1206 TS5600D0606 TS5600D TS5800D3208 TS5800D2408 TS5800D1608 TS5800D0808 TS5800D TS5400R0...

Reviews: