


Chapter 2
35
Learning Operation Basics
Fixture Compensation
2.
Lea
rn
ing
O
per
at
ion
Ba
si
cs
Fixture Compensation
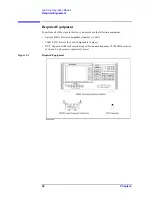
Next, you need to eliminate errors produced between the test fixture and the Agilent
4294A. This process is called “fixture compensation.” You can perform the process using
three compensation functions: OPEN, SHORT, and LOAD.
NOTE
All calibration settings, including those established through fixture compensation, are
applied to both Traces A and B. You can execute each compensation function without
specifying the active trace or checking the current state.
Perform Fixture Compensation for the Open Circuit State
Step 1.
Press the
[Cal]
key to display the Calibration menu.
Step 2.
Press the
FIXTURE COMPEN
key to display the Fixture Compensation menu.
Step 3.
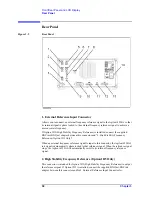
Make sure that the two test electrodes, HIGH and LOW, of the connected text fixture
(Agilent 16047E) are open. Be sure to fix the two electrodes in position by turning
clockwise the fixture’s two electrode fastening screws.
Step 4.
Press the
OPEN
key to measure the OPEN compensation data. While the instrument is
measuring the compensation data, a message “WAIT--MEASURING STANDARD” is
displayed in the Parameter Setting field in the upper-left area of the screen. Upon
completion of measurement, the
OPEN on OFF
softkey label changes to
OPEN ON off
,
indicating that the OPEN compensation function is turned on.
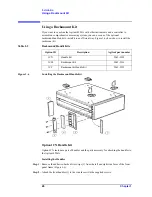
Perform Fixture Compensation for the Short Circuit State
Step 1.
Remove the short bar (a metal plate for SHORT compensation) from the upper part of the
Agilent 16047E by loosing the screws and then fit the short bar between the HIGH and
LOW terminals of the Agilent 16047E. Secure the short bar with the two electrode
fastening screws (Figure 2-3 on page 36).
Summary of Contents for 4294A
Page 1: ......
Page 2: ......
Page 4: ......
Page 5: ......
Page 6: ......
Page 8: ......
Page 16: ...8 ...
Page 30: ...22 Chapter1 Installation Power Cable Figure 1 2 Alternative Power Cable Options ...
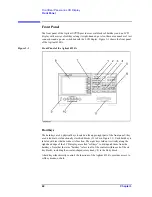
Page 70: ...62 Chapter3 Front Rear Panel and LCD Display Items Displayed on the LCD ...
Page 436: ...428 AppendixB Key Definitions Softkeys displayed by pressing the Recall key ...
Page 454: ...446 AppendixC Error messages WRONG I O PORT DIRECTION ...
Page 468: ......


