


Chapter 1
27
Installation
Using a Rackmount Kit
1
. Ins
tal
la
tio
n
Step 3.
Attach the trim strips (4) to the handles.
Option 1CM Rackmount Kit
Option 1CM includes a pair of flanges and the parts necessary for attaching them to the
Agilent 4294A. With this option, you can mount the 4294A on an equipment rack with
482.6 mm (19 inch) horizontal spacing.
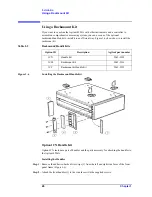
Mounting the Agilent 4294A on a Rack
Step 1.
Remove the adhesive-backed trim strips (1) from the left and right side faces of the front
panel frame (Figure 1-6 on page 26).
Step 2.
Attach the flanges (2) to the side faces with the supplied screws.
Step 3.
Remove all four legs from the bottom face by pulling up the tabs and sliding the legs out in
the direction indicated by the arrows.
Step 4.
Mount the 4294A on the rack.
Option 1CP Rackmount & Handle Kit
Option 1CP includes two flanges and two handles along with their attachments.
Mounting the Agilent 4294A on a Rack (with Handles)
Step 1.
Remove the adhesive-backed trim strips (1) from the left and right side faces of the front
panel frame (Figure 1-6 on page 26).
Step 2.
Attach the handles (3) and flanges (5) to the side faces with the supplied screws.
Step 3.
Remove all four legs from the bottom face by pulling up the tabs and sliding the legs out in
the direction indicated by the arrows.
Step 4.
Mount the 4294A on the rack.
Summary of Contents for 4294A
Page 1: ......
Page 2: ......
Page 4: ......
Page 5: ......
Page 6: ......
Page 8: ......
Page 16: ...8 ...
Page 30: ...22 Chapter1 Installation Power Cable Figure 1 2 Alternative Power Cable Options ...
Page 70: ...62 Chapter3 Front Rear Panel and LCD Display Items Displayed on the LCD ...
Page 436: ...428 AppendixB Key Definitions Softkeys displayed by pressing the Recall key ...
Page 454: ...446 AppendixC Error messages WRONG I O PORT DIRECTION ...
Page 468: ......


